The Great Bathroom Reno 2003
Many folks have asked to see the bathroom that I have spent the last 6 months renovating, so finally here are the before and after pictures. Totally demolishing the bathroom and starting over was *not* in the budget, so I worked with what I had. My total budget for the bathroom was about $650 CDN and a lot of elbow grease. Thank heavens for handy and patient husbands.
BEFORE

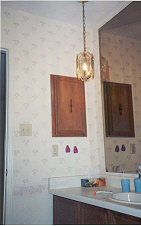
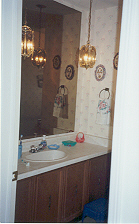
This bathroom was a mess, thanks to some previous thoughtless owners of our home. For some reason it was decided that installing a 5' by 5' smoked glass (that's right,smoked glass) mirror would be a good thing. Besides being too large for the space, you try putting makeup on in the dark! There were shutters on the window that did nothing but collect dirt and grime. The two hanging lights before the mirror added no useful light to the space and were another nightmare to clean. The wallpaper was pink and blue flowers (yick!) and had contracted mold somewhere along the line and was very stained and unsightly. The cupboard doors all had handles - smack dab in the middle of the doors where no one would use them. Very 80s and *very* ugly.
I have two small boys and I decided to make a fun and entertaining bathroom for them. While my husband and I were vacationing in Cuba, I found a souvenir plate that inspired the whole room. Note that this was before a certain Disney movie involving a fish was released. :-)
AFTER
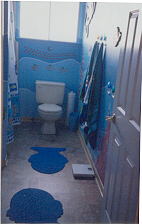
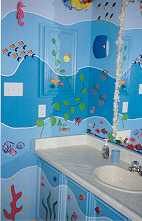
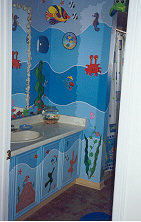
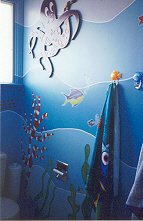
What a difference!
After ripping off the dreaded wallpaper and patching various holes, I primed the walls then put up quarter inch painters tape in wave-like shapes around the room. I then painted the in-between areas and the ceiling in 4 different shades of blue, from light to dark and back again. I also took the cupboard doors off, filled the holes where the old hardware was, sanded them down and primed and painted them to blend in with the rest of the room. Once the base paint was dry, then the tedious work began. I sponged on a coral-reef like shape on the wall with a variety of sponges and acrylic paints, then stenciled and free-hand drew various aquatic life and plants. I also happened upon some MDF cutouts of an octopus, fish and a crab which I painted and poly'd. In my quest to find fishy things, I found a variety of ceramic fish and seahorses at the dollar store along with the plastic hooks for hanging towels. My darling husband was kind enough to put in pot-lights in the ceiling for a better light source in the room and then installed two sconces on either side of the much smaller clear glass mirror we installed. The sconces are more for mood than for true light - but at night when you just turn on the sconces, the whole room looks distinctly like it is underwater! To hide the basic mirror frame, I hot glued seashells (again from the dollar store) around 3 of the 4 edges of the mirror. Along the bottom of the mirror I found some peel-and-stick fish border that I could paint as I chose (they're made from foam and are about a half inch thick). This did the trick of hiding the bottom of the mirror and gives folks something interesting to look at.
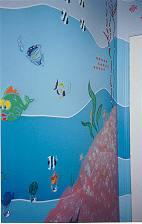
For the flooring we chose peel-and-stick tile that looks like slate in a sandy-colour (after all, the bottom of the ocean is sand, right?). For the window, instead of doing curtains, I frosted the glass with a frosting spray paint. First I placed masking tape on the glass and traced some of my fish stencils onto the tape. Then I cut away the excess tape and then sprayed the glass. This left me with clear fish shapes over the window, but still lots of privacy.
And to think, the whole thing began with the plate on the wall in the third picture!
If you have any comments or questions, please contact me.