|
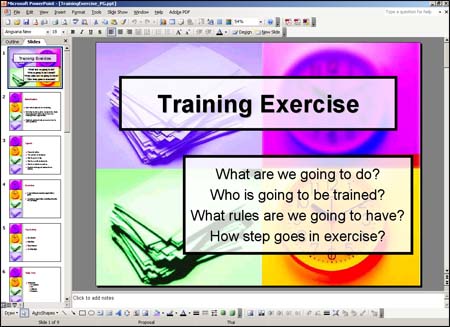
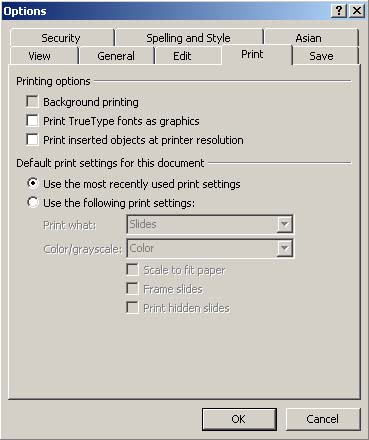
PowerPoint Components and Basic Used of Program • PowerPoint is used for presentations. This version will add more effects and technique. User can make new file, open exist file, and save new file. • PowerPoint window contains title bar (contain file name), menu bar (contains commands), tools bar (contains command icon that often used). User can also customize tools bar, what to be on there and what not to be on there. View (to change to different view, stage (working area), task pane , tools bar for text in slide . Customize Tools • Tools bar option: user can select hidden commands to use. If you want those commands to be on tools bar, you can add or remove command icon as you want. • Go to menu bar on the very right (option), select add or remove buttons > customize > select what you want. To Create Presentation Outline • In outline tab view, type in heading. Demote and promote are used to decrease an increase importance on each heading (left side bar). • - / + to hide and show sub headings. • User can change order by dragging slide up and down. User can summary slide by selecting slides then click on summary slides. User can also delete slide by just clicking on slide, then delete. To Print • User can select printer, pages, and how many copies as wanted. User can select how to print such as slide, hand out (can select how many per page), note page, outline view (only headings). User can also select color or grayscale printing, preview before print. • If user does not want background to show on print to save your ink, go to tool on menu bar > option > tab print > unchecked background printing.
Adding Background to Slides Adding From Template • On task pane on your right, click on getting started > slide design. Then templates will show on task pane. There will be 3 separate groups: current templates (templates using in current document), recently used templates (templates that were used before this documents), available templates (templates that can be used). Select the one you want and apply it, either to selected slide or all slides, depends on what you want. • User can insert and delete slide by right click on space in slide tab, or outline tab, then select insert new slide. Delete can be done by select the slide you want to delete then press Del on keyboard or right click on the slide in slide tab or outline tab, then delete slide. Adding Effects and Pictures to Plain Background • Click Format (on menu bar) > Background or right click on stage > Background. • In pop up dialogue, click to select color and user can also preview to see how it looks on screen. • User can fill effect instead of plain background, user can fill by gradient (using current foreground and background color), texture (from template), pattern (user can select foreground and background color), or put your picture in (browse from file). Edit Color Schemes • Task pane > getting started > slide design - color scheme. Then templates will appear on the right, the color of background, text, shape, etc. • You can edit color scheme by clicking link under template (edit color scheme). Standard - to add or remove exist templates. Custom - user can edit color of text, shape, background, etc. by click on color and change color, user can also add your color scheme as standard scheme (add as standard scheme, then apply).
Organize object in a slide Adding and Editing Text • There are two ways to add text. Place holder : on a stage will provide text box which contains click to add title or sub title, or text. Click in that box and type in what you'd like. Text box : at bottom tools bar, click on text box button then click on stage and type in. • User can move, resize, rotate text, also can set text align (such as left, center, right) • User can change fonts by select text then change font type and size on tools bar. • User can create text frame or border by creating auto shape using bottom tools bar. User can also set align of object to be in front of or behind text by right click at shape > order > sent to back (to put shape in the back, for example). User can also change shape properties such as line color, line style, fill color by using bottom tool bar. Adding and Editing Picture • To add picture, on menu bar > insert > picture > then you can select where you would get picture from. It can be clip art, from file, from scanner or camera, auto shape, word art, organization chart. • When you have a picture, whether from clip art, file, scanner or camera, it will appear with picture tool bar. User can set color, contract, brightness of the picture. User can also crop and rotate picture, can add frame or border to the picture. User can compress picture and reset what you have done with the picture before. • User can copy and delete picture also. Adding and Edit Chart • There are two types of charts. One is table, another one is graph. • To insert table: insert > table. Then you can set columns and rows as much as you want. Set its size to fit your screen. Another way is to click insert table button on menu bar and drag your mouse selecting numbers of columns and rows. There will be table and borders tools bar appear with table. User can set styles. User can split or combine cells, distribute rows or columns evenly. • To insert graph: insert > graph (or insert graph on tools bar). Graph will appear along with information table. User can put in own data in table. Then click at the space on stage to update data. To edit data, double click at graph. To edit graph components such as color can be done by double click on which of the graph you want to change. Adding Date and Time • To insert date and time: insert > date and time. Tick to available date and time in date and time dialogue. User can set time, language, date and time format, style in slide(s). • User can add page number and footer on slide(s). • User can set its style such as font, color, size by select view on menu bar > master > slide master or right click at date and time border. Then user will be able to change styles. Adding Hyperlink • Hyperlink or link in this case can link to file or web site. • To create hyperlink: select text that you want to link (or picture) then go to insert on menu bar > hyperlink (or insert hyperlink on menu bar), choose file or type in web site address in address:. On the other hand, if user type in web site address as text, the program will automatically create hyperlink for you. • To edit: right click > edit hyperlink, then edit file or address or remove link.
Inserting movie and sound file into slide Inserting Sound File • To insert clip sound (sound provided in software): insert (on menu bar) > movies and sounds > sound from clip organizer. Then sound files will appear in task pane. Drag into a stage. Select actions either automatically play or when click mouse. Speaker icon will appear. You can move icon to wherever you want and set its properties by right click on icon. You can set loop, show or hide icon (only automatically play), or delete (select cut). • To insert sound from file: insert > movies and sounds > sound from file. Select file, then user is able to set the same thing as clip sound. • To insert from CD audio track: insert > movies and sounds > play CD audio track. User can set which track to start, which track to end. Instead of speaker icon (from clip and file) will be CD icon. The rest is the same. Inserting Video or Movie File • To insert: insert > movies and sounds > movie from clip organizer (movie contains in software). File will show on task pane. Drag into stage. Set settings. • To insert from file: insert > movies and sounds > movie from file. Select file. Select actions. • To insert gif animate: insert > movies and sounds > movie from file. Then change file type from movie files to all files. Recording Sound into Slide • To do this, user must have microphone connected to the computer. Set volume control (in control panel), properties, and available microphone by check in the checkbox in a dialogue. • To record: insert (on menu bar) > movies and sounds > record sound. Then name your sound. Click record button (red circle button) to record sound. When you are done, click on stop (blue square button) button. You can play to listen to your file.
Setting Effects for Objects and Slides Creating Animation into Object • Animation can be added to text, picture, and chart. There are two ways of adding: from template and custom . • To use from template: select object, at getting started (on task pane) > slide design - animation schemes. Click on the effect you want to preview the animation. • To create animation: select object, right click > custom animation (or on task pane, at getting started > custom animation). Add effect to appear when you want (entrance, emphasis, exit). User can also set its action such as appear on mouse click, etc., can set directions of object, speed. User can also add sound to effect. • To remove, click on effect name, press remove button. Changing Slides Using Transitions • To create transition into a slide: right click on stage's space (slide show on menu bar > slide transition). Then transitions will appear in task pane. User can set speed and sound. For sound user can set loop (to repeat over and over again) if you want. • User can set action for transition: on mouse click, set time length. Setting Movement of Objects • Select object, right click > custom animation (or on task pane, at getting started > custom animation) > motion paths. Its movement will follow the picture in front of the list you selected. User can set size, direction. • To edit direction: right click at path > edit points > drag point and move as you want. • To create direction: select object > motion paths > draw custom path. Then select what kind of line you want to draw. Cursor will change to pencil. Then you can draw movements you want. To edit: double click at path, tab effect, user can select what you want to animate. For example, text, user can set to animate text as group, by letter, etc. Setting Time Movements Using Timeline • Time movements of each object can be set. In effect, when you already have your object and effect, click at effect name. Click to show advance timeline. Then timeline will appear at the bottom of all effects. Timeline of each effect will appear. User can drag to move, change duration of animations. Adding more interesting to chart (graph) • Right click at your graph > custom animation > add effect. In effect tab, chart animation, user can select appearance effect such as appear as one object, by series, by element in category, etc.
Creating Diagram or Organization Chart in PowerPoint 2003 Creating Organization Chart • Click on insert diagram or organization chart button on tools bar at the bottom. • Then a dialogue will appear, select chart as you want. Add your text. Click on the object to change fonts and size. • User can insert shape if ones that software provide are not enough, change layout, delete some unused shapes, or use auto format button to make it look nicer. Creating Diagram • Same way to create organization chart. • User can add text, insert shape, delete, change layout, or change diagram in a same way. • Properties or settings of each diagram or organization chart will be different, depends on type of diagram. Creating Flowchart • To show a sequence of operations. • To create Flowchart: use auto shapes on tools bar at the bottom > flow chart. When your cursor is over icon, it will show little information with each icon to tell you the meaning of it such as process, etc. Select what kind you want, draw and add text. • To create connecting lines: use auto shapes > connectors > select line as you want. Place cursor on the object, then draw connecting lines. If line is not straight, select object, then hold down Ctrl key and use arrow key on keyboard to move. • User can change background color, line color, styles, using tools on bottom tools bar.
Presentation Controlling Presentation • There are 3 ways to do slide show: go to slide show on menu bar > view show, or press F5 on keyboard, or press slide show button on bottom left. • When you are on slide show, to go to previous or next slide can be done by right click, or use buttons at bottom left, setting before do a slide show: right click on stage > slide transition. Under advance slide, tick automatically after then set time length. When you are on slide show, you can also emphasize your text by click on pen button on your bottom left. You can change type of pen, its color, etc. Adding Additional Buttons to Control Slide • Use auto shapes (on bottom tools bar) > action buttons. Select type of buttons you want, then draw onto stage. Action setting window will pop up. User can set its link: to link to other pages, file, or internet. • To edit setting, right click on button you have already created. Right click > action setting. Creating Slides for Different Audience • Sometimes you don't need your entire slide, just some pages for group of audiences. • To split slide into groups: slide show (menu bar) > custom shows > new. • Then name group, select slide > add, or remove if you do not want, user can switch slide order. • To show group of slide: slide show > custom show > select group > select show. • To select slide page during slide show: right click > go to slide > select slide page that you want. If you select custom show when right click, that will choose slide group. Outdoor Presentation • To create presentation on CD: file (on menu bar) > package for CD, this will launch a window. Name your file. In option select embedded true type fonts (in case the fonts you used dose not have in another computer that you will present). Select copy to CD (if you have CD burner) or copy to folder, name and locate your file. • To check your slide: go to destination folder, double click play file. Present Through Internet • To save file as web page: file (on menu bar) > save as web page. User should create new folder to contain this file because it is not just saving internet file, also audio and picture files. Select type as web page > save. • To view: double click on internet file, there will show slide. User can select full screen to view slide.
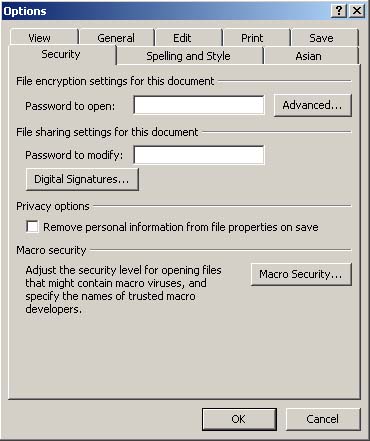
PowerPoint 2003 Techniques Creating Photo Album • To create photo album: insert (on menu bar) > picture > new photo album. Then setting window will appear. Select file/disk to launch pictures (to select multiple pictures can be done by using Ctrl or Shift key or drag mouse). • When pictures are added, select picture will show on the right, user can adjust picture using tools under picture. User can also re-order picture or remove. • User can add from scanner or camera also. Instead of file/disk, select scanner/camera. • User can put text into picture by selecting picture then using new text book button. User can set how many pictures on one slide, can add title, can select frame styles. Creating Password • File (on menu bar) > save as > tools > security options. • Put in password to open, and password to modify, then confirm your password. • When you open that file, PowerPoint will ask password. • To remove password: file > save as > tools > security options. Then delete password, and save over your old file. • Sometimes when working on a presentation, some error may occur. • To set this application to automatically save project every period of time can be done by: tools (on menu bar) > options > on save tab, tick save auto recover info every (put number in) minutes. Creating Macro • To decrease usage of repeating commands, to record actions that might be done over and over again. • Select object that you want to do the action. Then select tools (menu bar) > macro > record new macro. A window will pop up. Name your macro, save by doing the action. Then stop recording by click at stop recording button in a window. • To use: select object > press alt + F8 key to launch a window. Select macro you want to use > run. (Note: macro cannot be used with animation). • To create macro icon on tools bar: right click on menu bar space > customize > at command tab, select macro, then name of the macro that you put in will appear on the right. Drag into tools bar. • To delete macro: press Alt + F8 to launch macro window. Select macro > delete, and then confirm to delete. To delete macro on tools bar: right click at menu bar space > customize > commands tab > rearrange commands > tool bar > select formatting. Find your macro name under controls > delete (press Del ).
Close this window to go back |