|
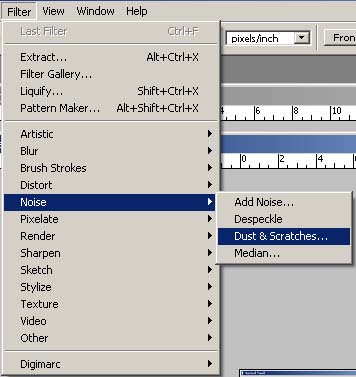
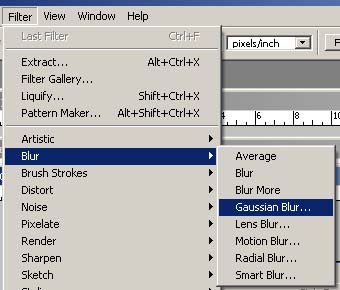
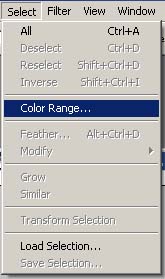
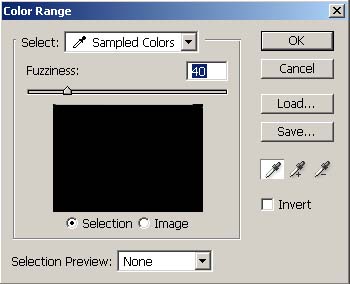
Modify portraits and objects Delete wrinkle from an object 1. Open the object > filter tool > noise > dust and scathes > modify radius until you get a satisfy object or modify the wrinkle value until wrinkle disappear from an object 2. Go to palette history > snap shot > select and set the source for the history brush in front of an image > select the first snap shot > click on history brush tool > modify size of the brush > drag mouse over the object to remove wrinkle Wrinkle removing tools Healing tool = Drag mouse over an object and press ALT, brush size can be modify, close stamp tool = decrease the opacity from the tool bar above to 30-50% drag mouse over the object at desire area. Click on acne in the picture, the acne will now removed from an object Changing of lips color 1.Click on edit in quick mask, then click on brush tool, paint the selected color in desire area 2. click "edit in standard mode" > go to selection menu > modify and choose the color you want Change lips color (2) Edit in quick mask mode > brush tool > paint the select color in certain area, modify chin in portrait. Filter menu > liquefy > poker tool > continuous click in certain edge to modify edge of the portrait * using broad tool to modify cheeks as well Modify and smoothen skin of the portrait Select for magic wand tool > click on desire area over the portrait. Press shift + F6 button to call in a feather selection box and modify the feather radius of the picture. Filter menu > blur > Gaussian blur >modify the portrait from the Gaussian blur box > click on OK to finish the operation. Modify contrast and sharpness of the picture drag mouse and directly move the portrait from its normal window to the background window you select > click on modify size of the portrait * To make copies of the portrait or an object, please hold ALT button, then drag mouse to desire area Advertising and publishing mode Image menu > adjustment > check on auto level button, then back to image > adjustment > Hue saturation > confirm an operation * Healing brush tools is and effective tool to fix and modify cheek as well Modify size There are 2 ways to modify, Increasing the pixels and reduction pixels 1. Filter > Liquefy > Crooker tool ( use to add or reduce size of certain area in an object ) 2. Filter > Liquefy > Bold tool ( use to add more pixel size to the certain area in an object ) Soften image Filter > Blur > Gaussian blur > change Gaussian blur radius to 1 In layer box click on create new field or adjustment layer > brightness contrast will now pop-up > modify brighten level to 10 - change value of contrast level to 19 Add highlight to an image 1. Select menu > color range > click on highlight option in color range box 2. Select menu > Feather > change feather radius to 25 pixels. go to layer bar and check for create new fill or adjustment layer • select brightness and contrast level > change brightness value to 100 > change contrast level to 46 Add heat effect to an object Create a new work sheet > change floor ground color to black and fill in the whole work sheet with black ink Use text tool to type in text > choose for desire font and font color from "text tool box list" click on move > image > rotate canvas to 90 degree > copy text to another layer > go to filter menu > stylize > "wind option" * repeat this process until you got a satisfied image, then click ok button to finish the operation. Go to image > rotate canvas > 90 degrees rotate > select for "filter menu" > distort > wave modify value in "number of generator" panel to 5 > wavelength to 10 and 120 > Amplitude to 5 and 35 > scale to 100 and 100 type to sine > undefined area to repeat edge pixels go to filter > blur > motion blur > modify angle value to 0 and 90 for motion blur > change distance to 35 Add more opacity to effects Filter > blur > Gaussian blur > modify any value you want. Modify background to rocky style Create a new work sheet > change mode to RGB mode > change background contents to white fill in gray color by go to edit tool > fill > in use box, modify value to 50% gray > select channels palette, click on create new panel, click create new channels. Select brush tool and modify size of the brush you desire > decrease opacity to 30 > check on "set to enable airbrush capabilities" > select floor ground color and randomly paint on the worksheet > click on filter menu > artistic > then call for "palette knife" tool * In palette knife box, modify stroke size value to 50, stroke detail to3 softness to 10 Click on horizontal type tool, type in some words > check on "commit" button at the right side of the top of the worksheet. Modify background to rocky style(2). Edge tool > crystallize > change cell size (value) to 3 back to palette layer > click on background layer > select for filter menu > render > lighting effect > change the lighting value * In text tool channel, set to alpha 1 * to soften the object, go to filter > unsnap mask > modify value Make a rusty logo Create new file > click on edit menu > fill > pattern > select for "custom pattern" to pattern >check on rusty metal > click ok and click on add a layer style > choose "Beral and Emboss" > click on texture > setup the preset manager to artist surface > click ok and click on granite style > click ok. Check on filter > render > cloud > change mode to vivid light > drag an object in this new layer and change layer properties to "soft light". Click on Berel and emboss style, change style option to "pillow emboss" Modify background to icy style Create a new work sheet > change mode to RGB mode > change background contents to white fill in gray color by go to edit tool > fill > in use box, modify value to 30% blue > select channels palette, click on create new panel, click create new channels. select brush tool and modify size of the brush you desire > decrease opacity to 10 > check on "set to enable airbrush capabilities" > select floor ground color and randomly paint on the worksheet > click on filter menu > artistic > then call for "palette knife" tool * In palette knife box, modify stroke size value to 100, stroke detail to 9, and softness to 10 Click on horizontal type tool, type in some words > check on "commit" button at the right side of the top of the worksheet Creating a stone frame
Creating a transparent frame
Creating a cartoon frame • Make a selection by lasso tool • press Ctrl+Shift+i for making a invert of the selection • createa a new layer • choose the colour of the frame frome the foreground • press Alt and delete • click on add a layer style > bevel and emboss > change the angle to be 90 ° • click on contour then OK • make a field to be 70% then deselect the selection • open the file picture you want but you have to delete the background before you use it. • Put in a style then choose bevel and emboss . You can make change as you want then OK Creating a feather frame
Creating a Zig zag frame
Creating a porariod frame • Create a new file • make a foreground to be white • bring the picture you want in the file • create a new layer • hold Ctrl and choose layer picture • go to layer#2 then click select > transform selection • press Shift+Alt then move the mouse out • move down the line below then enter • put in the white color and bring this layer below the layer picture • deselect the selection • then add a layer style > drop shadow • specify the angle to be 135 ° , distance = 10, size = 15 and click on stroke. Specify the size to be 1. • change the position to be center > change the color to be grey then ok Create a wood frame
Creating a texture frame • open the file you want to create. • create a new layer the press Ctrl+backspace for coloring the layer • click on filter > noise > add noise > set the amount to be the highest the OK • create the color from noise by setting the foreground to be white then press d and x at the keyboard • click on filter > texture > stained glass then OK • click on image > adjustment > hue/saturation for setting color • choose colorize to make 1 tone color then pick any color you want • drage mouse of this layer to the create a new layer button for making a copy • click on filter > stylize > emboss > OK you will get the picture with depth • go to blending mode and set it to be hard light • click ractangular marquee tool then press delete for deleting the unwanted area. • click the below layer and delete the picture out • click the above layer and then add layer style • go to drop shadow and bevel and emboss then OK Make a selection on a picture that has fur
Make a selection on a color picture
Dye cut picture by using pen tool • open file picture you want. (you can zoom in for making the picture bigger for easily doing the work) • choose pen tool for making selection • mark the first point you will see that there is a layer appeared. • create a next point. If the picture has a curve you can make it curve by holding mouse and set the shape you want. We can cut the line that comes out by pressing Alt at the keyboard and click at the point. If the color of the picture block the selection you can losen the opacity for allowing you to see the picture. • when you finish making the selection then click on the right side > make selection • setting the feather radius to be 2 if you want more feather, you can set more pixels > OK . You will get the selection you want. • Click at the layer background > Ctrl+c for making a copy • Ctrl+N for creating a new file the click OK • Press Ctrl+v for pasting it on the new file > and save it.
Close this window to go back |