|
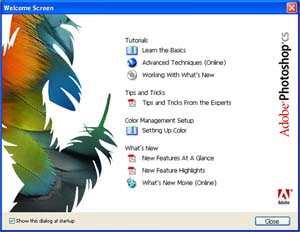
Software Abilities and Qualifications • Best software for creating and editing graphic. • It's not Photoshop 8, but it's CS stands for Creative Suite • There are more abilities in this version such as support RAW format, SWF format. Importing PDF image, photo merge, filter preview window, web contents (interactive). • System Requirements: Windows : CPU Pentium III or IV, Windows 2000 or XP, 192 MB Ram, 280 MB Hard disk free space, monitor 16 bit color or more, 1024 x 576 monitor resolution, CD-Rom support, internet (to download file from web). Macintosh : CPU G3, G4, G5. Mac OSx system. 192 MB ram at least, 16 bit color VGA. Introducing to Palette and Basic Used • Welcome screen will appear when first opened, guiding how to use. • Title bar (contains program and file name), menu bar (contains commands), tools box (tool icons), and palettes (i.e. navigator, info, color, swatches).
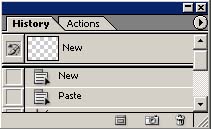
• Bitmap color is one bit color which is black and white. To create logo. Grayscale is toning of black to white. RGB is wavelength color, using in graphic. CMYK is subtractive color, using in printing documents. Tools • Foreground, background color setting. • To work on a part of image, do selection by using rectangular marquee tool (select squarely), lasso (free form selection), magic wand (select part of documents sorting by same area of color). • Paint bucket tool (fill image), brush tool (paint), gradient , pencil, eraser, auto shape , color replacement tool, clone stamped tool (to replace color by using color in those area as a template), healing brush tool (similar to clone stamped but also adjust color to fit background), dodge (to make image brighter), burn (to decrease image's brightness), sponge tool (to make image more colorful), blur , sharpen, smudge . • History Palette : to go back what you have done. Importing Picture • User can import file type that is support onto this software which shows when you browse file, next to file types: will show you what types that software support. • User can import file from web browser, or even PDF format. Scanning Picture • With Photoshop CS user can scan picture into computer. User can preview before scan, can set color, rotation, crop, and resolution of the scanning picture. Then set file type. • RGB: wavelength color, pixel: dots in a bitmap image (measurement is dpi <dots per inch>) Printing Image • There are two ways of printing image: with and without preview. • Printing without preview, user can set properties of printer, paper, and quality. • Printing with preview, user can set position, size of the image, then can set printer properties. To Organize Files by Using File Browser • User can preview file, rename, add keyword, flag files, rotate image, delete, print, search picture, can also rename bunch of picture in one time. • User can add keyword to a picture for easier used of search.
Basic Used of Photoshop Basic Commands • Image: rotate canvas > flip canvas horizontal, adjustment > desaturate (convert to black and white image), invert (negative color), canvas size. • History brush tool: to paint what was there. User can select how old was there to paint by using this tool along with history palette. Creating Selection • To select working area. • Rectangular marquee tool, then you can stroke (adding line for the frame) or fill the color in selection. Elliptical Marquee tool: another selection tool but instead of square this is ellipse or circle. Technique and Instruction of Using Selection with Other Commands • When you have selection, you can copy, paste, or feather your selection (to make it smoother). You can also transform your image (edit size), color range (changing color tone). Using Guide, Grid • Using rulers to line your item (Ctrl + R, or view > rulers). You can drag line from rulers out to your working area as a guide. • Grid is guideline that is created as pattern (view > show > grid).
Creating Graphic Text • Text can be typed normally or even added into shapes such as typed in a circle or sometimes can follow the paths that you have created or follow the paths of shape. • Tools: shape, text, pen. • User can also create text to be the selection using Type Mark Tool. Creating Graphic Image • User can create geometric shapes using polygon tool, then put number of sides. • Using pen tool to create graphic image from paths will filled color. • This is commonly used for creating logo. Using shape tool and pen tool give you a good quality of image. Drawing and Painting • Using brush tools to paint your image. For better painting, you should select working area first. User can set color tone, and also opacity (how much you want it to be seen through). User can also set brush properties and even create their own brush.
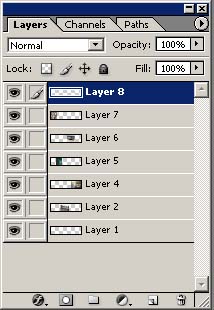
Technique of Using Layer Introduction to Layer • To separate one graphic with many components of the picture. • For easy of editing picture with one specific thing. • Layer is like item and item putting on the top of one another. • There are two types of layers: Raster (bitmap image, image composing of dots), Vector (i.e. text, path, shape, this type of image is creating from paths which won't lose resolution when you resize image). • In layer palette: user can visible and invisible layers. User can merge more than one layer together, can link layers together, lock position (cannot move), lock image pixel (cannot edit), lock transparent pixel (cannot adjust transparency), and lock all (cannot do anything to the picture). If you have lots of layers, you can put them together in a folder. User can set blending mode of each layer, add layer style. Using Layers • User can create new layer by select layer > new > layer and name it or click at create a new later button at the bottom of layer palette. User can delete, rename, merge, flatten them. • User can adjust opacity and fill color. Blending • Blending mode is to mix color between top layer and bottom layer. • Dissolve : random mix. Darken : main color of both layers, adjust to the one that is darker. Multiply : mixing layer, show the darker one. Color burn : mixed follow foreground dark color, if foreground color is white, this won't effect. Linear burn : mixed to get darker image follow foreground color. Lighten : mix color and show lighter color. Screen : mix like over-taken picture show lighter one (opposite to multiply). Color dodge : follow foreground color, getting lighter color, if foreground is black, this won't effect (opposite to color burn). Linear dodge is opposite to linear burn. Overlay is mixing 2 blending of multiply and screen. Soft light : getting image brighter. Hard light : multiply + screen. Vivid Light : color burn + dodge. Linear light : linear burn + dodge. Pin Light : use foreground color with background. Difference : subtract difference of color in channel, won't effect with black. Hue : light and color following top layer. Saturation : background follow foreground. Color : background follow foreground, follow background's light. Luminosity : foreground follow background, follow foreground's light. Editing Graphic in Layer with Style • 10 styles, select what you want, enter parameter in each style. • Layer styles can be added more than one. Determine Transparency with Mask Layer • To do: double click at layer. Select area you want to create. Layer (on menu bar) > add layer mask > reveal selection. • To remove: layer > remove layer mask.
Editing Color and Adding Filter Editing Color Level • Color influence audience's emotions. Hot tone, cool tone. When you see image, it's the sun shine to the object then reflect to your eyes. This type is called RGB mode (Red, Green, Blue), is to have image in wavelength color. In printing we use CMYK mode (Cyan, Magenta, Yellow, Black), but this is limited because some of the color cannot be printed, color palette will show you if that color cannot be printed. • Image mode: grayscale (to convert to black and white image), index (to convert file normally used in web site). • When you select color for your graphic, you must think of the theme you want to present, tone of color, emotions you want audience to feel. • User can use light and shadow to add softness. Editing Only A Part in Your Graphic • This can be done easily by using selection tools. • Then use color tools you want: color range, level, dodge, burn, etc. Editing Graphic Color • To edit your entire picture to another color to be black and white picture: image (on menu bar) > adjustment > desaturate. • To edit your entire picture to another color: image > adjustment > variation. Then thumbnails will appear, select the one you want. Using Filter • Using filter to add more effects to your graphic. • In a graphic, user can use more than one filter. • In this version, software provides filter gallery which provides example of each filter.
Retouch Putting Graphic Together • Copy a picture using selection, then paste in another file that you want to put with. • Link layer, press Ctrl + E to merge them. Then you may use blur tool to adjust them together, make your picture looks smoother. Repairing Picture • To do this, you may use clone stamp tools or healing tools. When you are done with this repair. You may adjust color by going to image on menu bar then adjustment > auto color. Editing Picture • When you take a photo, sometimes red eyes problem occurs. • With Photoshop CS, you may use color replacement tool to remove those problem. • When you finish removing red eyes, you may adjust your entire picture color again by using image (on menu bar) > adjustment > curves. Photo merge • If your camera cannot take a whole wide picture, you can take them as many times as you want in the same angle and put them together in Photoshop CS. • To do: file (on menu bar) > automate > photomerge, then select file you want, set it as you want, then if you don't want outer part of your picture, you can remove by using crop tools.
Graphic and Printing Media Creating Graphic for Printing Used • In printing, normally it is CMYK color mode, resolution 300 dpi. But graphic that we normally created on computer is RGB mode, resolution72 dpi. • To convert your graphic to CMYK color mode: image (on menu bar) > mode > CMYK color. • To set graphic resolution, go to image > image size then set resolution to 300 dpi. Spread Color Channel • When you send your graphic to a printing house, if you send the finished graphic, sometimes your monitor color and their monitor color are difference. Therefore we must be sure what color do we really want. To have the exact color as we want is to send them instead of completely graphic with color, we will send them completely graphic in different channel. Therefore, in one graphic, you have to send four files to contain each channel (Cyan, Magenta, Yellow, Black). • To do: in channel palette, select split channel, then software will automatically split channels into different files. Save it and send to a printing house.
Creating Graphic and Web Design Using Photoshop Creating Graphic for Internet Used • To use on internet, file must be small (about 20 - 40 KB). When users open our website to view, if files are large, it will take a period of time depending on their internet speed. Therefore, graphic file on internet must be small. • Types to use on internet: .gif (preserve transparency, 256 color, animation), .jpg (compress file, file will be small, less resolution), .png (compress file but contain good resolution), .swf (flash animation). • To do: when you have your graphic done, select file > save for web. There will be four parts of preview. Original , Optimize (how your graphic looks when you save), 2 up (left-original, right-how your graphic looks when you save), 4 up (top left-original, the rest will contain different types of compression). Creating Buttons for Web Page • Open up Image Ready CS. • Ctrl + R to launch up rulers, then show grid (same way done in Photoshop). Creating shape of your button, inserting text. In palette styles, select your button styles. • You must create slice to divide your button using slice tools on tools bar. Creating area of each button. Then preview in browser (file > preview in > your browser). If you satisfy, then save optimize as html and images. Creating Animation Using Image Ready CS • Animation window, you can add frame as much as you want. If you want to make your animation smooth, it can be done by using tween. In the first frame, put the first look then the next frame, put the last look and use tween button under frame thumbnails, set properties. • When you are done creating your animation, you can save your file as animated gif (.gif) and macromedia flash player (.swf). To save as animated gif: file > save file > under file type, select animated gif. To save as macromedia flash player: file > export > macromedia flash swf. Design Web Page with Photoshop CS • When you create a web page, you must have a goal, concept, know what items are going to be on your website, links, what theme that you want to present. Also you have to cover all designs such as format, fonts, color, that will present that what your website will be about. • To create website, when you have your entire page, dividing graphic by using slice tools (slice select tool). The reason that we have to do this is to separate file into smaller pieces to make it faster to open on the internet. Then when you create all slide, select button slide (the one(s) you want to link), add link. Then save for web. Creating Photo Web Gallery • To create: toggle file browser (under menu bar). Select automate > photo web gallery. Select style you want. Select pictures, order your picture, set properties. Then software will automatically create photo web gallery. Save file, and you are done.
Creating Work Automatically with Automate Command To Create PDF File From Photoshop • File browser, select picture(s). On menu bar in file browser, select automate > PDF Presentation. You can set loop and transition. • Note: to create PDF file there are two types: one is PDF document and another is PDF Presentation. • You can view your file in PDF (Adobe Acrobat Reader Application). To start your presentation: view > full screen. Press ESC to cancel the presentation. Using Action Command • Actions command is set of commands that are already done. You can just select what you want to do and sometimes instead of doing the whole action, it can be done by clicking on a button. • To use action command: select layer, object that you want to do the action. In action palette (if this palette is not shown, go to window on menu bar then select actions), select actions that you want to do, click play and all actions will be done. Creating Action Command • You can create action that you think you might want to use it repeatedly. To create: in action palette > select create a new set button > name your action. Then create a new action > set. Select layer or object you want to do the action, press record button, then do the actions. When you are done, press stop record button. Then you can use the one that you have created just like another.
Close this window to go back |