So, where to begin? I hear you cry.

Well, the first step to solving the cube is to realise that is not six different faces with independent colours.
The truth is that the faces are actually inter-related. For example, to solve the blue and red faces, the blue/red edge must be in the correct place, between the centre blue and red colours. The next step is to realise that the centre colour on each face never moves. These centre tiles always maintain their relative positions with each other. For example, white will always be opposite yellow, red with orange, and blue with green. (Going with the orginal Rubik colour scheme, there are other variations)
This means that all solving the cube entails is rearranging the edges around these centre colours back to their original positions.
Moves
The easiest way of describing the moves on the cube means representing the faces with unique letters. This means whole sequences of moves can be written and recorded for future reference. Before the cube can be solved, you need to understand and act on this simple language so that you know what to do.
Ok, here we go. Hold the cube in your hand, with one face towards you. This face will always be F (as in 'forward'). The opposite to this, is the face facing away from you. This will always be B (as in 'back'). On the left is L (because it's on the left), and in the same way the face on the right is referred to as R. The face on top is called U (because it's most 'upward'). Similarly, the face facing downwards is called D (as in 'down').
Ok, so just to recap, we have F opposite B, L opposite R, and finally U opposite D.
I would at this stage like to point out that you may find it helpful to keep the associated names for the respective faces. If not, there can be some confusion .ie. The 'down' face may also be referred to as 'bottom'. This will not work, however, as the letter B is already being used as the 'back' face. It is important that each face have a unique and relevant letter.
It is also essential to mention that in a series of moves, you should never change the orentation of the cube, or how you hold it. This is because by turning the cube, 'front' and 'side' and the other individual face features lose their meaning.
In order to make use of the letter system, you must hold the cube the same way throughout a move sequence.
Direction
I have explained how to make the faces relevant and individual. Now i will introduce you to a way of describing how these faces can move.As you look at each face, one 90° turn clockwise is represented just by the initial letter for that face. So [ F ] means "Turn the face facing you one clockwise turn by 90°."
One anticlockwise 90° turn of a face is represented by the initial of the face with an apostrophe. So [ R ' ] means "Turn the face on the right one anticlockwise turn by 90°."
The other move that a face can make is through 180°, or a half-turn. It doesn't matter whether the face is turned clockwise or anticlockwise in this case. You decide what is better or quicker for you. The half turn is represented by the initial of the face followed by a '2'. So [ D2 ] means "Turn the face facing downwards a half-turn."
A Beginning
The cube is capable of assuming 43,000,000,000,000 possible positions. It can be solved from every one of these positions by applying patterns of moves at key stages.First, lets assemble one face. I always start with white, but you can choose any of the colours. This face is assembled in two parts, starting with the white edges, and then finishing with the white corners. To start, find the face with the white in the centre colour, and revolve the whole cube so that this face is on top, in the U position.
Search the cube for a white edge piece. It doesn't matter what the other colour on the edge is. It can be red, orange, blue or green. Once you have found one of these edges, rotate the cube so that the white square of the edge piece is on the downward face, opposite the upward face with the white centre colour. This will leave the other colour on the white edge on one of the side faces, it doesn't matter which.
Once you have done this, rotate the downward face so that the other colour on the white edge piece lines up next to the side of the cube with the same colour in the centre. So, if the other colour on the white edge is orange, for example, you rotate the downward face (keeping the white side of the edge facing downward) so that the orange side of the edge piece arrives next to the orange centre square on one of the side faces.
If you now rotate the side face with the orange centre colour through 180°, you bring the orange/white edge up to the top, with the white square of the edge lined up on the upward face, as well as the orange side of the edge piece aligned.
The white/orange piece is now in it's 'home' position. This means that when the cube is solved, this is where it will be, between the orange and white centre colours.
To explain what you have just done, you found an edge that you needed, and moved it onto the downward face. This is because here you can rotate the downward face as much as you like, and it won't mess up the upward face. Once the downward face was aligned with the correct side face, the required edge was brought to the top, where it was needed.
This series of moves then needs to be repeated for the other three white edges on the cube. Each should be rotated onto the bottom, turned to the relevant side, and then brought to the top.
Practice with this method until you are comfortable with it. At this early stage, there is nothing to be mucked up, so feel free to mess around with the cube until you are comfortable with what you are doing.
If an edge that you need to get on the bottom is placed awkwardly, feel free to make additional moves, which often means moving one of the edges you placed earlier. Just be sure that once you get the edge you need on the bottom, you replace any existing edges that you may have had to move first. Feel free to experiment with the above method. It really is very simple once you understand what is happening.
Ok, if that has all gone to plan, then you should have all four white edges in the right place, forming a sort of cross on the upward face. Now we can get the four white corners in place.

To insert the four white corners, they must be on the downward face. They don't all have to be there at the same time. But to have complete flexibility in moving a corner, get it on the downward face, whilst keeping the white cross on the upward face complete.
Do you remember the move description system I described above? Well from this point onward you will find it an essential tool to help you solve the cube. If there are bits you aren't sure about, you should review the descriptions of the moves now so that you know how to read them when written down, and how to act on them.
Ok, to move the corners into their correct places, get the corner piece on the underneath face, but also directly under the corner position on the upward face it needs to go to. This means, get the white corner in question in position 'X', with an aim to get it into position 'Y'. This is illustrated below:

From here there are three posible events:
The white side of the corner can either be on the F, R or D face.
If the white side is on the R face, then do this:
That should have that sorted. If the white side is on the F face, then do this:
That should now be ok as well. The final event is if the white side is on the D face. If it is, then do this:
Using those three sequences, you can now bring the white corners up to the top, without permanently upsetting any of the white edges. If there are no available white corners on the bottom, feel free to move one onto the bottom, as long as you put the side it came from back, to keep the white cross in place.
Just to check, the cube should now look like this:

The Middle Layer
Ok, turn the cube upside down, so that the white face is downwards. From this point onwards we shall keep the cube in this orientation, as it gives a better view of what we are working on.Because we have already placed the white face so that the side colours match up, solving the middle layer only consists of correctly placing the four edges between the four side faces.
Reference picture showing face labels for the middle layer:

There are four possible events of what can happen next for each of these four edges.
Assume you are trying to correctly place the Red/Blue edge. Find the edge on the top layer, and rotate it so that it is above the right of the two colours involved. So with the Red/Blue edge, turn the cube so that the red face is on the Left, and the blue face is on the Front face, with the edge in concern above the blue face.
It can only look like one of these:
|
|
|
|
|

|

|

|

|
If the Red/Blue face is not on the top layer, then it is not available at this stage. Select any other edge that will have to go down to a side edge position, and position it as described with the Red/Blue edge.
If your cube is in picture 4 shown above, then you don't have to do anything, as the edge is already correctly placed. It is more likely however that you will be able to manipulate the cube into a position similar to picture 1 or 2.
If this is the case you find yourself in, then keep the cube in the orientation illustrated above whilst making the required moves:
| For picture 1: | For picture 2: | For picture 3: |
| F U2 R U' R' U2 F' | F U2 R U R' U2 F' | F U2 R U2 R' U2 F' |
Please note that after doing the sequence for picture 2; do move U2, then do the sequence for picture 1.
When you do those sequences for all four of the edges concerned, the cube should look like this:
Positioning The Top Layer Corners
Now that you have the first two layers of the cube complete, the next thing to be done is put each of the corners on the top layer in their home positions. At the moment the cube is looking something like this:

Rotate the top layer so that one of the corners is in the correct position, it does not need to be in the correct orientation. Once this is done, it will look something like this:

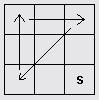
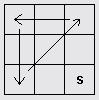
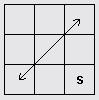
We now have one corner in place, which we shall call 'S'. Look down at the cube, with the S corner at the bottom - right, see the illustrations below. Establish where each corner has to go to get to it's home position. The corners will need to be cycled clockwise (see picture 5 below), cycled anticlockwise (see picture 6), have two corners diagonally swapped (see picture 7), or have two adjacent corners swapped (see picture 8).
| Showing 'S' |
|
|
|
|

|
|
|
|
|
The sequence for Picture 5 is:
The sequence for Picture 6 is that for picture 5 twice:
The sequence for Picture 7 is:
The sequence for Picture 8 is that for 5, then 7:
Notice that the U' U between the two sequences mean they can be ignored.
By the end of all that, what you have is all of the top layer corners in the correct positions, but not necessarily in their correct orientations:

Positioning The Top Layer Edges
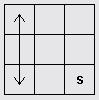
Next we have to get all of the top layer edges in their correct positions, although perhaps not in their correct orientations. To do this, look for a top edge that is already in it's correct position. For this stage we shall call it 'E':

Look down at the cube so that your view matches that of the picture shown:

The sequence to move the other three edges in the clockwise movement are:
If there is not a edge that is already in it's correct position, then do the sequence of moves just described anyway, with any of the edges taking up the position of E. It is very important though when doing this sequence, that if there is a correctly placed edge it must be in the E position. Otherwise the sequence will not work.
By following the sequence once, three things could have happened:
- One edge was in it's correct position originally, the other three edges have been moved clockwise, and now they are all in the correct positions.
- None of the edges were in their correct positions. But after doing the sequence with any one of the edges in the E position one of the edges is in the correct place. - Rotate the whole cube so that the correct edge is in the E position, and repeat the sequence.
- One edge was in it's correct position originally, the sequence was done, but the other three edges still aren't in their right positions. - In this case, keep the edge you used as E in the same position, and rotate the other three edges clockwise again. This time, they will all be in their correct positions.

The top layer of the cube may look a mess, but you can see that only the orientations of all the corners and edges are wrong - if you were to twist the corners and flip the edges they are essentially in the right place.
Correctly Orientating The Top Layer Corners
The corners have to be correctly orientated in pairs. A corner is rotated clockwise, and then another anticlockwise.To start, find a corner that needs to be rotated clockwise, and rotate the whole cube so that it is in the position labelled 'M':

Once you have your corner to be rotated clockwise in this position, do this sequence:
DON'T move the cube or change how you hold it. The cube looks like chaos at the moment, but this really isn't the case. Rotate the top layer only so that you bring the corner to be rotated anticlockwise into the M position, and then do this sequence:
Then all you have to do is rotate the top layer until the sides are back to their home faces.
Note: you may have to do this twice, for the second pair of corners.
It is also possible that when you get to this stage, that there are an odd number of corners to be orientated, if this is the case, do the sequence anyway, although you will have to do it for a second time to sort out the second pair of corners.
If all has gone according to plan, your cube should now look like this:

Correctly Orientating The Top Layer Edges
The top layer edges also have to be orientated in pairs. To flip the edges, rotate the whole cube so that the edge to be flipped is in the 'P' position:

Once that is done, do this sequence of moves:
Again the cube looks in chaos, but never fear. Just revolve the top layer so that the next edge to be flipped is in the 'T' position, and then do the sequence:
Then revolve the top layer so that the side faces match up.
Note: You may have to do this twice, for the second pair of edges.
I think that's it. By now your cube will look like one of these:
|
|

|
Good Luck.