My First Quilting Project
Here's a diary of my first quilting project.
Straight and True
I went through my fabric stash last night to see what I had to work with. I still had quite a few fabric pieces and scraps from past projects. I spread the most likely candidates on the bed and looked at them and at a book of quilting patterns, trying to find a set of fabrics that fit a likely pattern. I finally narrowed it down to three floral prints, a creamy fabric that looked like it would make a good backing, and a dark teal solid. I wasn't sure yet if I would use them all, but I wanted to wash all my fabrics so I gathered up enough for a small load.
Prewashing fabric to make sure it doesn't shrink after your project is completed and then washed is still an important step in sewing. You can't necessarily be sure that the fabric won't shrink or bleed excess color unless you do wash it in hot water to see. I'm even washing the batting to make sure it won't shrink, either. They all came through just fine, and they're all cotton/polyester blends with nice straight grains so they look like good quilting materials. It's important to be sure that your fabric will hold its shape crisply while making the quilt and while the quilt is in use. The best quilting techniques in the world won't help if your fabric is poorly made and poorly prepared.
After sleeping on my choice of quilting pattern, I decided on a nine patch block called Tick Tack Toe. One of the floral prints has a variety of pink, violet, and blue flower clusters on a creamy white background which would fit the biggest pieces of the block, so it is going to be the major pattern. Another print is a soft pattern of pink and salmon flowers with gently curved strips of white daisies interspersed among them on a pale green background, so it should make a good choice for the smaller pieces separating the larger ones like sashing. I'll have to check the yardage to see if I need the other print and the teal.
This morning I got some ice cream bucket lids and made the templates for the pieces. I wanted to be sure that I had an accurate pattern. I got out my maternal grandfather's drafting tools to make sure this set of templates was accurately fitted. Grandfather had been trained in chemical engineering back when there was no computer assisted drafting programs, so the engineering students had to take a formal course in draftmanship to make sure they could draw a professional diagram if needed for a project report. Professional drafting tools are made of rugged materials with carefully calibrated scales and tough straight edges and set screws to adjust compasses and the like. They're a far cry in accuracy from the inexpensive compasses and rulers most children use in math classes, and their accuracy makes it much easier to spot any flaws in a template.
I know that sounds like overkill at this point, but I'm going to turn the odds of finishing this in my favor as much as possible. The Tick Tack Toe pattern has only squares and rectangles, so I could use the T square to check on the alignment of the template sides as well as their length. Also, avoiding triangular pieces avoids the problem of pieces stretching on the bias when stitched. The tough plastic should keep its shape while I cut the pieces and won't be nearly as easy to nick as a notebook paper or cardboard pattern.
Next comes checking my yardage to see how many pieces I can get to make the final decision on whether I need the other fabrics, too.
Cat Attacks!
My yardage check showed that I didn't have enough of the pink and green floral print to finish the blocks and put the sashing around it, so I decided to use the lavender print with Johnny Jump Ups in the blocks and save the pink and green print to connect two blocks with sashing strips. Johnny Jump Ups look like little violets, only they are either gold and purple or white and purple. There's enough fabric to stick with those prints and save the teal for another project.
My first warning that our cats had discovered a new game to play was when I found my quilting book on the floor and my carefully made templates scattered under the bed. Both cats were innocently snoozing on my bed, pretending they hadn't done anything. Since my mother and brother aren't given to playing with pieces of plastic under my bed, I knew the cats were just resting until an opportunity to play with the new quilt presented itself.
I fed the cats to distract them and got out the fabric and templates. I put a big folding table across my bed for a working surface and began to mark my pieces on the fabrics. Instantly, my cat Mischief's trouble sensors alerted him that there was something fun to get into. He sprang into action. First he wallowed on the fabric and grabbed for the pencil I was using. Then he started merrily grabbing big pawfuls and biting it. I finally let him go outside and managed to get the majority of the pieces drawn and cut out before Mother let him back in again.
Pounce! He was right back on the fabric grabbing for the scissors. "Mischief! Do you want to lose some toes?" He snapped at the blades, endangering his tongue as well. I finally played with him some, turning him over and tickling his stomach until he ran off to get some cat food from the kitchen. That gave me enough time to quickly finish cutting out the last pieces and put them into plastic sandwich bags with their templates.
The next morning I fed the cats their favorite cat food and set up the folding table and ironing board to do the sewing of the blocks. Rascal settled comfortably on my sewing case by the window and Mischief hopped up on the piano in the living room to look out that window. "Good," I thought, "that's probably as peaceful as it is going to get." I set up the sewing machine, put water in the steam iron and plugged it in, and set out the first pieces in order on the table so I could sew them together in order. Neither cat stirred from their places. The steam iron puffed a bit. Now was the moment to start the quilt. I reached for the first two pieces.
Plink, plank, plunk! The piano keys warned me that Mischief's trouble sensors were going full tilt again. He came charging into the room and jumped up on the end of the bed. Rascal also came over and started the feline charge for the quilt. He luxuriously wallowed on as many fabric pieces as he could, scattering my careful arrangement into total disarray. Mischief started for the sewing machine. I stepped on the pedal and the machine whirred to life. "Meooooooow!" howled Mischief, as he leapt backwards and fell off the end of the bed. "Monster in the room! It tried to get me!"
His brother froze with a piece of fabric poised for the kill before his mouth. I rescued the fabric and scolded them. That had little effect, as usual, but the steam iron made a well timed hiss as it went into full steam, which sent Mischief fleeing to the doorway. He decided that two monsters in the room were two too many and went back to the living room. Mother swooped up Rascal while I rescued the rest of the pieces. After one more attempt to wallow on the pieces, he finally compromised on sleeping on the end of the bed as long as I patted him every time I went to the ironing board to press my blocks. He made sure I remembered by swatting me on the rump with his claws out if he didn't get his attention on my way to the ironing board.
I did get the quilt top finished today despite occasional feline sneak attacks by both of them once the shock of the two monsters wore off. It is about 36" high by 20" wide plus the extra fabric to bind the quilt once the quilting is done. I didn't get all the pieces perfectly placed, but I hope the quilting will help disguise that some. I have it draped over the ironing board over the backing fabric which I ironed, too. The next step is to mark the quilting lines on the top. With the two monsters unplugged for now, the cats are probably plotting their next moves.
Marking Mania
Now it was time to choose quilting patterns and transfer them to the quilt top. How to do it was the question. I got out some transfer papers and decided they were too messy. I tried the transfer pencil and it wouldn't transfer. That left tracing the design with a pencil.
That's easier said than done when you don't have a light box and the sky is so overcast that there is no chance of a sunny window, especially when your major fabric is a bright floral print. What those are used for is to light up the back of your chosen outline behind the fabric so you can see it clearly enough to trace it. What substitute did I have?
The computer sprang to mind. A nice white background could work, so I tried taping a piece of typing paper with a butterfly outline on it to the screen and putting the fabric over it. It showed up nicely, but how to hold the fabric in place? Then Mother showed up and started remarking on how the screen was curved and other such objections. I read between the lines. This method was going to tie up the computer so she couldn't play Hearts. Aargh, foiled by a card game!
What about an ancient computer I had? Too ancient, it only lit up a gray screen and then crashed. Not bright enough for long enough, so on to the living room TV.
Now that had more promise. I turned on a nice preacher giving a sermon on telling the truth. Unfortunately, he kept roaming around in front of his congregation so that the occasional bright patch of scenery kept moving, too. I got so interested in what he was saying that I stopped trying to trace and listened to the sermon instead. At the end I was morally uplifted and decidedly enlightened, and the quilt top was as pristine as my spirit.
I tried another channel. This had a nice bright background for two ladies advertising a facial exerciser. Its promise evaporated when one of them put the exerciser to her forehead so that the tiny current made her eyebrow twitch repeatedly. "It makes you look like you're winking at the camera!" the other one gushed. Just watching that made me feel twitchy no matter how firm her face looked in the before and after photos. Other channels were no better.
I sneaked back to the new computer. Still no good with the Hearts tournament and its fatal lure for my mother. It would have been a wrist breaker to have to trace that much on a vertical screen as well.
Finally, inspiration led me back to a simple method I had considered earlier but had hoped to avoid. I got a cranky old flashlight that kept flickering off because of worn connections and put it pointing up under a glass baking dish on my lap. I taped the pattern to it and put the fabric over it. The flashlight flashed on and off, but I finally had my light box. After tracing the butterflies and the flowering vine I had chosen after asking a question about possible choices in the about.com quilting forum (thank you and God bless you, JMAY22), I decided to call it a night and finish the outline pattern for the little strips the next day.
The cats had been quiet the previous day, with only one major attack to grab for my pencil before curling up for a nap. Today they were ready to play, especially after I put the big folding table on their bed (nominally mine, but only because they put up with me because I'm the family cook with the good meat scraps at meal time). Both of them decided that they just had to lie on the quilt top and fight with each other. After being boosted off several times, Mischief ran off and Rascal sulked beside the table. I quickly traced the last lines and got the backing material to make the backing-batting-top sandwich.
Plink, plank, plunk! Back came Mischief to join his brother already on the backing that I was trying to smooth out and tape to the table. I boosted them off and quickly got the batting. That was a cat magnet. It might as well have been made of catnip for the effect it had on them. Rascal majestically sprawled on its luxuriously soft surface and started biting it. Mischief attacked the other end. They scrambled back on as fast as I moved them. I finally got it in place and trimmed while they wallowed and played with the excess that I flipped over them.
A can of cat food proved to be a short lived distraction. I got the cat hair brushed off the batting and smoothed the quilt top over it. Pounce! They're baaaaaack! At least the quilt top wasn't so enticing, so they decided to bathe and settle down for a nap. I quietly shook out some safety pins to pin the layers together. I might as well have rung an alarm. "Toys!" the look in their eyes said, "Cat toys! Gimme, gimme, gimme!"
I did finally manage to get the quilt pinned together, despite their best efforts to steal the pins, even if it meant unpinning them from the quilt. We're all worn out, so putting the quilt in a hoop to start quilting it will have to wait until tomorrow.
It's Working!
I think the Lord must have tranquilized those cats, because the actual quilting is going along quite well. I used a plastic embroidery hoop to hold the quilt sandwich smooth, threaded my needle with quilting thread, and made a knot in the end of the thread. After two tries, I managed to unlearn how to make a knot that won't slip through fabric and made one that would. Then I figured out how to make one that would slip through the fabric but lodge in the batting without coming through the other side. Now I had a thread poised to quilt my first flower outline in the middle of the quilt.
It actually went pretty well. It feels funny compared to embroidering a stitch through a single layer of fabric, though. I keep expecting the needle tip to come up closer to the previous stitch, but the thickness of the batting and backing makes it come up farther away. I want to pull the needle back to adjust the stitch, and pull it through the backing so that I haven't gotten a stitch through that. Then I have to pull the stitch out and do it again and stifle the impulse to pull it that far back. Thank you and God bless you to KEY4UNC, ANNIEGIBB1, and Janice from the about.com quilting forum for further advice in this area of quilting.
It reminds me of the difference between playing badminton and tennis. The technique of making a stroke is similar, but using a heavier racket and ball in tennis makes a big difference in the result for the amount of force and speed you use. I had enough tennis lessons as a child that I had to unlearn some of that when I took a college badminton court so I wouldn't send the birdie sailing over the opponent's court. Learning how to control a quilting needle after learning embroidery is the reverse, but practice should solve that as well.
It will probably take a while, especially if the cats take a renewed interest in it, but I am making steady progress. Rascal has just awakened from his nap and is attacking the amaryllis beside Mother's bed. He's having a wonderful time shredding a gracefully curving leaf. I just hope that he won't try to shred the quilt as well.
Over the Hump
I've been stitching away on the quilt, and I've got the top half done and the bottom half started. The cats have lost interest in it and moved on to hunting for new toys anywhere they can grab something of a suitable size.
The quilting is pretty even, but I'm still learning new lessons as I go. I found out why stab stitching isn't as a good method as the running stitch. I had to stab stitch the skinny lavender strips because the seam allowances got pressed under them, and it isn't easy to keep the stitches underneath the quilt even and straight. They like to wander at crooked angles unless each one is checked. I can get smaller stitches that way, but it takes so much more time that I'll plan my seam allowances and quilting lines more carefully the next time.
Yes, I'm already thinking of new projects. This is turning out to be a lot of fun in the areas where the butterflies and flowering vine are away from the seam allowances so I can do a running stitch. I'm working on getting two stitches at a time on the needle, but three or more is unbelievably hard to get the needle through. The quilters who have mastered that many must have extremely strong hands. I'll be sure to shake hands carefully if I ever meet any of them so I don't accidentally lose any fingers to their grip.
I've noticed that the more I quilt, the thinner the quilt sandwich feels. I know it isn't shrinking, because my flowers are as puffy as the first ones. My fingers are adjusting to stitching through it and telling my brain where to look for the needle tip to come up again. I also am having less trouble catching the backing fabric going down without adjusting the needle to even out the stitch size. Practice is making perfect, slowly but surely.
I've never really been patient about practicing anything to develop my skills in it. I usually plunge in and get things done quickly so I can go on to something else. That may work for some things, but quilting isn't one of them. I didn't like piano lessons for the same reason. I could quickly sight read a piece and play it, but not as well as if I had practiced it repeatedly to perfect my technique. The piano teacher could tell that the only practice I was getting was playing each piece by sight once or twice, and eventually the lessons ended when my improvement leveled out.
I'm learning that "haste makes waste" is as important a principle as "hurry up and get it done." There is a balancing point between dawdling and rushing where tasks get done smoothly and well. I'm trying to find it in quilting, and in other areas of my life as well.
Nurse, Scalpel!
The patient lay before me on the cold, hard table. This was going to be a tricky operation, I thought, as I examined the situation. Well, no point in putting it off any longer. I reached for the pincushion and T-square.
The "patient" is my quilted wall hanging. After several weeks of stitching my fingers to the bone to hand quilt it, that part of the project is finally done. I've learned a lot more about quilting from doing it than I ever learned from reading the quilting books. My stitches are pretty even, and I've learned more about how to make them smaller. I tried to keep that from happening on this piece so the quilting would be uniform, but it is making more sense with practice.
The operation my patient needs is to have its backing and batting trimmed to the right dimensions so I can turn the edges of the top over and sew them down to bind the quilt neatly. I'm actually feeling more nervous about this than I did about the quilting, since once cut, there isn't any going back neatly. The quilting on the border is done, and there isn't much room for error. I didn't think about that when I drew the quilting lines for the flowering vines on the top. I think it was an outbreak of cheapness in not wanting to waste fabric that led me to leaving such a narrow margin of error.
My plan is to use the T-square to put a line of pins along the top where the edge will be turned under one inch from the raw edge of the fabric. Then I'll just fold my quilt top back to expose the batting and backing underneath and trim away the excess. With care, this should be a simple operation...
Wait! We have a complication! My border strips have shrunk by 1/4 inch! I moved the T-square around the top, checking the borders and the center sashing strip connecting the two Tick Tack Toe blocks. No question about it, my borders were now uniformly 1/4 inch smaller than expected. My margin of error just shrunk in half. Think this through, there's always falling back on sewing on a binding from that floral print that dominates the piece...or maybe it isn't necessary.
I still had a little less than an inch and a half between the edge of the flowers and the raw edge. I needed at least a quarter of an inch to turn under the raw edge, though a half inch would be better. It isn't helping that at one side the backing is awfully close to the minimum width to fit under the binding to hide its raw edge. It's due to an outbreak of excessive cheapness, all right.
I took several calming breaths and checked the width of my center sashing strip. I need to have the border strips the same width as that when the binding is in place to preserve the symmetry of the piece. Well, there's good luck there. It is also 1/4 inch smaller than its pre-quilting width. I've never read anything like that in the quilting books, but maybe they'll know at the quilting forum. For now, I'm back to the original plan of using the outer inch of the top for a binding. Now, is that narrow spot in the backing still wide enough for this to work?
Several minutes of work later, I had a row of pins along a line one inch from the edge and a second line half an inch from the edge. I turned the piece over to look at the narrow spot. Thank you, Lord, it is just wide enough there! There's only a tiny smidgen of fabric beyond that first line of pins, but that is enough. I sat back and breathed a sigh of relief.
I decided to take this one edge at a time. I started at a short edge at the end near the narrow spot, folded the top back, shone a strong desk lamp directly on the operating area, and began my first incision, er, cut, just outside the row of pins. Careful, don't cut the edge of the quilt top, nice and smooth...
The patient survived the first cut. I folded the binding over twice and stitched it into place. I decided to forget about mitered corners, since square corners would fit well with the block design anyway. Well, this looks pretty nice. Let's try the next side.
And so my quilt now has its binding on. The edge isn't perfectly straight, but I think it looks pretty good. I just need to remove the pencil markings for the quilting lines and give it a gentle overall cleaning, and it will be truly finished.
The Finished Quilt
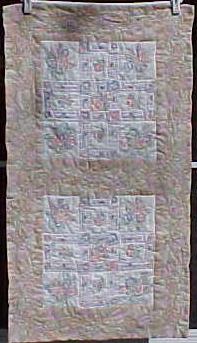 Here's a picture of my first quilting project, the two Tick Tack Toe
blocks connected with a pink and green floral print sashing and border.
This project is proof positive that anyone can make a quilt. Whether
anyone can make a good quilt is still up for grabs. I'm working on my
second project, but it isn't finished enough to take a picture of it
yet. I probably will put pictures of it on another page when it is
finished. You have been warned!
Here's a picture of my first quilting project, the two Tick Tack Toe
blocks connected with a pink and green floral print sashing and border.
This project is proof positive that anyone can make a quilt. Whether
anyone can make a good quilt is still up for grabs. I'm working on my
second project, but it isn't finished enough to take a picture of it
yet. I probably will put pictures of it on another page when it is
finished. You have been warned!
Below is a closeup of one half of it. You can see the quilting a little better in it. This illustrates why you don't quilt a complicated pattern over a complicated print. You can sort of see the butterflies over the floral blocks and the flowering vine along the border strips. I had read about that, but I stubbornly wanted to do it anyway. I'm doing it again on the second project with a feathered circle that looks like a peony on the floral squares in that project. Sometimes it takes a lot to convince me that my good ideas really aren't that good.
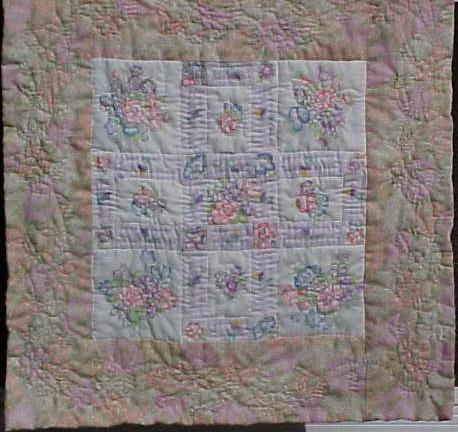 I read on the about.com quilting forum that quilting close to the edge
of a piece makes that piece recede and the adjacent piece stand out
better, so I quilted around all the big floral print pieces to make the
pale lavender strips stand out better. It was a crafting "Eureka!"
moment like the moment when I started knitting a cable pattern and
watched the knitted cable stitches rise in magnificent plumpness above
the purled background. You can actually see the pale lavender strips
now. They're so close in color to the creamy background of the floral
print that they blend with it very well. I had that fabric folded with
several thicknesses reinforcing the color when I put it next to the
floral print to check the contrast. Yet another lesson learned in the
school of experience.
I read on the about.com quilting forum that quilting close to the edge
of a piece makes that piece recede and the adjacent piece stand out
better, so I quilted around all the big floral print pieces to make the
pale lavender strips stand out better. It was a crafting "Eureka!"
moment like the moment when I started knitting a cable pattern and
watched the knitted cable stitches rise in magnificent plumpness above
the purled background. You can actually see the pale lavender strips
now. They're so close in color to the creamy background of the floral
print that they blend with it very well. I had that fabric folded with
several thicknesses reinforcing the color when I put it next to the
floral print to check the contrast. Yet another lesson learned in the
school of experience.
Last update: August 21, 2003