The Gull Check Sweater
 The Gull Check Sweater features a knit stitch that looks like embroidery added to the sweater. I found the original stitch in "A Treasury of Knitting Patterns" by Barbara G. Walker. It looks like a flock of gulls skimming garter stitch ocean waves. I decided to modify the stitch slightly by lengthening the "wings" of the birds so that the pattern would assume a more geometrical form that lay flat.
This sweater is a women's 40 tall size with a finished bust measurement of 46 1/2". It is knit in Red Heart Super Saver in color 0997 Sage Mary (shaded plum, dark sage, and beige) and color 0633 Dark Sage. It took five skeins of the Sage Mary and one skein of the Dark Sage. The gauge is 18 stitches to 4 inches horizontally and 25 rows to 4 inches vertically in stockinette stitch on number 8 needles. The ribbing was done on number 6 needles.
The sweater's design was built around featuring panels of the modified gull check stitch as a yoke on the front and back. It is a very simple cable stitch that doesn't even require the use of a cable needle.
Multiple of 7 stitches plus 1. Colors A (Sage Mary) and B (Dark Sage)
Knit one foundation row in A on the right side to start.
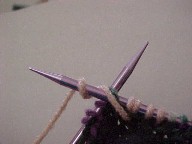 Row 1: (Wrong side)--With A, k3, * p2 wrapping the yarn twice around the needle for each stitch, k5; rep from *, end p2 wrapping the yarn twice around the needle for each stitch, k3.
The extra wrap will make these purled stitches much taller so they don't squeeze the knitting vertically.
 Rows 2 and 4--With B, k3, * sl 2 with yarn in back, k5; rep from *, end sl 2 with yarn in back, k3.
Rows 3 and 5--With B, p3, * sl 2 with yarn in front, p5; rep from *, end sl 2 with yarn in front, p3.
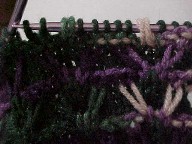
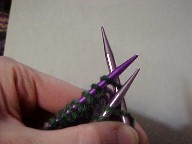
When you slip the stitches on row 2, drop the second wrap so you have a very long stitch. The slipped stitches will look very loose at first but will be pulled straighter as you work these four rows of stockinette stitch behind them.
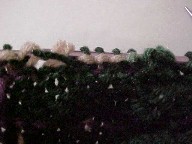
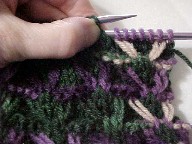
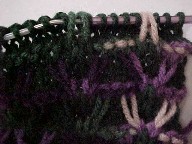 See how you did need that extra length by the time you finish row 5? You can see the finished stitch in the rows beneath with the long stitches crossed into a V shape.
 Be sure to carry the yarn loosely behind the slipped stitches as shown on each of these four rows. As you keep knitting the rows, this slack will be absorbed into the adjacent stitches as they expand slightly and fill in a solid background behind those long stitches. That's the hardest part about this pattern when you first try it, believing that all that extra yarn really does turn into a nice firm fabric with neat V stitches. It's almost magic!
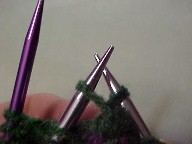
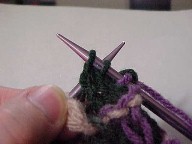 Row 6--With A, * k1, sl 2 purlwise with yarn in back, drop the first color A slipped stitch off the needle and hold it in front with your fingers . . .
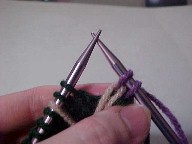 . . . sl the same 2 stitches back onto the left needle, put the color A stitch on the left needle and knit it onto the right needle . . .
 . . . k2 and drop the other color A slipped stitch and hold it in front with your fingers . . .
 . . . k2, put the color A slipped stitch on the left needle and knit it; rep from *, end k1.
Repeat rows 1-6 for the pattern. After the last repeat of the pattern, knit another row on the wrong side with no long purl stitches to make a final garter stitch row if desired.
I used a generic pullover pattern and fitted the gull check panel just above the beginning armhole shaping. That placed it above my bustline so that it lay smoothly. I also opted to eliminate any shoulder shaping and knit the panel long enough to meet at the shoulder seams along a garter stitch row. The finishing collar is a short standup rib wide enough to fit my head through it.
It took twelve repeats of the gull check pattern (85 stitches) to make the required width. The armhole shaping required an additional 20 stitches. Since I intended to knit the body of the sweater in the round up to the armholes, I cast on 210 stitches in Sage Mary (color A) on a size 6 circular needle (85 plus 20, times 2 for both sides knitted at once on a circular needle) and knitted a k1p1 rib for 3 inches. Then I switched to a size 8 circular needle and knit in stockinette stitch until the piece was about 15 1/2 inches long. That placed the ribbing at the mid-hip level.
For the armholes, I placed markers to divide the piece into 105 stitches on each side and worked each side separately. Working back and forth on the first side, bind off 6 stitches at the beginning of the next two rows. Decrease 1 stitch at each end every other row 4 times. This should end with a knit row on the right side in Sage Mary (color A) for the foundation row of the gull check pattern.
Work even on the remaining 85 stitches in the gull check pattern until the armholes measure 10 inches.
On the first side only, end the pattern with a knit row to make a final garter stitch row as noted in the pattern instructions above. Put the stitches on the size 6 needle to hold them while working the other side.
Attach Sage Mary yarn to the other set of stitches and work the second side the same way up to the instruction about finishing with a knit row. I finished that part while I used a three needle bindoff to make the shoulder seams so I wouldn't have a double garter stitch row on either side of the shoulder seam.
I first pinned the shoulder seams together to see how big a neckhole I would need. Since a standup collar isn't as forgiving as a neckline which has some shaping in the front which enlarges it, that needs more care before deciding how many stitches to bind off on either side of the central opening. It had the advantage of not interrupting the pattern with shaping, though. It turned out that the collar fit nicely across the center six repeats with three repeats on each side for the shoulder seams.
 A three needle bindoff is used to seam together two pieces of knitting. It forms a neat chain along the seam line. Knit the stitches loosely so the seam is flexible and does not pucker the knitting. Start by turning the knitted pieces so they are back to back, wrong sides out. Knit together the first stitches from the two needles. Knit together the next stitches from the two needles.
 Then pull the first stitch on the right needle over the second stitch, just as you would in binding off along the top of a single knitted piece. This starts the seam. Knit the next pair, one from each needle. Pull the first stitch on the right needle over that. Keep going until you have seamed together all the stitches from the two needles.
I turned the sweater inside out and matched the right shoulder sides. Using the free tip of the number 8 needle to bind off loosely, I knitted together the right shoulder seam to the end of the third repeat of the pattern. Then I knitted across the second side neckhole stitches only to make the final garter stitch row across the second neck section.
At this point, part of the neckline stitches were still on the size 6 needle and part had just been knitted on the size 8 needle working across them to get to the left shoulder seam. Transfer the neckline stitches to a holder and line up the needles again to knit the second seam together. A second size 6 needle as a holder would be ideal since the next step is to knit a k1p1 ribbing in the round in Sage Mary on those stitches for an inch and bind it off loosely for the collar.
I knitted the sleeves flat and sewed the sleeve seams. Much as I dislike sewing seams, I dislike knitting sleeves in the round even more. I've tried the circular needle methods as well as the double pointed needles and just don't get comfortable with them.
Cast on 47 stitches on size 6 needles and knit a k1p1 ribbing for three inches, then switch to size 8 needles and work in stockinette stitch. Increase 1 stitch on each side every 6th row fifteen times, then work even on the 77 stitches until the sleeve is about 19 inches long. Bind off 6 stitches at the beginning of the next two rows, then decrease 1 stitch at each end every other row fifteen times. Bind off two stitches at the beginning of the next 4 rows. Bind off remaining 27 stitches. Sew the sleeve seams and sew them to the sweater body.
I've calculated the changes to make this sweater in the adjacent sizes. Since these are women's tall sizes, they would also make nice sweaters for average size men. If the collar given for the size doesn't fit your neck well, use the collar that does and divide the remaining stitches evenly between the two shoulder seams. Remember that this standup collar needs to be checked for size before you seam the shoulders.
One skein of Red Heart Super Saver in Dark Sage should be enough for all sizes; I'd get five skeins of Red Heart Super Saver in Sage Mary for the three smaller sizes and six skeins for the size 42 sweater.
| Size | 16 | 18 | 40 (sweater shown) | 42 |
| Bust measurement | 38" | 40" | 44" | 46" |
| Finished bust measurement of sweater | 40 1/2" | 43 1/2" | 46 1/2" | 49 1/2" |
| Cast on stitches at bottom rib | 182 | 196 | 210 | 224 |
| Body length or to desired length | 13 1/2" | 14 1/2" | 15 1/2" | 16 1/2" |
| Stitches for each side before armhole shaping | 91 | 98 | 105 | 112 |
| Stitches for each side after armhole shaping | 71 | 78 | 85 | 92 |
| Armhole depth in pattern repeats, inches | 9, 9" | 9, 9" | 10, 10" | 10, 10" |
| Shoulder seams | 18 stitches | 20 stitches | 22 stitches | 24 stitches |
| Collar width | 35 stitches, 15 1/2" around neck | 38 stitches, 16.9" around neck | 41 stitches, 18" around neck | 44 stitches, 19.5" around neck |
| Cast on stitches for sleeve | 43 | 43 | 47 | 47 |
| After cuff, increase 1 stitch each side every 6th row | 14 times | 14 times | 15 times | 15 times |
| Number of stitches after last increase | 71 | 71 | 77 | 77 |
| Sleeve length to armhole or desired length | 18" | 18" | 19" | 19" |
| After two rows binding off 6 stitches, decrease 1 stitch at each end every other row | 12 times | 12 times | 15 times | 15 times |
Last update: March 9, 2008