Increases and Decreases
It is often necessary to shape a piece by increasing or decreasing the number of stitches in the row. For example, a sleeve is usually made by casting on the number of stitches for the bottom cuff, then widened by adding stitches to each side every few rows to widen it gradually as the piece gets longer. At the armhole position, the sleeve has stitch decreases to match the shaping of the armhole in the body pieces until the last row is finally bound off to finish the sleeve.
Decreases
Slip One, Knit One, Pass the Slipped Stitch Over (sl1, k1, psso)
The usual form
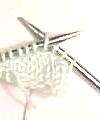
In this decrease, put the tip of the right needle into the first stitch as though you were going to knit it and slide it without knitting it onto the right needle. Knit the next stitch on the left needle. Slide the slipped stitch over the knitted stitch just like you pulled a stitch over the second stitch and off the needle to bind it off. The knitted stitch holds both stitches so that you have decreased by one stitch. The slip stitch leans to the left.
The mirror-image form
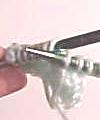
For a decrease where the slipped stitch leans to the right, knit the first stitch. Slip this knitted stitch back to the left needle and pull the second stitch over it and off the left needle. Slip the knitted stitch back onto the right needle. It now holds both stitches so that you have decreased by one stitch, but the slip stitch on top leans to the right.
Tip: Decreases made at the edge of a piece which will be sewn into a seam may be made in whatever method is easiest. The reason that decreases can be made leaning in either direction is for paired decreases. Paired decreases are seen in some knitted patterns where the decreases on opposite sides of the center line of the pattern should slant towards or away from the center of the pattern for a more attractive symmetrical appearance. For example, decreases to the right of the center line may slant left towards the center while decreases on the left may slant right towards the center. They can also be seen in some shaping techniques like raglan sleeves (the armhole slants diagonally from the bottom of the armhole across the shoulder to the neckline) where the decreases will be seen and should be made as attractively as possible.
Tip: The instructions for stitches and stitch patterns are often given in abbreviated form. "k1" means knit one stitch while "k3" means knit three stitches. "p1" is purl one stitch. "sl 1" is slip one stitch. "psso" is pass the slipped stitch over. For example, the instructions for the first decrease, "Slip One, Knit One, Pass the Slipped Stitch Over," are written sl1, k1, psso. Learn the abbreviations as you learn new stitch patterns and you'll soon be able to read the abbreviated instructions easily.
Knit Two Stitches Together (k2 tog)
The usual form
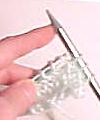
This is the simplest decrease and is usually used at edges to be sewn into seams. Just put the tip of the right needle through two stitches on the left needle at the same time and knit both of them together. The second stitch is pulled on top of the first stitch for the right-leaning version.
The mirror-image form
 The left-leaning version is a little more complicated and uses a technique called knitting "in the back loop." Up to now, you have been knitting "in the front loop," which means you have been using your right needle in front of the knitted piece. To knit in the back loop (k1 tbl), you have to position your needle behind the piece. The yarn is held behind the piece as usual for a knit stitch. The tip of the right needle is put in the top of the stitch to be knitted with the tip going down behind the piece. It looks like you are going to purl except that the tip of the right needle is behind the piece and not in front. Wrap the yarn around the right needle and use it to pull a loop up and through the stitch. Slip the old stitch off the left needle.
Now look closely at the stitch you have made. The yarn passes over the needle just like the ordinary knit stitch and ends up in the back of the piece. The top of the old stitch has gone to the back of the work like a knit stitch should. The difference is that the old stitch has been given a twist.
Now, try this to knit two stitches together through the back loop (k2 tog tbl). Put the tip of the right needle through two stitches at once in this same position, through the top of the stitch with the tip pointing down on the back of the piece. Wrap the yarn around the right needle, pull up a loop, and slip both stitches off the left needle. The first stitch has been pulled over the second stitch by the twist in this left-leaning version.
Decreasing Three Stitches
You can decrease three stitches in several ways. You can decrease two stitches and pull an additional stitch over either side to make the appropriate right or left leaning version.
An attractive alternative that makes a vertical stitch in appearance is the vertical double decrease. Slip the tip of the right needle through two stitches on the left needle as though to knit them, but slip them to the right needle without knitting. Knit the next stitch and slip the two slipped stitches over it. This stacks the slipped stitches over the knitted one so that it holds all three with the middle stitch on top. This decrease is preferred for joining the edging of a V-shaped neckline where you need to decrease three stitches at the front point in each row to fit the two sides together.
Tip: Purled decreases are made similarly using a purl stitch instead of a knit stitch.
 Tip: To purl in the back loop (p1 tbl), you put the tip of the right needle through the bottom of the stitch on the left needle from the back side of the piece. This looks like you are going to knit except that the needle is on the back of the work. Wrap the yarn around the right tip and pull it through, then slip the old stitch off the left needle. Look closely at the stitch you just made. It should look like a purl stitch with the top of the old stitch pointing towards the front, but the old stitch will be twisted.
Increases
Knit One, Purl One in the Same Stitch
This technique is used at the edge of a piece where it is not conspicuous. You knit the first stitch but don't slip it off the left needle. Move the yarn to the front and purl the same stitch. Slip it off the left needle and move the yarn to the back.
Knit One, Knit One in the Back Loop in the Same Stitch
This is similar except that the second stitch is a knit stitch made in the back loop.
Knit in the Strand
 The strand referred to is the yarn connecting the last stitch knitted (now under the right needle) to the next stitch on the left needle. You slip the tip of the left needle under this strand from front to back and lift it up. It looks like the yarn of a knit stitch passing over the needle. This makes an inconspicuous increase if you knit in the back loop because it twists the strand like a single cast-on, but it makes a hole beneath the increase if you knit in the front loop. Which one is used depends on whether you want a solid or lacy appearance at the increase.
Yarn Over
You wrap the yarn around the needle and knit or purl into it on the next row. This makes a hole beneath the increase. If several wraps are specified, you have to alternate knit and purl stitches in succeeding wraps when you knit over the wraps on the next row so that you make separate stitches.
Buttonholes
 Buttonholes can be made with decreases and increases. The tiniest buttonhole is an eyelet made by knitting two stitches together followed by a yarn over. This makes a round hole usually seen in baby clothes. A slightly larger buttonhole is made by knitting two together, making two yarn overs, and knitting two together tbl. Both buttonholes are finished by knitting the next row over them.
For bigger buttonholes, there are two techniques depending on whether the buttonhole will be parallel to the rows or perpendicular to them. A buttonhole parallel to the rows is easiest to make. When you reach the position for the start of the buttonhole, bind off enough stitches to make a hole big enough to fit the button and continue to knit across the row. On the next row, when you reach the buttonhole, use single cast-on to make enough stitches to replace the ones bound off and continue across the row.
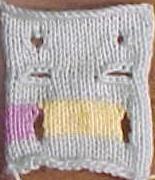
A buttonhole perpendicular to the rows takes a little more work. When you get to the stitch where you want the buttonhole, stop knitting and turn the piece. Work back to the end of the row (or the adjacent buttonhole). Turn and knit back to the buttonhole, then turn and work back to the end of the row or adjacent buttonhole. You have to knit enough rows to make the fabric on that side of the buttonhole. On the other side, you have to tie on another skein of yarn and knit the rows between the buttonhole and the other end of the row (or adjacent buttonhole). This leaves a slit in the fabric at the buttonhole. When you have knit enough rows between each buttonhole to make a wide enough buttonhole, you knit across the row across all the buttonholes to finish them. In the picture of the buttonholes at the right of this section, a different color yarn was used to knit each section beside the buttonholes to show how they are knitted separately.
Which of these buttonholes you can use depends on the construction of the garment and the size of the button. You have to have enough stitches on all sides of the buttonhole to make firm edges that won't be pulled out of shape by the button. The width of the overlap of the pieces to be buttoned together will limit the size of a buttonhole made across the width of the overlap to the width of the overlap minus the stitches to make the narrow edges of the buttonhole. You can make larger buttonholes sometimes by making the buttonhole parallel to the length of the overlap.
Tip: If you want to substitute larger or oddly shaped buttons or buttons with a higher dome for the buttons called for in a pattern, you may need to make a bigger buttonhole to fit the widest part of button through it. Experiment with test swatches to find out how big the biggest buttonhole must be and compare that to the overlap. If you can't make bigger buttonholes or turn the buttonholes parallel to the length of the overlap to accommodate the buttons, you may have to increase the overlap to accommodate the buttons and that may require other changes to the garment. For example, in a sweater with ribbing around the opening, you may have to increase other sections of the ribbing to match the wider ribbing at the overlap.
Picking Up Stitches Along an Edge
When the instructions say to pick up a certain number of stitches along a knitted piece, such as when you add a ribbing to a shaped neckline to finish the neckline, use a crochet hook to pull evenly spaced loops of yarn through the stitches along the edge of the piece and slide each loop on the knitting needle you will use.
Tip: If you don't have a circular needle to knit a neckline edging once both shoulder seams are sewn, sew one shoulder seam and use a regular knitting needle in the correct size. Just pull up loops from one edge at the unsewn shoulder seam across the neckline to the other side of the unsewn shoulder seam. You'll sew the edging together when you sew the open shoulder seam.
Last update: December 31, 2003