 |
|
|
|
|
|
|
|
|
|
|
|
|
|
|
|
|
|
|
|
|
WEATHERING A TRUCK |
|
|
|
BY SPITFIRE |
|
|
|
Model railroaders take great pride and joy to make their locomotives and rolling stock look old, used and have been sitting out in the weather for years. Weathering is an artform in its self, and brings out the life of the model. But very few take time to do their vehicles. Instead, they keep them "Showroom" new, with very few miles on the odometer. Unless its in a junk yard, or abandoned behind an old barn, very few cars and trucks get that, "long, not stored in a garage, hard miles" look. Spitfire has taken those steps, to make her vehicles look like they are being used, and not just a trophy winner at a car show. Here's how she did it to one of her trucks.. |
|
|
|
 |
|
|
|
The original model was a Brekina WWII U.S. Army canvas-topped stake truck. It was army green of course, but the main reason I bought it was the canvas top was removable. It had a Mercedes-Benz logo as a hood ornament and that was the second thing to go. I just snipped it off, leaving a little bump which I would deal with later.
In my case, I wanted the truck to be a more protypical dark blue, so the first step was to remove the wheels(easy on this model)mask the windows with liquid frisket, and airbrush the whole thing with thinned PolyScale.
To paint the wheel their first coat of blue, I just used a brush. Its easier than masking the tires and looks just fine. I also used a brush to add rust and mud.
Once dry, I airbrushed the under carriage with Poly Scale Mud, or whatever you've established as your dry earth color. This is the single most important step in getting that dusty, well-travelled look. Turn the vehicle upside down and spray from below. Turn it a couple of times so you get every angle. You don't need to be an airbrush wiz for this work, just keep your spray light. What happens is that overspray gets onto the sides of the vehicle in exactly the same physical way that it would in real life. If you do nothing else to the model, this produces a great effect. |
|
|
|
 |
|
|
|
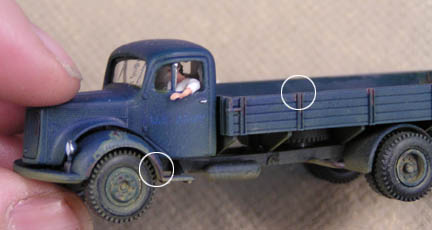
The next step was the strategic application of rust. Next time though I'm going to do this before I do the dirt spray, because realistcally, the rust layer would be under the dirt layer. However, because I didn'thave to much dirt on the sides of the truck, I was ableto getting away with adding rust later. For my rust, I use various combinations of Engine Black, and any red i have laying around, Oxide Red, Boxcar Red and Daylight Red, any of whichof these would work. New rust is more brown, severe rust is red.
I like to pool a wash in the areas where water would locically settle, but I also like to think about places where paint would get worn down,or dinged off as possible sites for rust, Sometimes I paint a dark grey spot, showing worn off paint first, and then just rust part of that area. Thats a little more complicated, but it looks great if you don't overdo it.
I made a mistake on the left front fender as you can see in this shot. A little too mush paint trickled out from the wheel well as i was turning the model. It looked ok to me though, so I left it. |
|
|
|
NEXT PAGE |
|
BACK TO CONTENTS |
|