| Sound Modules for the large scale tank |
| All Copy Rights Reserved JR Bates 2008 |
| EAST PAC Eastern Piedmont Armor Club |
| Under construction!!! |
| A model can look good, it can run good but its the sound effects that bring everything together. There is nothing better than the roar of a engine coming to life. The heavy rumbling of a motor idling or reving up to take the next hill and even that of the main cannon firing a shot. Many of us would like to have sound effects for our large scale tanks but have very few choices. The Choices Of these choices , you are often limited to prebuilt and often very expensive sound units. While these units are very good and well worth the money to many model builders, some of us just don't have 3-4 hundred dollars to spend on such. Other sound units are geared more for the model boat builders. They can come with sounds already loaded but normally the sounds are for tugs or small water craft. Hardly the stuff for ground pounding large scale tank models. Some of these may be loaded with your own sounds but then you are limited to the length of the sound clips. There are sound recording modules available, such as the Chipcorder sound units from Winbond. You are typically limited from 10 seconds to as much as 15 minutes or so depending on which unit you use. I haven't used one of these so I can't vouch for the sound reproduction. I decided to build my own unit. For my unit I wanted the ability to have various sound clips with no limit on length or sound reproduction. For this I needed a MP3 player. I also wanted the ability to control each clip from the radio transmitter. I also wanted as usually somthing that would be fairly cheap and even off the shelf as it were. I purchase a fairly cheap, 30 dollars or so MP3 player to take apart to see if I could use this for my project. Although it was good idea and a cheap thrill I finally decided that the player would be just too difficult to interface. These small devices while easy to carry are just not made to hack easy for other projects. I was able to attach wires to the base of a couple of switches on the MP3 player and actaully operate the unit via a PICAXE but decided the vibration from the tank model moving around would evenually short the connection. Then, there was the problem of knowing just which sound effect was playing at any given time. In the end I wrote it off as a interesting side trip. After much research I finally decided to take a chance with a MP3 player known as the Vmusic2 unit. The cost of this little guy was around 40 dollars US funds and available from Mouser Electronics. A direct link at this writing is Vmusic2 unit Mouser electronics. The Vmusic module needs a flash drive to hold the sound files. I purchased a 1GB unit at a local office supply store for less than 10 dollars on sale. I used a Picaxe 28X1 microprocessor to interface to control the unit. While on the face of it, it sounds like a difficult project, you should know that it was a easy project more or less if you can handle a soldering iron, the sound effects unit could be built in a few hours. The Picaxe is an easy to program microprocessor using Basic code programmed and downloaded from your computer. Any microprocessor could be used but I like the Picaxe microprocessor due the fact I can program in basic and don't need a Eprom burner or learn assembly programming. The Picaxe microprocessors are cheap and have a lot of support on the internet, They are now available through a few companies here in the USA. I normally use Peter Anderson. The sound files you use can be the ones I've made for my own model or you can mix your own using a audio mixing program. There are a number of sound mixing programs available on the internet. Some cost money, others are free. The one I use, Audacity is an open source program for free, no strings attached, no spyware that I can detect. Audacity is an excellent program although you may spend a day or so getting use to the commands. |
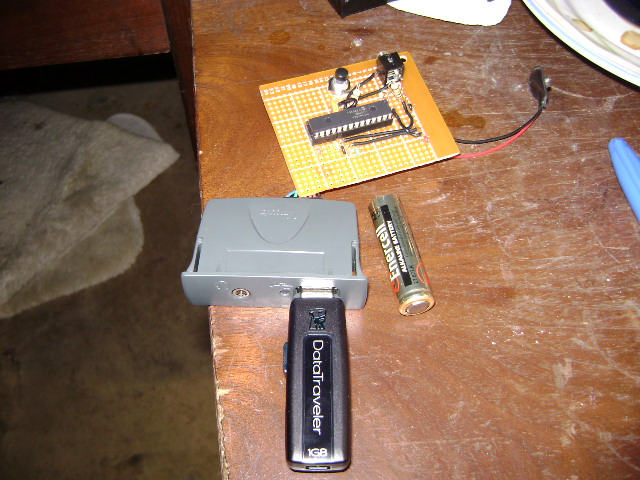
| As you can see there is very few items for the sound unit. The entire package is very small. An AA battery is shown beside the project for size reference. The Vmusic2 module is self-contained and even supplied with a cable. The flash drive is a 1GB unit . The microprocessor used is a 28X1 Picaxe unit. As you can see there is very little to connect and only needing of a few extra resistors and a 1/8 audio port used for downloading of program information to the microprocessor. The black button is a reset for the microprocessor. Don't be mislead by the 9 volt battery connector, the circuit is design to run between 4 and 5 volts dc. Anything over 5 volts and you may ruin the microprocessor. For our power circuit we used a 5 volt regulator from Radio Shack which regulates the 12 voltage from one of the two 12 volt batteries I use for my tank. Additonal items needed . The last thing you will need is a speaker or two and a amp system for the sound. I used a amp board and two speakers gutted from an old radio I sitting around. A car audio amp could also be used if you are using at least a 12 volt system. Operation of the sound unit The operation of the circuit is fairly simple. The throttle servo lead for your ESC (Electronic Speed Control) is also used to send the signal to the sound module by means of of a Y connector servo lead. The microprocessor (Picaxe 28X1) is programmed to receive and process the code from the RC transmitter. Due the easy commands used in the Basic code, this is actually a fairly simple process. The microprocessor tells the Vmusic2 which sound track to play. There is a slight delay between playing of tracks but we can work past this also. Because the flash drive is a 1GB unit we can pretty much have has many sound files as you desire. Although I have 3 files at this point. These include a engine startup (About 13 seconds), engine idle (about 9 minutes) and finally engine rev up and run (about 5 minutes). As you can there is very little memory used in the flash drive considering just how many music files you can load onto your MP3 player with 1GB of memory. Later I will add the main cannon and machine gun files. The Vmusic module can handle upward of 320Kbps which means we can record and play back some fairly decent sound files at a high sample rate. Typical MP3 music files are 128 Kbps. The sound files I mixed are sampled at 192Kbps. |
 |
| Below is a link to the Start motor sound mixed in MP3 format used for my T34-85. The sample was mixed by me using the audio mixing program Audacity. The sample is 13 seconds long, recorded at 192 kbps, the file size is 310 KB. The clip size is very small but offers excellent sound reproduction. The clip starts with the engine turning over and then goes to a idle, finally rev's up the engine a time or two. Feel free to use the sample as is or adapt it for your tank project. Click here to hear ENGINE START sound clip |
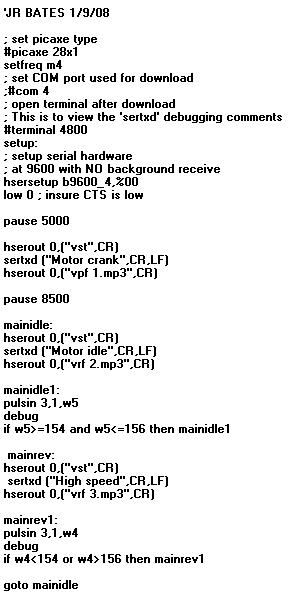 |
| On the left is the program I used for controlling the Vmusic2 module with a PicAxe 28X1. There are few things to keep in mind, I used COM PORT 4 for this as this is the port I use on my computer. This is noted in the program listing. You should change this program line to ;#com 1 Most folks will use COM PORT 1 or 2. The hsersetup command should be left as I have it in this program listing. Normally it is used as hsersetup b9600_4,%01 But I found a problem with the comand if using the pulsin command which we do.The first pause command pause 5000 is a delay time to allow the Vmusic2 module to setup. The sound clip file names are not the file names used by the Vmusic module. I saue numbers. This can be seen in the command hserout 0, ("vpf 1.mp3",CR) The "vpf" is the command to the Vmusic2 module. The sertxd command is simply a text command back to the debugger when hooked up the computer to see what is going on during operation. The actual command isn't used by the Vmusic2 module/ sertxd ("motor idle",CR,LF) |
| The program listing is actually a Jpeg image of the file. You can visit our forum at Large Scale Tank forum for a downloadable version of this program listing. |
| As you can see, there is very little programming involved with the actual circuit. Simply all we are doing is reading the signal being generated by the RC receiver. The normal values are between 100 and 200 depending on your radio and the the trim settings. The average or stick in middle position is around 155. In our program if the value moves higher or lower 155 then the proper sound clip is played. This value can be changed to change from one sound clip to another wherever you desire in the stick travel. The first clip is the "Motor start clip", its programmed to play the clip 1 time. The pause command after the play 1st clip allows the complete clip to play. The pause command isn't used after the first time. The only only thing worth noting about the setup and any possible problems is that some RC radio receivers operate at a lower voltage. For instance, when I first built this circuit I used an old JR radio setup I had on hand for testing the sound unit. It worked fine, when I installed the unit into my model and hookup my new Futaba radio, the PicAxe did not see the signal from the receiver. After a bit of hair pulling and a evening or so on the internet I found that lowering the voltage supply to the PicAxe a volt or so worked perfectly. I originally supplied the unit with 5vdc. I used a 3 diodes dropping the voltage to just about 4 volts. The unit now works fine. |