|
|
Supplies Needed: Paint Shop Pro, any version Graphic of choice
Performance Notes: This tutorial was done using PSP X No outside filters Add Noise, Texture Blinds, and Inner Bevel settings will remain the same throughout the tutorial. Results of some steps may vary with graphic used.
PS - These steps are just guidelines. Feel free to experiment!
Open Paint Shop Pro
1- File > Open > Graphic of choice
2- Window > Duplicate > Close original
3 - Dropper Tool Left click on graphic, select a light color Right click on graphic, select a dark color OK
4- Minimize graphic
Background
6- File > New Settings: 200 X 200 Pixels Resolution 72.000, Raster Background RGB – 8 bits/channel Note: Versions 9 and earlier use 24/bits Transparent checked Right click on color box, choose background color OK
7 -Adjust > Add/Remove Noise > Add Noise Settings: Uniform, Noise = 7%, Monochrome checked OK
8- Effects > Texture Effects > Blinds Settings: Width = 5, Opacity = 20 Color = Right click on color box, choose foreground color Horizontal and Light from left/top NOT checked OK
9 -Repeat step #8 Change only = Horizontal checked OK
10- File > Export > JPEG Optimizer Compression = 20 OK
The Frame
1- Restore graphic
2- Image > Add Borders Settings: Color = Right click on color box, choose background color Symmetric checked, Border size = 2 OK
3 - Image > Add Borders Settings: Same as in step #2 except change to lighter color OK
4 - Image > Add Borders Settings: Same as in step #2 OK
5 - Selections > Select All
6 - Selections > Modify > Contract Number of pixels = 6 OK
7- Effects > 3D Effects > Cutout
Settings: Fill interior with color NOT checked OK
8- Selections > Select None
9 - Image > Add Borders Settings: Color = right click, choose lighter color Pixels = 25 OK
10 - Magic Wand Tool Settings: Mode = Replace, Match Mode = RGB Value, Tolerance = 20, Use all layers NOT checked, Contiguous = checked, Feather = 40 – 45, Anti-alias = checked, Outside
11- Select Border Note: This will look unusual because we have a large feather going on. But the end result will be worth it.
12 - Flood Fill Tool Settings: Match Mode = RGB Value, Tolerance = 20, Use all layers NOT checked, Blend Mode = Normal, Opacity = 100
13 - Layers > New Raster Layer OK
14 - Flood fill selection with background color
15 - Adjust > Add/Remove Noise > Add Noise
16 - Effects > Texture Effects > Blinds Horizontal NOT checked
17 - Effects > Texture Effects > Blinds Horizontal checked
18 - Selections > Select None
19 - Layers > Merge > Merge All (Flatten)
20 - Selections > Select All
21- Selections > Modify > Contract Number of pixels = 25 OK
22 - Selections > Invert
23 - Effects > 3D Effects > Inner Bevel Settings: Bevel = #2, Width = 5, Smoothness = 40 Depth = 2, Ambience = 0, Shininess = 10 Color = White, Angle = 315 Intensity = 67, Elevation = 21 OK
24 - Selections > Select None
25 - Image > Add Borders Settings: Color = Background color, Symmetric checked, Pixel size = 2 OK
26 - Repeat Borders, change only color to foreground color OK
27 - Repeat Borders, change only color to background color OK
28 - Selections > Select All
29 - Selections > Modify > Contract Number of pixels = 6 OK
30 - Effects > 3D Effects > Inner Bevel
Optional = Add decorative corners
31- Layers > New Raster Layer Add your watermark
32 - File > Export > JPEG Optimizer Compression = 20
And you’re done!! Thanks for trying this Frame and Background effect!
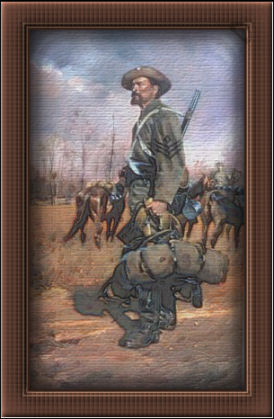
Here's the original attempt at this tutorial. I couldn't get the frame effect the same as what's in it. Don't know why! Just one of those things, I guess! LOL
|