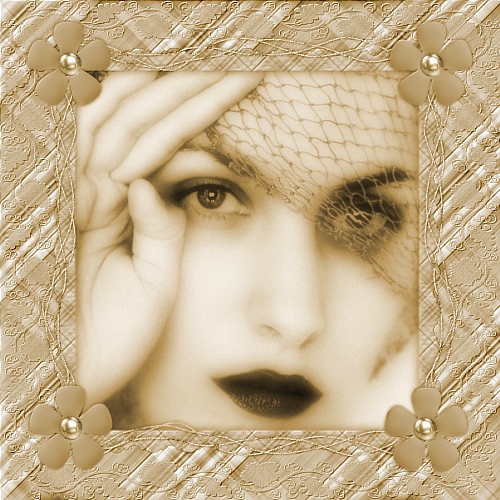
This
is what we will be making, or something close to it. You are, of
course, encouraged
to use
your imagination, your own papers, images, etc.
SUPPLIES NEEDED:
Paint
Shop Pro - any version. Trial version
here
Daisy Cream zip:
Save to your computer.
Hot Pink zip:
Save to your computer.
Frame Mask zip
Grapevine Mask
zip
Both masks are saved in .jpg form so they can
be opened.
No outside filters needed.
This would be considered an Intermediate
tutorial.
Open Paint Shop Pro, the papers.
Duplicate the papers and close out the originals.
I don't mind if my papers are used for other
projects, just don't claim them as your own.
The paper sets I've provided
are in 3 layers.
They don't need to be
separated.
Just work each layer one at a time.
Top layer:
Layers, Load/Save Mask, Load Mask from Disk
Search for Grapevine Mask - Source Luminance, Fit to Canvas,
Hide all Mask, Load.
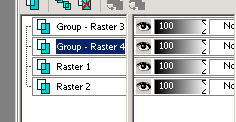
Layers, Merge, Merge Group
Adjust, Sharpen.
Drop Shadow - 1,1, 30, 1. OK
Make any adjustments with this part according to what color you
are using.
Middle Layer:
Layers, Load/Save Mask, Load Mask from Disk.
Search for the frame mask (or one that you would like to use)
Source Luminance, Fit to Canvas, Hide all Mask, Load.
Layers, Merge, Merge Group
Image Resize, 90%, Resample Using Bicubic,
Lock Aspect Ratio checked, Resize all Layers
UNchecked,
OK.
Resizing just this layer will keep it from being
hidden behind the Grapevine mask.
Now it's time to insert the graphic of choice. You want to be
sure you are working
from a duplicate. I resized by 90% enough to fit my 500 X 500
image.
This may have to be done several times to make
the graphic the right size.
Highlight your bottom layer, then go to your
graphic, Edit, copy and close.
On the Scrap Frame, Edit, Paste as a New Layer.
You may need to resize some more.
Magic Wand:

Click inside the Frame:
Selections, Modify, Expand by 4, OK.
Selections, Invert.
Click on graphic image and press delete one time.
Selections, Select None.
I like to soften my image a bit so here's what I do:
Duplicate the graphic/image using; on the bottom graphic layer,
Adjust, Blur, Guassian Blur at 7.00, OK.
On the duplicate layer, lower the Opacity to around 44.
Layers, Merge, Merge down.
Returning to the Frame layer (optional):
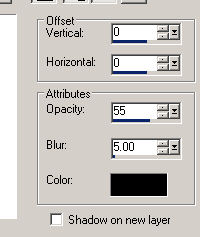
Effects, 3D Effects, Drop Shadow:
Put the shadow on new layer - CHECKED!
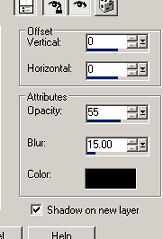
OK
The shadow is on it's own layer so we can do the following:
With the Magic Wand, click on the outside of the Frame layer.
On the Shadow layer, hit delete once and eliminate the shadow
outside the Frame layer.
Selections, Select None.
BOTTOM LAYER: LEAVE AS IS, UNLESS YOU WANT
TO ADD TEXTURE
Now, we're pretty much finished. Layers, Merge, Merge
All/Flatten.
You can add your own embellishments. I just used a preset shaped
flower.
Effects, 3D Effects, Inner Bevel:

Layers, Duplicate, Mirror;
Duplicate and with mover tool, move to bottom of Frame.
Duplicate again and Mirror.
NOW...
I used one of my background papers to fill a 200 X 200 New image
making a fill to use with my Pen tool. This is used to make the
strings
along the top, bottom and sides.
Or you can use anything to give your strings some texture.
Be sure to be UNDER your corner elements, if used, and with the
Pen tool:
Create as Vector, Drawing Mode, Freehand, Solid Line, Width
2.00.
Draw some squiggly lines, 2 or 3 what ever suits your taste.
You can go to Layers, Convert to Raster Layer, or continue with
several
lines and THEN convert to Raster Layer.
I used some Noise with these settings:
Adjust, Add Noise, Uniform, Monochrome, 30, OK.
Drop Shadow:
When finished, add your watermark or whatever text you want.
Then go to Layers, Merge, Merge All/Flatten.
Add borders if you like.
If you have any problems, please "call" me or
email me.
Thanks for trying my tutorial!
Back
Sign
View
E-Mail
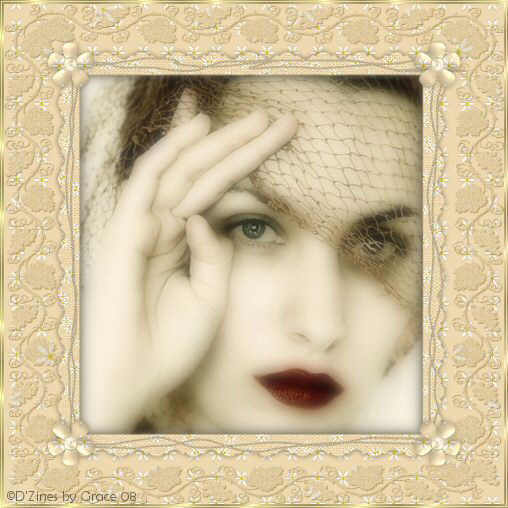
Thanks to Sharon Jenkins for testing this for me!
Super job, Sharon!!