Scalloped Edges
These are 2 examples of what we
will be making.
First, let me say, thanks to the
owner of PSPMadeEZ and the Mod's
of this wonderful group. My
learning to write tutorials and create
such images, is pretty much due
to them.
I would, also, say thanks to my
best friend, Sheryl, who gave me the
tools and opportunity to expand
my creativity. :-) Love ya', Babe!!
This tutorial is being presented
to PSPMadeEZ as a learning tool,
with my express permission. ©D'Zines by
Grace 2008.
Any resemblance to this tutorial
is purely coincidental.
What you create with this
information,
is owned solely by you.
SUPPLIES NEEDED
Paint Shop Pro - I used Version
8. I would think any
version would work.
OUTSIDE FILTER
MuRa's Filter Meister
Unzip and extract to the folder
where you keep them.
Filter zip
here
To get started, have your PSP
open.
1. Open a 500 X 500 transparent
image,
(you can always resize)
Resolution 100.000, Raster
Background,
16 Million colors (24 bit)
Okay
2. Click on your Flood Fill
tool ( the little bucket)
3. Fill your canvas with
white
3. Click on your Preset Shape
Tool and choose
Ellipse - Create as Vector :-)
checked
Anti-alias - checked
Foreground - black
Background - null
Line style - solid
Width - 14.00 (that's what I used
here)
Draw out a circle. To make it
perfectly round,
hold down the shift key while
drawing it out
4. Objects/Align/Center in Canvas
5. Layers/Convert to Raster Layer
If you don't like how this
looks, there's always the
undo button. This is just a
guide. :-)
6. Effects/Plugins/MuRa's
Meister/Copies
Then choose Encircle. Adjust the
Number settings till you
get something you like. Push them
together or
separate them a little.
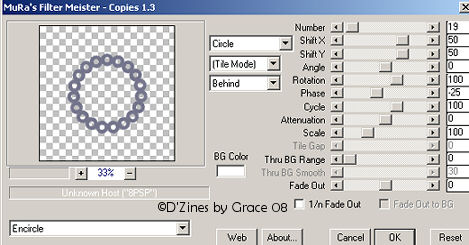
Number - 19
Shift X - 50
Shift Y - 50
Angle - 0
Rotation - 100
Phase - -25
Cycle - 100
Attenuation - 0
Scale - 100
Tile Gap - 0
Thru BG Range - 0
Thru BG Smooth - 30
Fade Out - 0
Circle, Tile Mode, Behind
OK
7. Foreground - null
Background - Black
8. Click on your Ellipse preset
shape
and draw out a circle to fit into
your scallops
Hold down the shift key for a
perfect circle
9. Object/Align/Center in Canvas
If you don't like how this looks
use the undo to redo the circle.
Depending on what kind of look
you're after
what size you make your circle.
10. Layers/ Convert to a Raster
Layer
When you're satisfied with your
results,
Layers/Merge/Merge Down
Flatten All if you're
wanting to make a mask.
As a black and white image, you
can Merge All,
and go to the process of creating
a mask to use later.
Now you can play with this to
your heart's content!
Use a different preset shape,
like a heart. Just adjust the
settings in MuRa's Filter Meister
Copies.
Just that simple... and easy.
Thanks so much for visiting my
site and quite
possibly, giving this a try.
 Home
Back
E-Mail
Home
Back
E-Mail
Sign
View
Want to join?? Click on the cute,
little button! :-)
Hidden Treasures Of Colorado
Tutorial written
and created by Grace Williamson, ©D’Zines by Grace. These Tutorials
are copyrighted by law.
You may
LINK to them only. You may not remove any of the graphics, or HTML
within these pages
to reproduce
these Tutorials, without the expressed permission of ©D’Zines by
Grace.
These pages may
not be removed from this website and sent via e-mail, nor saved,
stored or archived in files in YahooGroups or other mailing list
sites, nor may they be translated and placed on another site.
Creations made from these tutorials are your creations.
©D’Zines by Grace, holds the copyright to all original tubes and
original images that have been created
and provided, by
me, for use within my tutorials.
Page backgrounds
and images are created exclusively for this website
and may not be
downloaded or used without written permission
©D'Zines by Grace
2008