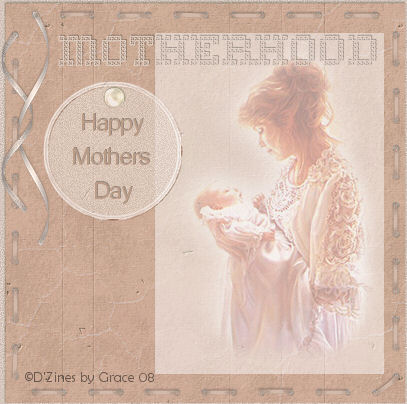
Motherhood Tag
This
tutorial was written and presented by me, ©D'Zines by Grace,
2008.
Any resemblance to this tutorial
is purely coincidental.
What you create with this
information, is owned solely by you.
It was written, obviously,
around Mother's Day, but feel
free to substitute your own
images and textures.
The stitching can be
colorized to fit your creation.
SUPPLIES
NEEDED:
Paint Shop
Pro - Here
Mask zip - Here
Open and extract to your mask
folder
Stitching zip - Here
Open into a folder or into
PSP and minimize on your workspace.
Font zip Home Sweet Home - Here
An image of your choice.
Now... Let's begin.
1. File/New/New Image
500 X 500 Pixels
Resolution 100.00
Raster Background
16 Million colors (24 bit)
Transparent
OK
2. Flood Fill - Foreground to
white
Match Mode - none
Blend Mode - Normal
Opacity - 100
Fill your layer with white
3. Open the image you are
planning on using
and choose a complimentary
color
4. File/New/New Image
400 X 400 Pixels
No... I'm not crazy. :-)
There's a method to my
madness.
4. Flood Fill the new layer
with your chosen color.
5. Layers/Load/Save Mask/Load
Mask from Disk
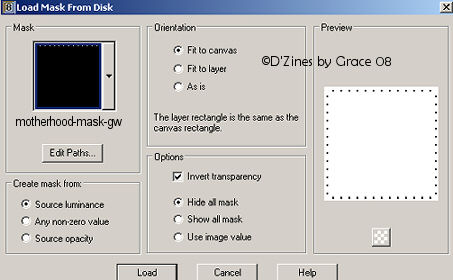
OK
6. Layers/Merge/Merge group
7. Edit/Copy
Back to your original image
Edit/Paste/Paste as a New
Layer
**Note - The reason for the
extra image, when you resize
it loses some of it's clarity
AND the stitching fits the
400 X 400 size image**
Now you can texturize, or
find a complimentary
picture to use. If you want
to do that, then follow the directions below.
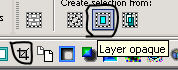
8. On the mask layer
Selections/Select All
Selections/Float
9. Layers/New Raster Layer/OK
10. On your chosen image
Edit/Copy
Back to the mask image
Edit/Paste into Selection
Selections/Select None
11. Lower the opacity of the
top layer to your taste
12. Close off the white layer
Layers/Merge/Merge Visible
13. Effects/3D Effects/Drop
Shadow
Vertical - -1 (minus 1)
Horizontal - 1
Opacity - 25
Blur - 4.00
13. Activate your
motherhood-stitching
Edit/Copy minimize back to
your workspace
On your working image
Edit/Paste/Paste as a New
Layer
Now... I don't know what
happened but while doing this
as I write, the stitching is
off just a tad.
So with your mover tool, move
the stitching so it is just over the
holes in the mask layer.
14. Effects/3D Effects/Drop
Shadow
Vertical - -1 (minus 1)
Horizontal - 1
Opacity - 25
Blur - 4.00
OK
15. Activate your chosen
image
Edit/Copy, Edit/Paste as a
New Layer
Move this to the right side
of your image.
You can lower the opacity of
this layer if you like...
I like to do this for a
softer look.
16. Materials Palette
Foreground null, Background
on white
17. Preset shape set to
Rectangle
On the top layer, draw a
rectangle
covering your image
18. Layers/Convert to Raster
Layer
19. Lower the Opacity to
around 40 - 42
Once again, a matter of taste
20. Text
Add text with your chosen,
complimentary color
Layers/Convert to Raster
Layer
21. Effects/3D Effects/Drop
Shadow
Vertical - -1 (minus 1)
Horizontal - 1
Opacity - 25
Blur - 4.00
OK
22. Close off your bottom
layer (the white one)
Layers/Merge/Merge Visible
23. Selections/Select All
Click on your Selection tool

Then at the top, click on the
large square
and the marching ants will
hug your image
Then on the other funny
looking one,
click on it and your image
will be cropped to fit your final creation
24. Unhide your bottom layer
Layers/Merge/Merge All
(Flatten)
Add your watermark, Merge
again and flatten if necessary
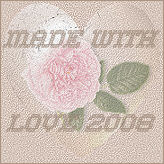
and your finished!
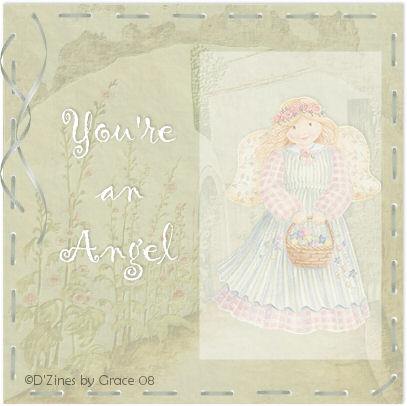
Here's what I made while
writing this.
I do hope you have enjoyed
this tutorial!