|
This tutorial was written and presented by me, ©D'Zines by Grace, 2008. Any resemblance to this tutorial is purely coincidental. What you create with this information, is owned solely by you.
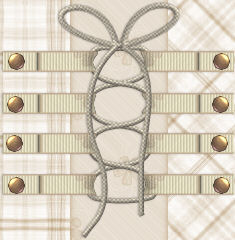
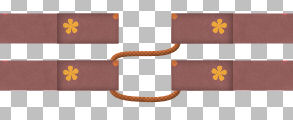
A special thanks to Shawna for the use of her awesome String texture for this tutorial. Below is the link to her blog. http://scrap-stuff-with-psp-tutorials.blogspot.com/ For this tutorial, you will also find the string download. TECHNIQUE This is what we will be making. This will be rather lengthy but worth the effort. It also involves the Pen Tool and working with "nodes". But I promise... It won't hurt!! I'm using Paint Shop Pro Version 8. No outside filters used. This is guessing you have a basic knowledge of the Pen Tool and Nodes.
1. Have your Paint Shop Pro open and the material you are wanting to use.
2. File/New/New Image Size - 500 X 500 Pixel Resolution - 72, Raster Background 16 Million Colors (24bit), Transparent OK
3. Click on Preset shape, Rectangle Anti-alias checked, Create as vector checked Materials Foreground - Null, Background - Chosen material
4. Draw out an image approximately 200 pixel long by 30 pixels deep.
5. Objects/Align/Center in Canvas; Layers/Convert to Raster Layer
6. Click on the Selection Tool set to Rectangle Feather - 0, draw out a selection about 50 pixels while over the top of your drawn out image. Selections/Float
7. Effects/3D Effects/Cutout (suggested settings) Vertical - 0 (zero), Horizontal - 2 Opacity - 35, Blur -10.00 OK Selections/Select None
With your mover tool, move to the bottom or to the top depending on how you want to work.
8. Layers/Duplicate once. Image/Mirror
9. Layers/Merge Down
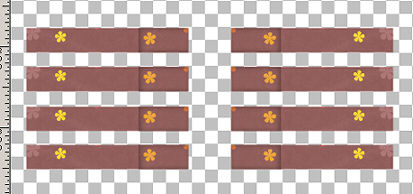
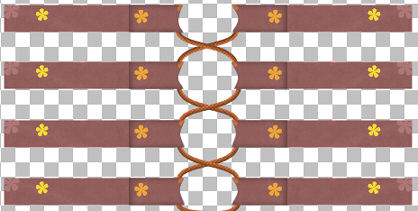
10. Layers/Duplicate as many time as you want. At least 2 times. :-)
This is what I have so far
11. Click on the Pen Tool with the following settings Create as Vector, Mode set on Drawing, Point to Point Line Style - Solid, Width - 5.00, Anti-Alias checked
Materials - Foreground set on Sk String, Background - Null Click on the bottom Layer. ***Note - I named my duplicate layers so I can keep track of what layer I'm working on. Also, you want the lace UNDER your ribbons, etc.
12. With the Pen Tool, click on the left side and then on the right. NOW... Right click on the left node, node type - Symmetric. Your arrows show up. Move the arrow to the left. On the right side, right click on the node, node type - Symmetric. When your arrows show up, move to the right. We want to make a half-circle type image. When your satisfied with the placement, go to Layers/Convert to Raster Layer **Note - if you know a simpler way, then by all means, do it. This is just the way I've made it.
13. Inner Bevel Settings (Settings by Shawna) Effects/3D Effects/Inner Bevel Bevel # 2, Width - 8 Smoothness - 0, Depth - 1, Ambience - -3 (minus 3) Shininess - 0, Color - White (or a color to match) Angle - 315, Intensity - 50, Elevation - 30 OK
14. Adjust/Hue and Saturation/Colorize - to your liking.
15. Pen Tool - Same settings as before
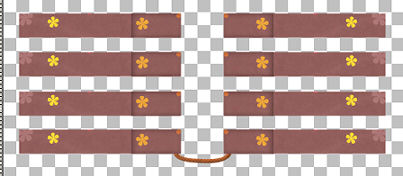
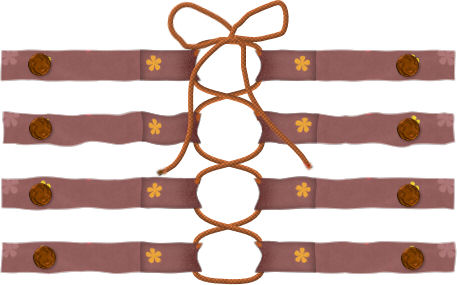
16. Click on the first layer the click on the right NEXT layer working left to right or right to left. Whatever works for you. :-)
17. With the same technique, right click on each node, one at a time, move the arrows to make it fit like your lacing.
Okay. You may now either duplicate the lace, mirror, and move into place, OR make each side separately. Do these steps until you have all the laces you need.
18. Click on the Warp Brush (mine is located with the Paint/Air Brush) Depending on how large your images are, how large you want you brush. Warp Mode - Push, Your size, Hardness - 0 (zero) Strength - 100, Edgemode - Background, Draft Quality - High, Final apply - Best Quality
19. Gently push your images in to look like the laces are pulling it.
The next step is a matter of preference. The Lighten/Darken Tool can be used. The Burn Tool can be used.
20. The Lighten/Darken Tool Settings Size - 36 (my size), Hardness - 16, Step - 9. Density - 50, Thickness - 100, Rotation - 0 Opacity - 65, Mode - RGB, Swap mouse buttons CHECKED Use these settings to gently color inside where the laces have grabbed your images.
21. Click on the very first/bottom lace, the half moon one. Layers/Duplicate, Image/Flip Move into place at the top. Now, the dreaded bow!! Not that bad. We will use the Pen Tool with the same settings except for it will be Freehand.
22. Draw out one side of your bow. With the Freehand, you have the opportunity to make it look more like it's been tied. Not so neat! Use the Bevel from before and colorize as before.
You can either draw out another one or duplicate and mirror the first one.
23. Draw out your tie lengths, position as you want; use the bevel and colorize.
24. If your satisfied and have not merged, then this would be a good time to do it. Just a technique. So many possibilities! I added the brads and did a little Eye Candy 3 Jiggle. Very optional!!
We're finished! I hope this was helpful and something you will use. ~~~~~~~~~~~~~~~~~~~~~~~~~~~~~~~~~~~~~~~~~~~~~~~~~~~~~~
©D'Zines by Grace 2008 |