|
D'Zines by Grace How to Make a Umbrella Tutorial written and owned by ©Julie the nekkid one 2008 What you make with this technique is owned by you.
SUPPLIES NEEDED: Paint Shop Pro http://corel.com Umbrella template here. Open, extract to a folder on your hard drive.
1. Open the umbrella template, duplicate (shift+D) and close the original
2. In the layer palette, click on the umbrella layer to highlight.
3. Find your fill paper, Edit/Copy; back on your umbrella layer Edit/Paste as a New Layer
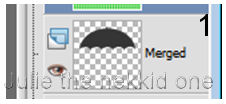
4. Click on the Pick Tool
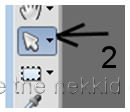
While holding down the Shift key, drag the paper sides, top and bottom like this
This layer needs to be under the umbrella layer.
5. Highlight your umbrella layer Selections/Select all/Float/Defloat/Invert
6. On the paper layer, hit delete. Selections/Invert
7. Layer/New Raster Layer (on top of your paper fill)
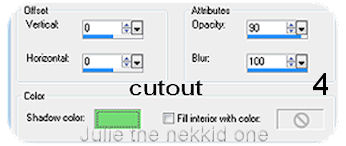
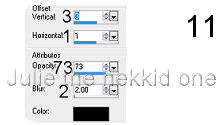
8. Effects/3D Effects/Cutout with the following settings
Use a dark color from your paper fill for the Shadow color
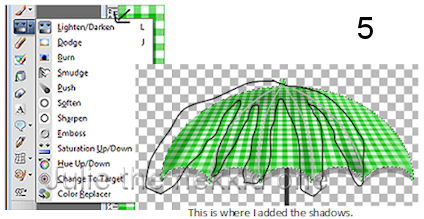
9. Back on the paper layer, add some highlights using the Lighten/Darken tool
Right click for Darken; left click for Lighten
10. Selections/Select none
11. The Spokes Click on the top layer - Spokes Selections/Select all/Float/Defloat Layer/New Raster Layer and fill with you chosen dark color. Selections/Select None
12. The Frill/Fringe Click on the Frill layer (number 3 from the bottom) Selections/Select all/Float/Defloat Layer/New Raster Layer
13. Click on the Brush tool - size about the fringe size Fill in with your chosen dark color
Selections/Select none
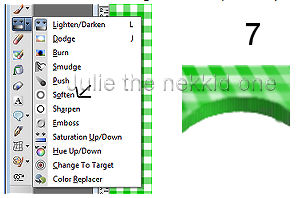
14. Lower the opacity of the Frill/Fringe layer to around 65 Optional - Use the Soften tool to soften this layer a bit
15. Umbrella tips
Click on the Preset tool set to Ellipse Foreground - Null Background set to your chosen dark color Draw out a small oval shape Layer/Convert to Raster Layer With the Selection tool, trim off some of the top
With your mover tool, move it into place Layers/Arrange/Bring to Top
16. With the mouse, right click on the layer and duplicate as many times to cover the other tips
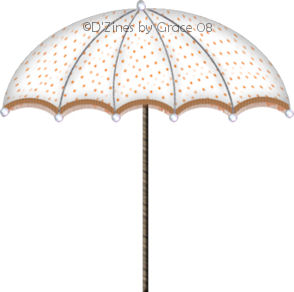
17. Hide all the layers except for the tips Layers/Merge/Merge Visible
18. The Handle Click on handle layer Selections/Select all/Float/Defloat Layer/New Raster Layer
19. Foreground wood pattern With Flood fill tool (bucket) fill layer with the pattern Selections/Select none
20. Right click on layer and duplicate With mover tool, move 2 or 3 pixels to the side to give the handle more depth Layers/Merge/Merge down
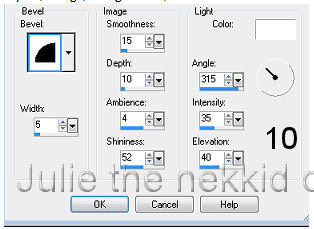
21. Inner Bevel
22. Use the same inner bevel settings on the tips of the umbrella
23. Finish up by deleting all the template layers except the Edge and the Frill/Fringe
24. Adjust/Hue and Saturation/Colorize, using your chosen dark color on the Frill/Fringe layer Delete the Frill/Fringe layer
25. Drop Shadow
26. If you have the white background visible, hide it Layers/Merge/Merge visible
And, ta-da... you have a umbrella!! Thanks for trying my tutorial!
Page built and designed by ©D'Zines by Grace 2008 06/01/2008 |