|
Easy Plaid Using Paint Shop Pro Halftone Effect ©D'Zines by Grace 2006 Created Oct. 16, 2006
~~~~~~~~~~~~~~~~~~~~~~~~~~~~~~~~~~~~~~~~~~~~~~~~~~~~~~~~~~
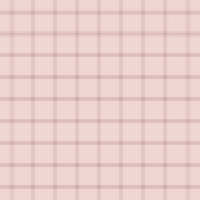
This is what we will be making, or something close to it. :-) I have found that different versions MAY offer up different results. So playing with the settings will be the fun part.
SUPPLIES NEEDED: PSP X - Demo at http://corel.com This effect can be done in any version
Open Paint Shop Pro version of choice NO OUTSIDE FILTERS!
1 - File > New Settings: Raster Background 200 X 200 pixels Resolution = 72 Transparent checked OK
2 - Materials Palette Foreground color = your choice Background color = your choice
3 - Flood Fill Tool Settings: Match Mode = RGB Value Tolerance = 0 Use all layers NOT checked Blend Mode = Normal Opacity = 100 Fill with your foreground color.
4 - Effects > Artistic Effects > Halftone Note: Here’s where you get to play. The settings here are just a guide and a matter of preference.
Cell properties settings:
Halftone Pattern: Line = Size 11 All Screen Angles = 0 (zero) Use as Overlay = NOT checked Color Scheme = Greyscale Ink = your background color Background = your foreground color Transparent = NOT checked OPTIONAL: Check Overlay and play with opacity settings to get a softer line effect OK
5 - Layers > Duplicate <
6 - Top layer Image > Free Rotate Settings: Direction = Right, Degrees = 90 All layers = NOT checked Rotate single layer CHECKED OK
7 - Lower Opacity of top layer to around 60 – 70 Once again, a matter of taste
8 - Layers > Merge > Merge All (Flattenn))
Now, you can stop here but I like to make sure the tile is seamless.
SEAMLESS TILING:
9 - Effects > Image Effects > Seamless Tiling Settings: Tiling Method = Mirror Direction = Bidirectional Horizontal = 3 Vertical = 72 Width = 29
10 - File > Export > JPEG Optimizer Compression = 25
And you’re done!! Pretty simple, but very effective. Thanks for trying my first tutorial! I hope it will be useful to your creativity.
Below is another result from repeating the Halftone again and changing the line size to 7.
~~~~~~~~~~~~~~~~~~~~~~~~~~~~~~~~~~~~~~~~~~~~~~~~~~~~~~~~
©D'zines by Grace 2006
|