Ballcano:
MIT Robot Design Competition
~ Design Portfolio ~
David William McLoda
TABLE OF CONTENTS
- Table of Contents, Figures, Tables and Info
- Introduction
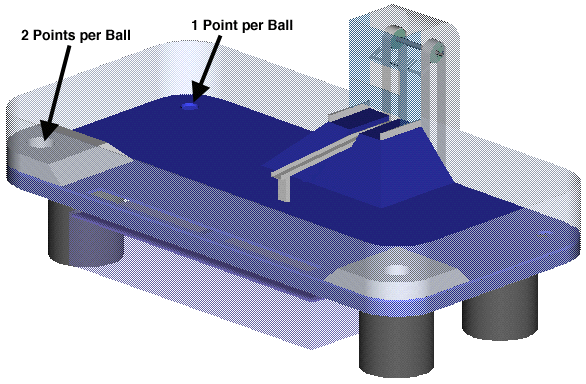
- The 2.007 Problem for 1998– Ballcano
- Overall Strategy and Machine Concepts
- Driving Strategy
- Functional Requirements/Design Parameters
- Motive Module
- Deployed Ramp
- Aimable Ball Trough
- Quick-Change System
- Actuator Evaluation & Calculations
- Prototype and Testing
- Electrical Hookup
- Evaluation of Final Machine
- Special Thanks
ADDITIONAL INFORMATION
2.007 Home Page (Contest Rules, Kit Contents, Actuator Info): http://pergatory.mit.edu/2.007/
David McLoda’s Home Page (Personal, Complete Portfolio, Resume) http://web.mit.edu/dwmcloda/www/
Matt Duplessie’s Home Pagehttp://web.mit.edu/mattdupe/www/
It seems that perfection is attained not when there is nothing more to add, but when there is nothing more to take away. -Antoine de Saint-Exupery
2.007 Machines are complex systems.
Simplification is the key to the success of inherently complex systems.
- Iterate the design and simplify, simplify, simplify. Before you add a feature, a mechanism, or a degree of freedom, ask yourself, "Is this really necessary?"
- Test modules separately and exhaustively before prematurely integrating parts.
- Integrate modules and components as early as possible after testing.
- Overall Strategy and Machine Concepts
- The Machine is a four-wheeled rover, with a ball collector mounted on top, and an aimable trough extended out the rear.
- The Machine will start directly in front of the Ballcano ramp, so that it will only need to drive straight forward to position itself underneath the single-ball bridge, and directly in front of the ramp.
- A hatch is deployed that will rest against the Ballcano ramp. The hatch is U-shaped so that the notch locks the hatch in place, over the bridge. The machine is now immobile.
- Four balls roll down the deployed hatch, into the collector, and are channeled through the machine and into the aimable trough.
- The angle of the trough is slowly adjusted until there is a constant flow of balls into the one-point hole.
Driving Strategy
I have no need to steer the machine. This is a great source of simplification.
A drawback is that I cannot adjust for contingencies. This problem is minimized since my machine is VERY fast and will most likely get to the center of the Ballcano ramp without being disturbed.
Functional Requirements/ Design Parameters
Must be as simple as possible.
- Minimize number of actuators.
- Minimize number of moving parts.
- Take away as many "parts" of the machine as possible without losing necessary features.
- Consider the use of one-piece compliant mechanism to take the place of more complicated mechanisms. Oftentimes, compliant mechanisms are simpler to manufacture and work very well. This mostly applies to mechanisms where a spring action is necessary or at least desired.
- Design parts so that they are easily manufactured.
- Design parts so that they can be made without the mill or lathe. (These machine tools are an invaluable part of the manufacturing process; however, they require considerable more overhead than the other shop tools.
Must be very fast.
- Gear the motors down.
- Use ball bearings for drive shaft to reduce friction.
- Use lightest materials possible.
- Use welding rod matrices where applicable.
- Limit use of heavy extrusions and plastics.
Must drive straight.
- Put front wheels on a single axle, and back wheels on a single axle.
- Machine is forced to travel only forward and reverse.
There is no need to turn the machine. (NO independent control of left/right wheels)
- Must work on either side of the table.
- Turnaround time for switching sides must be less than 40 seconds.
- Components can be made modular for switching from one side of the machine to the other.
- Must be robust.
- Use oversized holes to allow for misalignment.
- Design parts so that they are easily maintained/replaced if necessary.
- Components must work every time.
- Reliable trigger.
- Drive straight.
- Simple actuators and connectors to actuators.
- Eliminate binding problems.
- Balls must not get stuck or jammed in machine
- Throughput must be uninhibited.
- Use maximum slant angle in machine to roll balls out of machine as fast as possible.
- Trough should accommodate two balls at once.
- Motive Module
(If necessary, Refer to the Isometric Figure of the Machine on page 11)
- Speed philosophy
- Having a very fast machine was one of my top Functional Requirements.
- With a fast machine, I will be able to position my machine on the table in such a way as to block almost all bulldozer/dumptruck type of machines from getting any balls at all.
- Overall module
- Two axles only, no independent turning of left/right wheels
- ¼" Rod and simple snap bearing for back axle
- ¼" Rod and ball bearings for front drive axle
- Use both Bosch motors to provide power for single front axle.
- This will increase the amount of torque delivered to the axle.
- The motors will be electrically hooked up in parallel to a single rocker switch to prevent one motor from stalling the other (which would be a possibility if one motor was inadvertently turned on before the other).
- Gearing the motors down
- The motors turn a gear, not the axle.
- The large gear turns a smaller one that is attached to the axle, thus giving an increase in speed.
- These are the possible combinations with the gears given: (ratio of number of teeth)
- 48/24 = 2:1 speed increase
- 42/25 = 1.68:1 speed increase
- 42/12 = 3.5:1 speed increase
- 25/12 = 2.08:1 speed increase
- Speed increase corresponds to torque decrease.
I’ve chosen the 45/25 gear combination for several reasons:
- Gives modest increase in speed while maintaining control
- Torque reduction is minimal.
- These gears are particularly easy to mount to the axles.
- Deployed Ramp
- The Ramp
- To make as light-weight as possible, the ramp is made out of strategically placed welding rod. The welding rod frame is then, in turn, neatly covered with electrical tape.
- The 270° Vane actuator
- The actuator rotates a simple delrin arm through 180°, which in turn flip the ramp 180° by simply pushing it over.
- By simply pushing the ramp over, this mechanism avoids binding problems associated with more complicated linear bearing systems.
- This actuator has plenty of power to flip the ramp.
- Quick-change
- To change the 270° vane actuator capability from one side of the table to the other, simply loosen one wing nut, slide it off, place it in the new slot and tighten. This takes only about 10 seconds.
- To change the ramp capability from one side of the table to the other, simply loosen two wing nuts, slide the ramp off, and put it on the other side and tighten. This takes only about 20 seconds.
- A conservative estimate is that it will take me 40 seconds to switch my machine capability from one side of the table to the other.
Aimable Ball Trough
Steering Mechanism
- Uses the Polaroid 6V gear motor assembly.
- A second Polaroid motor is hooked up in series so that each only "sees" 6 volts.
- The trough need only move about 120°.
- To slow the motor down as much as possible, it is wired to the proportional controller. Furthermore, I will have an assistant whose job is to carefully aim the trough. I found that this is necessary since in the heat of the practice contests, I tended to move the PWM joystick to dangerously high voltages, causing the trough to overshoot the maximum distance it is designed to move through.
The Trough
- A clever design that is lightweight and effective.
- Made solely from welding rod, it is very light-weight.
- The best feature of the trough is that it can accommodate two balls at once, while accurately aiming single balls to travel toward the one point hole.
- This trough design makes it virtually impossible for balls to get jammed.
- The trough must be "cocked back" into the machine and then later deployed. This is the only way to make the machine fit within the restricted dimensions of it’s shipping container.
Spring Mechanism
- A clever design that is simple and effective.
- The spring action of spongy foam block is in place of a rigid body mechanism or traditional spring.
- This compliant mechanism was easy to manufacture and works flawlessly.
Trigger mechanism
- The trigger sets the trough into the machine, keeping the trough in tension caused by the above spring mechanism.
- The trigger uses a 12V solenoid.
- It is simply an L-shaped pin made from a short piece of welding rod.
Quick-Change System (For changing the machine capability from left/right table starting positions)
Minimize the number of necessary changes (used only three bolts)
Exploit symmetry (No new modules are necessary)
Use wing nuts and minimize connectors for interchangeable parts.
Use slots, not holes, where appropriates so that nuts need only be loosened and slid off, not unscrewed completely.
Actuator Evaluation
Bosch Motor (For Driving the front axle)
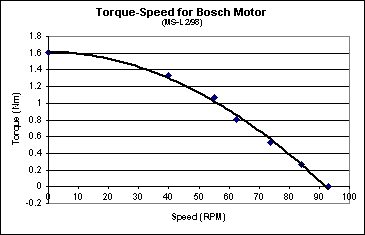
- The Bosch wormgear motor provides substantial torque and speed. It is much less massive than the Ford motors in the kit, and forward/reverse speeds are identical.
- In order to determine what wheel radius to use in my design, I used a spreadsheet that showed the necessary torque on an axle, for wheels of different radii and with varying total weight of the machine.
|
Wheel radius
(inches) |
Weight of Machine (lbs) |
|
|
6 |
7 |
8 |
9 |
10 |
11 |
12 |
|
2.25 |
0.763 |
0.890 |
1.017 |
1.144 |
1.271 |
1.398 |
1.526 |
|
1.875 |
0.636 |
0.742 |
0.848 |
0.958 |
1.059 |
1.165 |
1.271 |
|
1 |
0.339 |
0.396 |
0.452 |
0.509 |
0.565 |
0.622 |
0.678 |
- Numbers in the spreadsheet are given in Newton-Meters.
- Approximation of necessary axle torque:
0.5(Machine Weight)(Wheel Radius)(0.113) = Newton-Meters
- This helped me determine that I should make my machine as light as possible to take advantage of the above torque/speed graph.
- I decided to design my machine with the maximum wheel radius of 2.25 inches. This will allow my machine to travel as fast as possible.
- I determined that the machine could be manufactured to weigh less than 10 pounds, therefore providing a safe margin of error for necessary torque.
- It is clear from the calculations that the additional torque provided from a second Bosch motor on the same axle is necessary.
- My goal is to have this mechanism operate within the shaded region.
- 6V Polaroid Motor with Gear train (To aim ball trough)
- I used this motor because the geared-down output is strong and slow enough to control a trough that turns only a fraction of a rotation.
- It is a rather delicate mechanism and must be treated carefully as not to strip or misalign the gears.
- Since these motors are 6 volt, I connected a second motor in series so that each motor "sees" only 6 volts each.
- This is probably the greatest weakness of my machine. For the sake of simplicity and practical considerations, no other actuators were considered.
- Solenoid (For Trough Deployment)
- The 12volt solenoid is extremely robust.
- My trigger mechanism is extremely simple and virtually fail-safe.
- The key to making the trigger work every time is to limit the trigger stroke to a half-inch or less. This way, the pull of the solenoid is very strong.
- 270°, Vane Actuator (For Ramp Deployment)
- The Vane Actuator can provide a maximum of 2.2 in-lbs of torque.
- The spreadsheet below gives the torque necessary for the actuator to provide given different length of actuator arms and different ramp weights.
|
Arm Length
(inches) |
Weight of Flip Ramp (lbs) |
|
|
0.25 |
0.5 |
1 |
1.5 |
2 |
|
|
|
4 |
1 |
2 |
4 |
6 |
8 |
|
|
|
5 |
1.25 |
2.5 |
5 |
7.5 |
10 |
|
|
|
6 |
1.5 |
3 |
6 |
9 |
12 |
|
|
- Numbers in the spreadsheet are given in inch-lbs.
- Approximation of necessary flipping torque (conservative):
(Weight of Flip Ramp)(Length of Arm)= Inch-lbs
- It is apparent since the vane actuator can only provide 2.2 in-lbs, the flipping ramp must be made as light as possible. I will use a matrix of welding rod instead of a solid piece to reduce weight.
- My goal is to have this mechanism operate within the shaded region.
- Prototype and testing
- Motive
- Make sure the gears do not slip on the shaft.
- Make sure the wheels do not slip on the shaft.
- Experiment with different traction materials for the wheels. The rubber bands provided the best traction.
- Deployed ramp
- Make sure the vane actuator is strong enough to flip the ramp.
- Make sure that balls roll down the ramp easily without getting stuck.
- Make sure the ramp can easily switch sides of the machine.
- Trough
- Solenoid should trigger every time.
- Make sure that the compliant trough hinge has enough tension at all times.
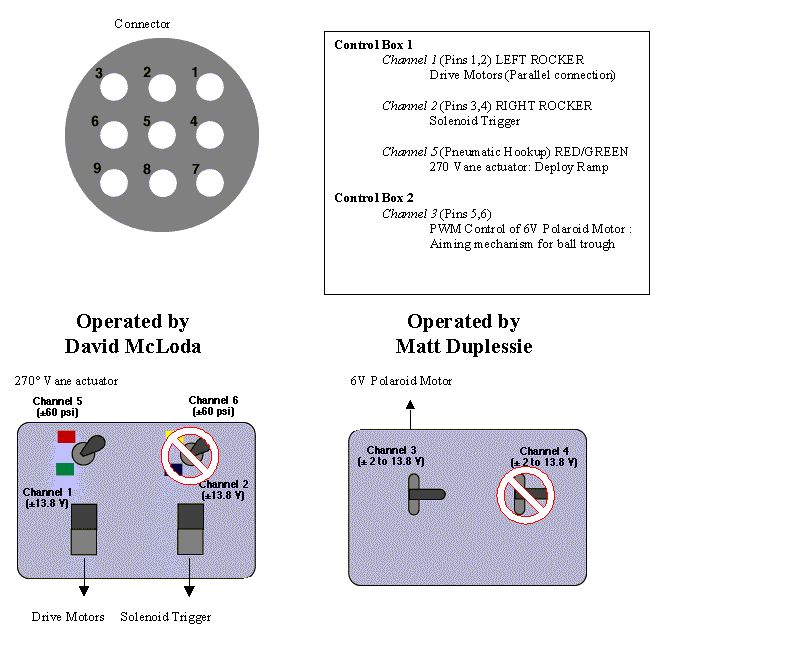
- Electrical Hookup (See Diagram Below)
- Control Box 1 (run by myself)
- Two motors on 12V rocker (in parallel).
- Solenoid on 12V rocker.
- 270° Vane actuator on pneumatic (red/green)
- Control Box 2 (run by Matt Duplessie)
- 6V steering motor on 12V proportional toggle.
Evaluation of Final Machine
What did not work mechanically?
With small adjustments, all mechanical subsystems worked well within the set parameters.
The 270° vane actuator is slower than I had expected. Here, I run the risk of being blocked from deploying my ramp if I am against a marginally fast machine.
Two sources of backlash are present in the aimable trough.
- Between the rotating trough base plate and the rotating square rod.
- Within the gears of the gearbox.
Wheels and gears are fastened to threaded shafts by "squeezing" a nut on each side of the wheel or gear. I found that the wheels would come loose after driving my machine for several runs. To fix this, I used lock nuts and tightened them very tightly. Tightening the nuts is an acceptable part of my machine’s normal maintenance.
Overall Performance
The Machine is FAST! I reach my final position is less than 3 seconds.
The solenoid trigger works every time.
It is difficult to operate both controllers. Matt Duplessie will be operating one of the controllers.
The machine is violently jarred as the forward drive limiters collide with the ramp. This was to be expected, and although the machine is jarred there is no perceivable damage. Over the short course of operation of the machine, I can see no harmful effects from the jarring.
The aimable trough moves a bit fast and there is a risk that external forces from an opponent’s machine could damage the gears attached to the 6V Polaroid motor.
Electrically/ Controller
Trough steering mechanism is very sensitive and a bit fragile.
So that each Polaroid motor "sees" 6V instead of 12V, a second motor is connected in series with the first as a "dummy load".
To help solve this problem, I will be using a second person to run the proportional controller so that he can pay special attention to it.
Machine Maintenance
Tighten nuts.
Check trough hinge for adequate compliance ("springiness").
Special Thanks to Mathew Duplessie for operating the PWM controller box.
[email protected]