Introduction
Having seen many poor attempts at photographing N gauge stock
(particularly for sale on eBay), I have decided to write this article
which describes what I do and may hopefully help some readers to produce
better pictures for their records or listings.
The method described here will not produce top quality studio
pictures - to do that you will need to use a studio. What this method
should do is produce pictures that are of sufficient quality to clearly
illustrate the item being photographed with the minimum of effort and
equipment.
The remainder of this document contains a comprehensive description
of what I do which seems to produce good representative images of the N
gauge stock that I have.
Location
I use a sturdy table that is set against a wall in a well-lit room,
but out of the direct sunlight. I photograph at approximately 90 degrees
to the window.
Lighting
Light is both your best friend and your worst enemy. Without light
there is no picture and with too much light and/or light in the wrong
places then the image is ruined and there is no picture.
Do not use artificial (tungsten) light - this is what produces the
yellow/orange colour cast on some pictures that you may see. Fluorescent
strip lighting is also deceptive - it looks bright but in reality is a
very low light - as anybody who has tried to take pictures in an office
will know. Switch off any lights in the room.
If I do find that additional light is required - particularly in
winter - then I use angle poise lamps with daylight bulbs fitted. Once
everything has been put together take a step back and look at the
set. If it looks as if there is enough light to work by, then normally
there is enough light to work by.
Props
On the table I place a large sheet of white cartridge paper (I use
A2 although it may be possible to manage with A3 for short wheelbase items).
The paper lies on the table surface and curves up the wall at the back of the
table, thus forming both the foreground surface and the background. Use
white material as it reflects the light and will also make any shadows
obvious so that they can be removed by adjusting things before
photography commences.
Do not fold or crease the paper at the change of direction - allow it
to curve naturally. I can usually secure the paper by using weights on
the lower edge or if necessary a blob of blu-tac to stick it to the
wall. If that would be a problem, put something between the wall and the
background first. Only the first 100mm or so of the vertical background
will be relevant in the final image so don't worry if the upper part of
the background is untidy.
Do not use shiny or glossy background material - this will catch the
light and cause flare, which you certainly don't want.
You may want to put additional white material (such as polystyrene
blocks) to the left and right of the paper to assist in bouncing light
around the image but I've never found this necessary for the N gauge
stock that I have photographed.
Positioning
Now that the set is ready, I add the length of track and of course
the item of stock itself.
These are positioned at a shallow angle (approximately 30 degrees) to
the camera position, with the left edge of the item closest to the
camera. Why the left edge? Why not - it seems to be a convention. If you
prefer the right edge leading in a three-quarter view, then position the
track and stock accordingly.
I tend not to photograph stock sideways on (flat) to the camera; the
three-quarter view tends to produce a more flattering image plus you
can also see one end of the item as well as one side.
Two common positionings that I see which can detract from the final picture:
1. Stock that is laid on its side and photographed from above. Things
look better when photographed in their natural position. For railway
stock this is either sitting upright on its wheels or in its box.
Instead of lying unboxed stock on its side and photographing from above,
place it upright and photograph from the side.
2. Stock that is sitting on track with joints, curves or pointwork etc.
This adds an unnecessary distraction to the picture. Use a straight
piece of flexi track or one of the longer pieces of Setrack. As can be
seen from the pictures below, all that will be seen in the final image
is the track directly under the stock plus another three or four
sleepers length either side.
The item should be in the centre of the paper and be positioned
around 100mm from the background - this should prevent any shadows from
appearing there.
Now look to see where the light reflects from the item and/or the
side of the rail. This is particularly important if you are using
additional light sources. Move the light and/or the item so that any
flare point is not going to be on or near the item. The additional light
source is doing just that; providing additional light - it is not the
main light.
The Camera
As the subject is sitting on the table, then so shall the camera.
I use a fairly basic digital compact camera, which I place parallel to
the background around 400mm from the item.
On the camera, I turn the flash off, turn the macro mode on and zoom
in to the maximum extent.
Always turn the flash off. The camera is much too close to the item
for the flash to be used. Too much light in all the wrong places.
You've seen the results. If you cannot turn the flash off, then stick
a piece of black tape across the flash lens.
If your camera does not have a macro (close up) mode, then check the
manual and see what the minimum focussing distance is. For example,
if the closest distance is 500mm (0.5m), then make sure that the camera is at
least 500mm from leading edge of the stock otherwise the subject will be
out of focus.
Zoom in as far as you can. The larger the subject is in the frame,
the more detail will appear in the resulting picture. Don't worry if
you can see the vertical edges (or even a horizontal edge) of the
background paper in the image; all you are concerned with is the subject
and the area immediately around it. The centre of the side of the item
should be in the centre of the frame.
Now take the picture. On my camera the shutter is on top of the
camera body, so I am pressing down onto the table. The table is sturdy
so the camera doesn't move in any direction so images are clear and sharp.
Image Manipulation
Download the image to your computer and have a look at it in a
graphics package. You will see a very large picture with the item taking
up a small area somewhere in the middle. The image will also look a lot
darker than it appeared in the camera.
At this point, three things need to be done; 1. Lighten the image, 2.
Make the item much larger in the image, 3. Reduce the size on disk of
the image.
To take care of the dark areas (particularly around the underframe)
adjust the brightness and contrast. I use 25% brightness and 15%
contrast that lifts the underframe detail at the expense of occasionally
making some of the image look a little overexposed.
In the graphics package, cut out a rectangle showing the item and a
small area around the item. Don't cut too close to the item otherwise
the picture will look a little strange; the eye needs to be able to
see a little bit of the area around the subject, even if it is a
plain white background. Make the cut-out rectangle a new image (I use
Paint Shop Pro; Copy then Paste does that).
I save the images as JPEGs with Progressive Encoding (the picture
gradually appears as it is loaded). The image size for a mainline
locomotive or bogie coach is around 1200 x 400 pixels and the file size
is between 60K and 70K. A perfectly adequate record photograph that
shows the item at several times life size.
eBay
If you are photographing stock for sale on eBay, then one final
operation to perform on the image is to resize it to fit the aperture on
the eBay listing.
The size of the aperture is 400 pixels (horizontal) by 300 pixels
(vertical). Unless you are enabling the supersize option, uploading an
image larger than 400 x 300 pixels just means that image will be
'squashed' into the viewport. Better to provide an image that will look
the same both online and offline.
Resize the image so that it fits in the eBay viewport. For most N
gauge stock, resize the horizontal dimension to 400 pixels. Make sure
this is a proportional resizing; your item will appear distorted
otherwise. When the image has been resized, check the dimensions; the
horizontal should be no more than 400 pixels and the vertical no more
than 300 pixels.
Save the image as a JPEG with Progressive Encoding (the picture
gradually appears as it is loaded). The file sizes are normally
between 20K and 30K. A perfectly adequate image for eBay listings.
Endpiece
...and we're done! Hopefully this is of help to someone. As I stated
at the beginning, you won't get studio quality pictures from this
method, but they should be good enough for the intended purpose. All
you need is the digital camera, a large piece of paper (or material)
and some thought.
Digital imaging is not my area of expertise; someone may be able to
tinker with the brightness and contrast settings for a more flattering
effect. These numbers may also need to be varied depending on the livery
of the item being photographed.
Comments and opinions welcome. If anybody has any other (better)
ideas, particularly in the digital manipulation section, then I would
be interested to hear them.
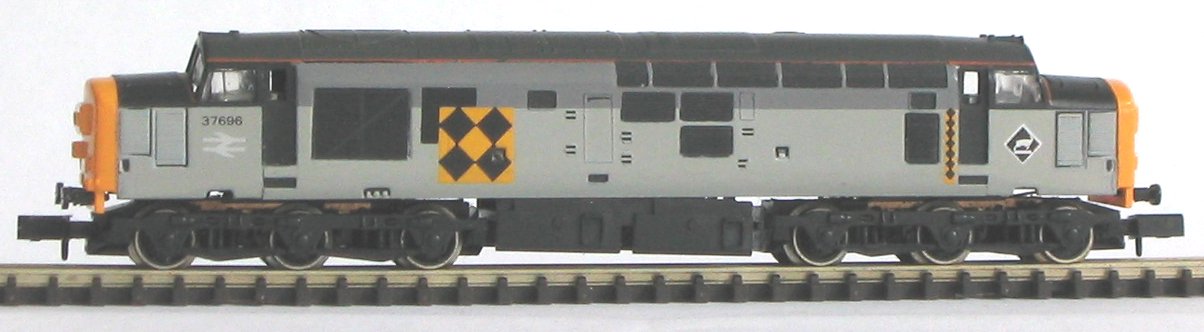
Examples
The proof of the pudding, I hope! Here are two examples of images
created using the method described above. These images have been reduced
in size to fit the eBay aperture.
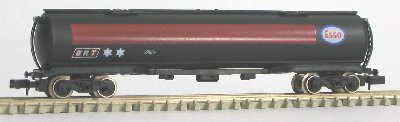

Finally an example of an image that hasn't been reduced in size, suitable for record keeping or archiving. [I've noted the dislodged underfloor tanks!]
NOTE: This image has been displayed in an eBay-sized viewport on this page otherwise people using less than 1600x1200 resolution would see a horizontal scroll bar. To view this image full size (1204 x 332 pixels) on a separate page please click on the image below.