|
Last update July 20th. 2011. |
18s 7jewels - Waltham Pocket Watch |
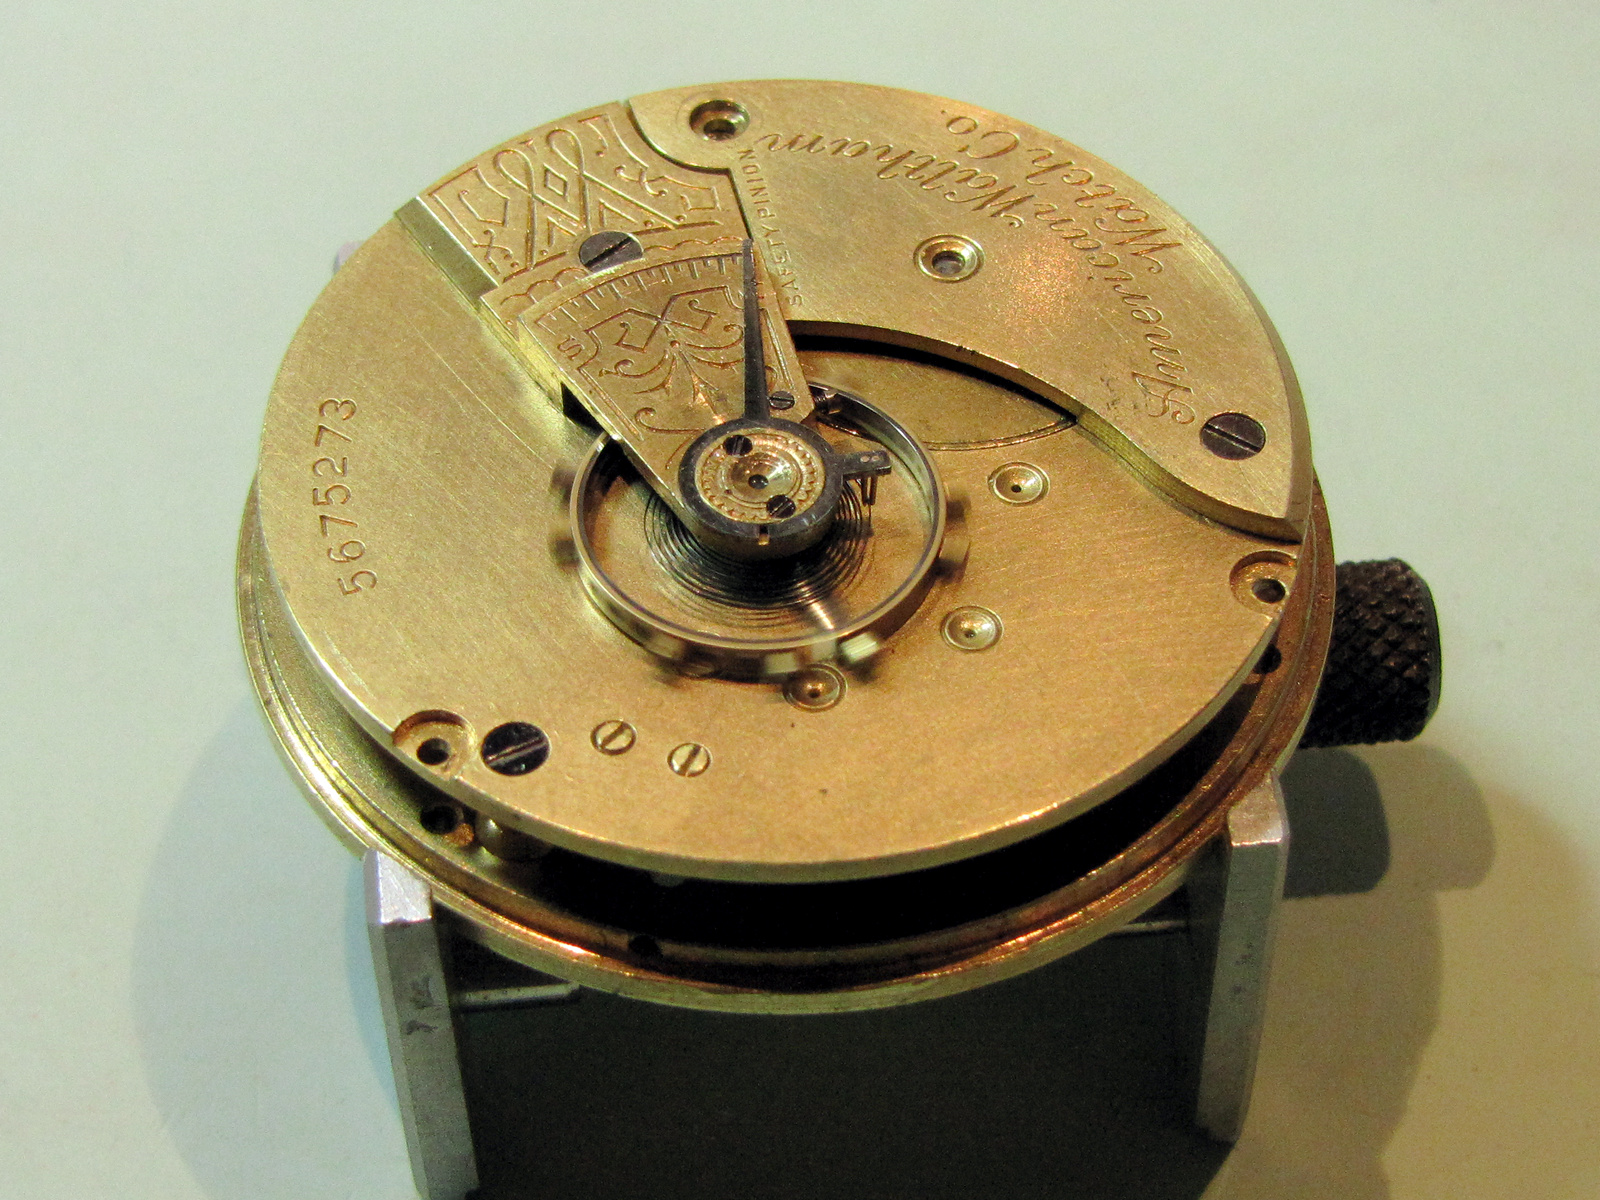
| Model 1883, # 5675273, over one hundred years old, barely touched by time, nevertheless badly mutilated by a repairer | |
| When I opened the watch I could not fail noticing how the balance wheel was ripped apart, and the balance cock was loose. |

|
| The
hole in the balance cock has been enlarged, and the balance cock was badly
bent.
The cause for enlarged screw hole became apparent later on, after I have thoroughly examined the watch. |
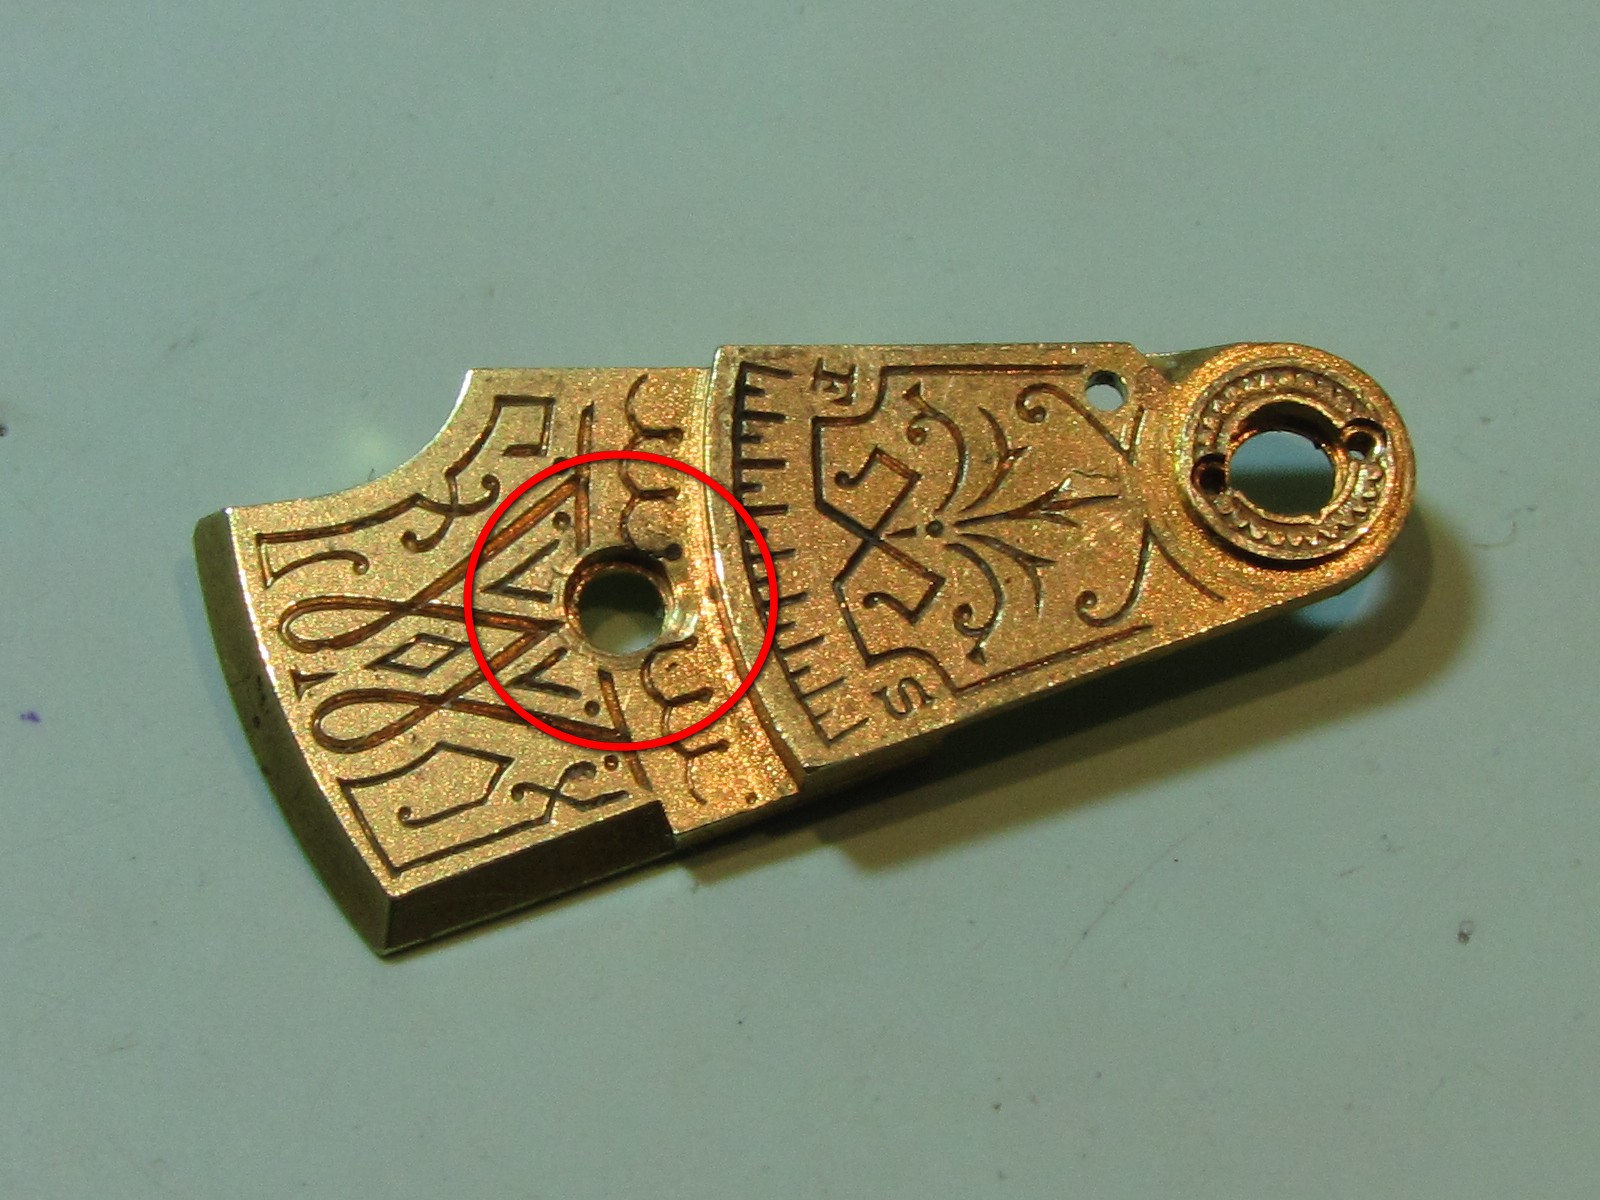 |
| In an
attempt to make room for a longer balance staff repairer has bent the
balance cock.
In doing so he ripped the screw from the upper plate shaving off the threads in the plate. To remedy this he enlarged screw hole in the balance cock, as well as the threaded one on the plate, all in order to use an oversized screw. You can see the original size screw (the small one) with a large replacement. This idea of his did not work out very well. |

|
| Of
course, this was not all of the "repairs" done by this
"skilful" repairer.
There is also third wheel with a broken lower pivot. |
 |
| Although
unorthodox, this "repair" is most ingenious, indeed.
Instead of re-pivoting the third wheel, our repairer decided to reduce the distance between the two plates, as it can be seen on the image. |
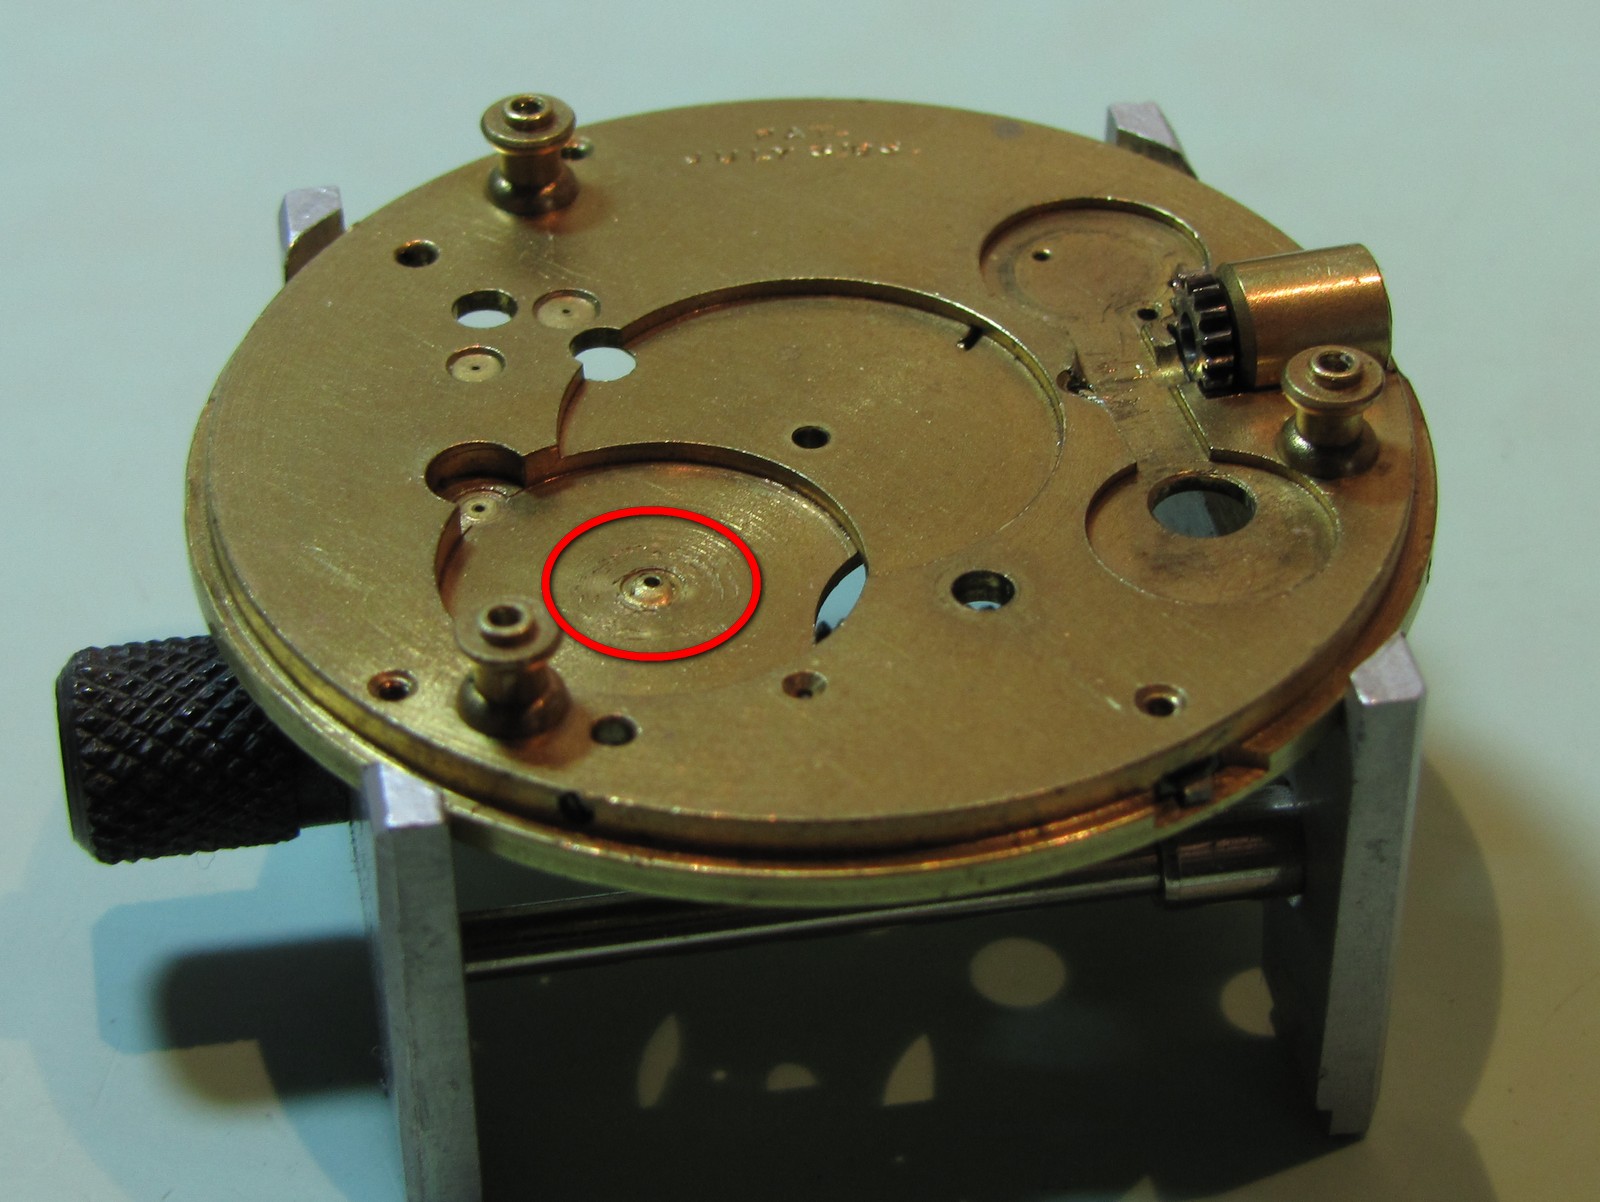 |
| To
achieve the task he used his staking set's rounded end punch to push the
pillar plate closer to the upper plate so that the third wheel will fit.
Strangely enough, this "repair" did work, after a fashion. |
 |
| If
You have thought that our repairer has exhausted his resources, You
are wrong!
Here is another example. |
 |
| The repair of the yoke spring of the winding and setting mechanism | 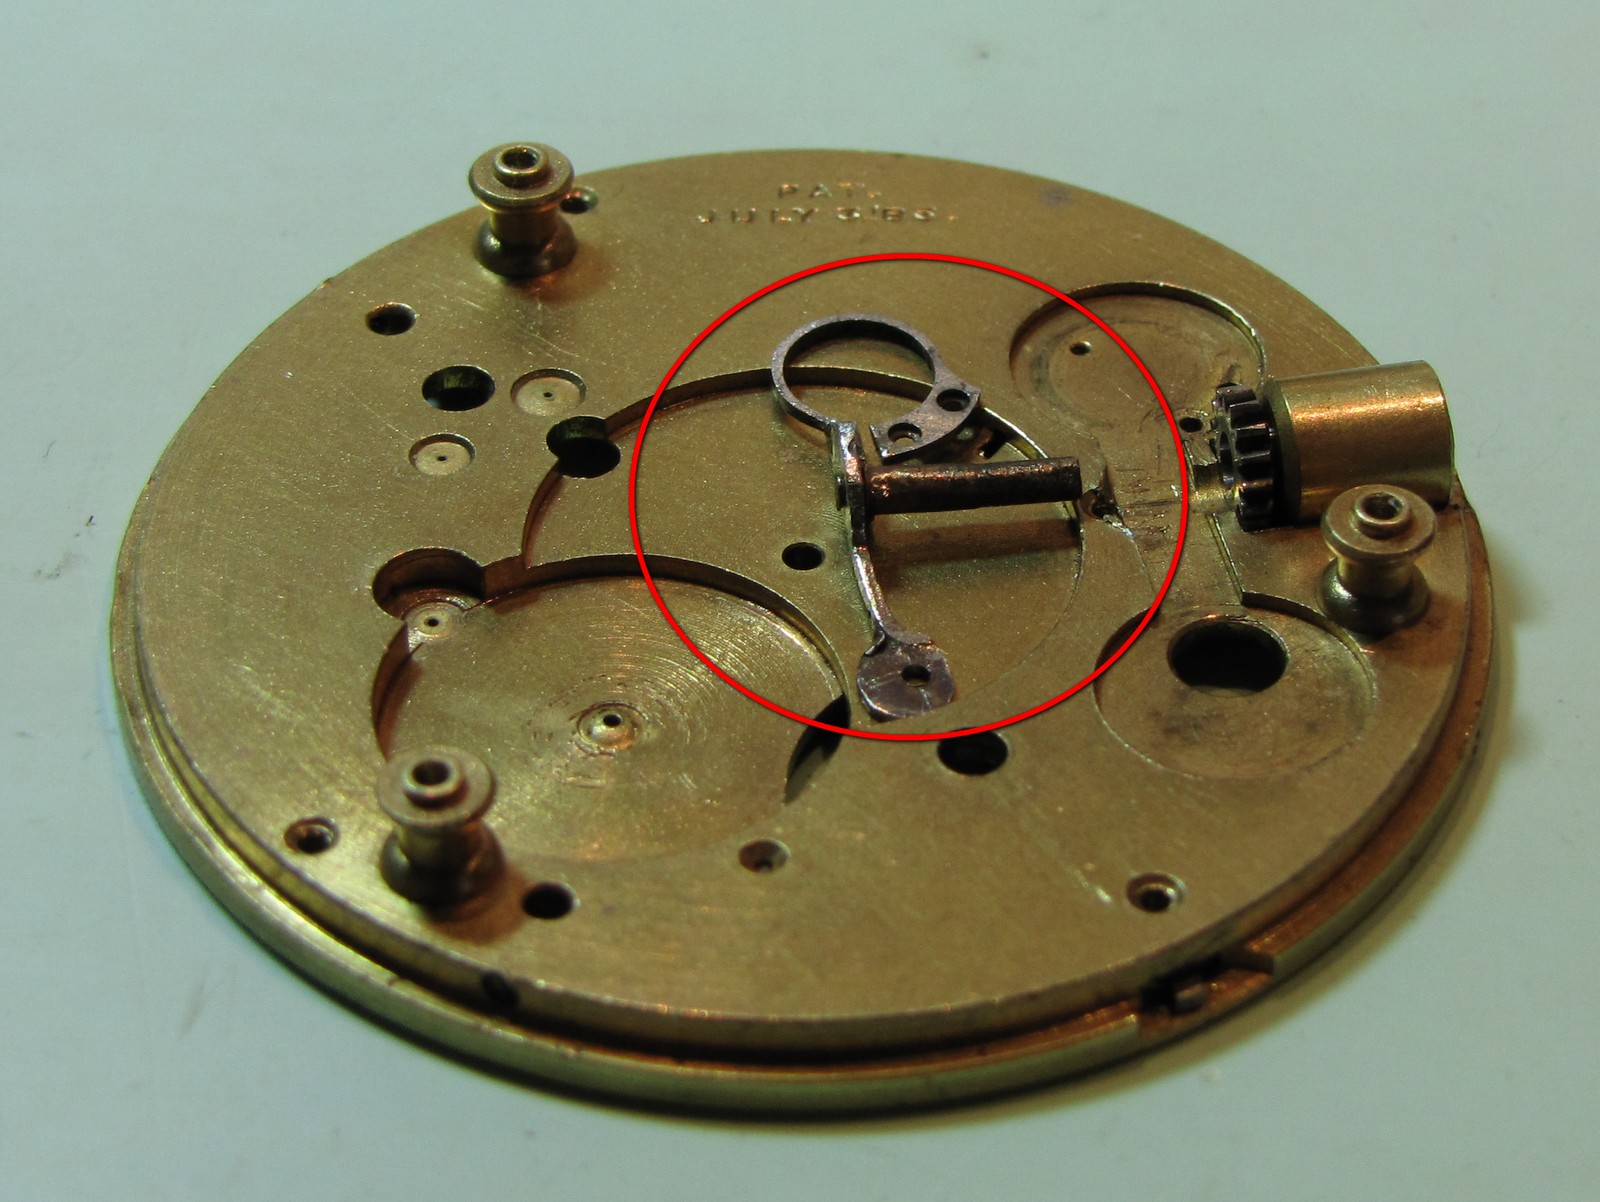 |
| The fourth wheel, obviously re-pivoted. This can easily be seen by colour change of the pinion to dark blue which occurred while drawing down temper of the steel to allow drilling it for re-pivoting. | 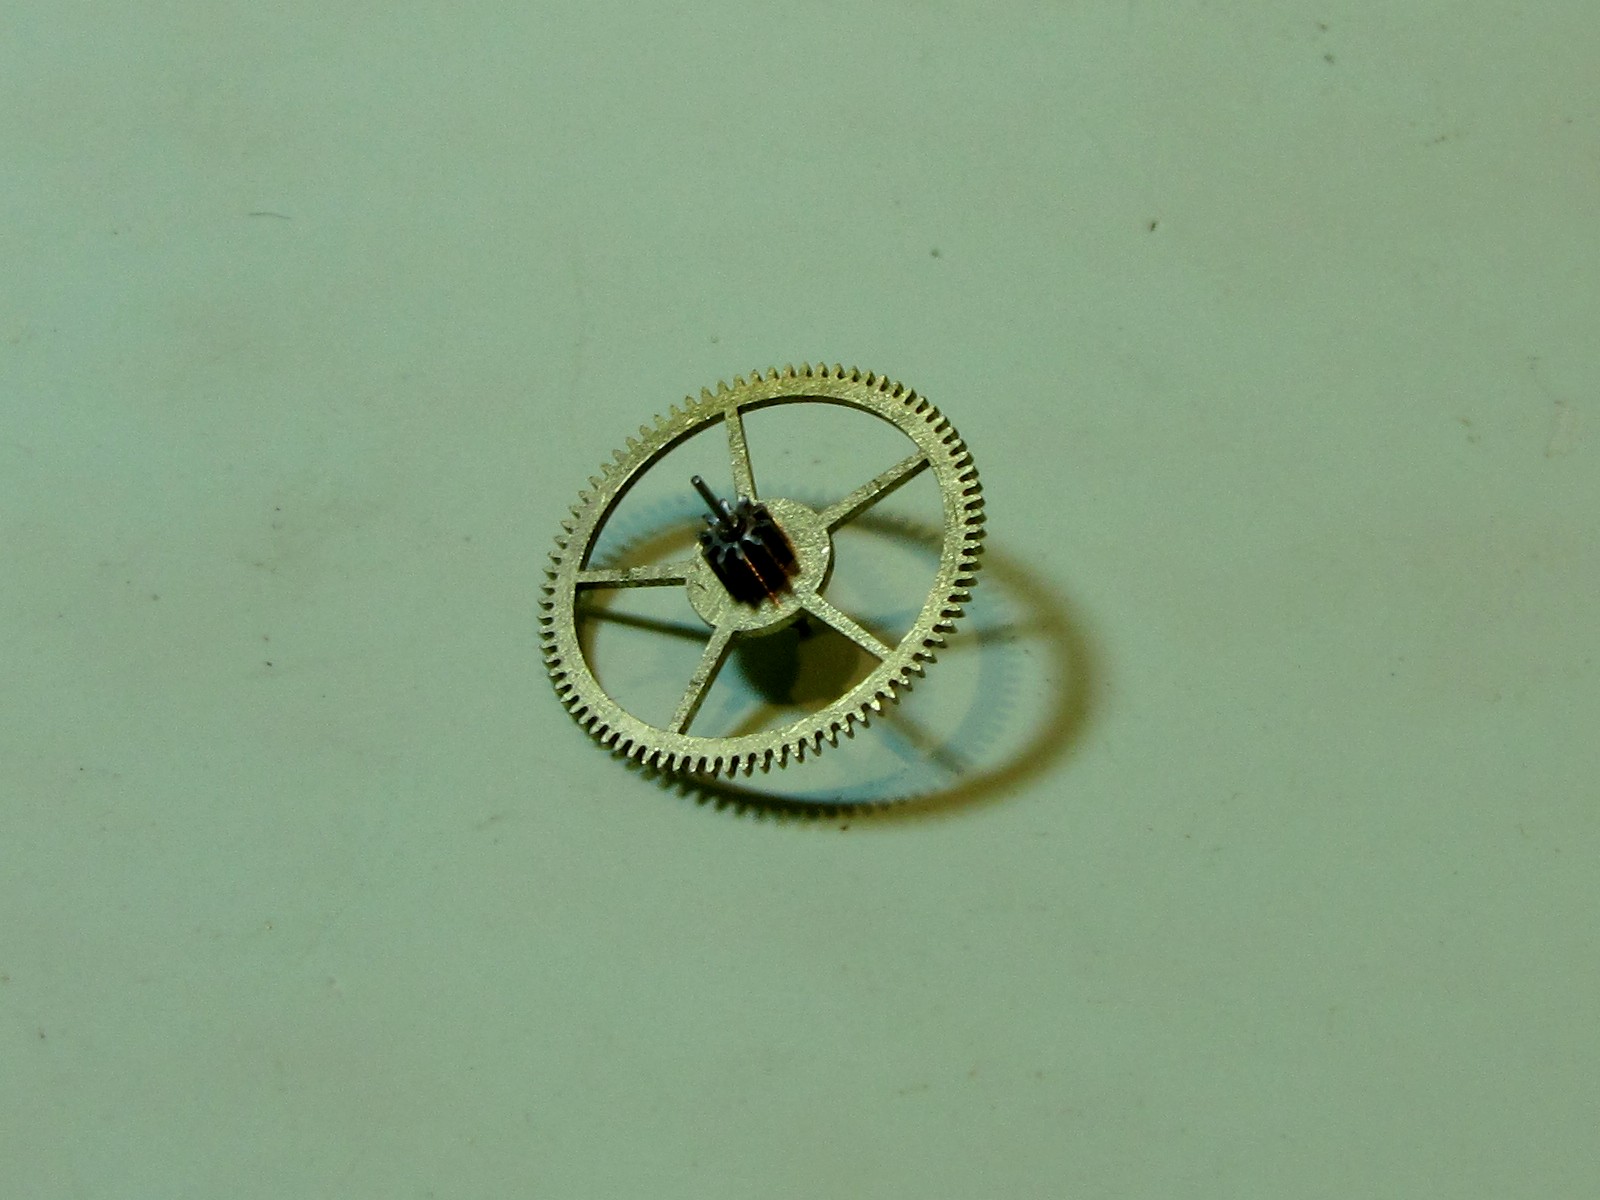 |
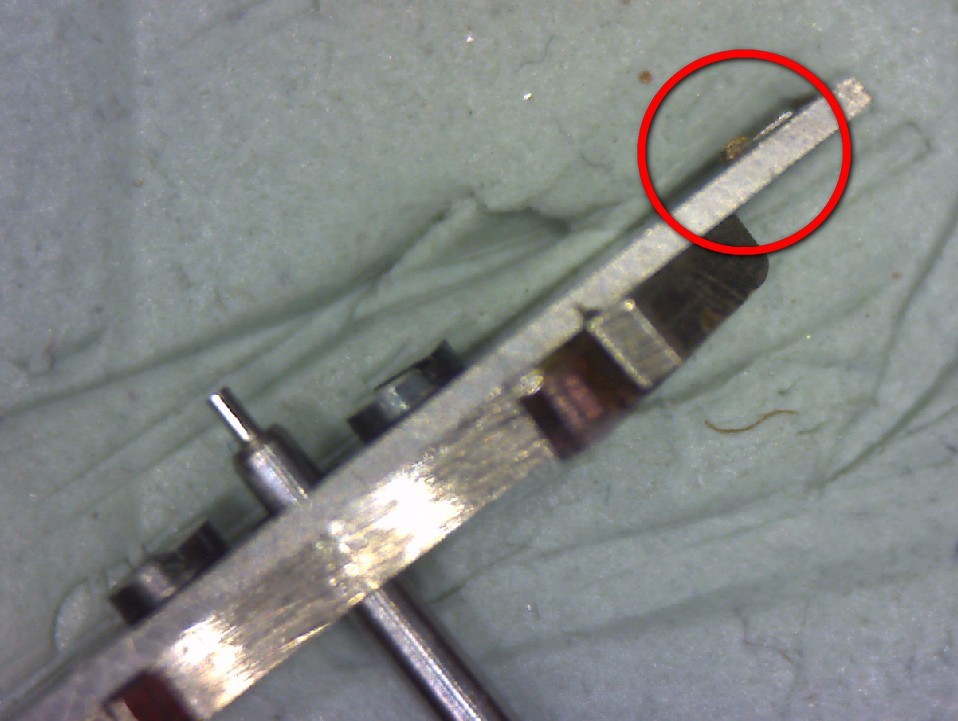
| After
close
examination, performed under the magnification by digital microscope, poorly executed
re-pivoting is easily revealed.
The unfinished, new long pivot, which bears seconds hand is placed in the off centre bored hole. Ferric oxide, the blue colouring, was not removed after the re-pivoting. |
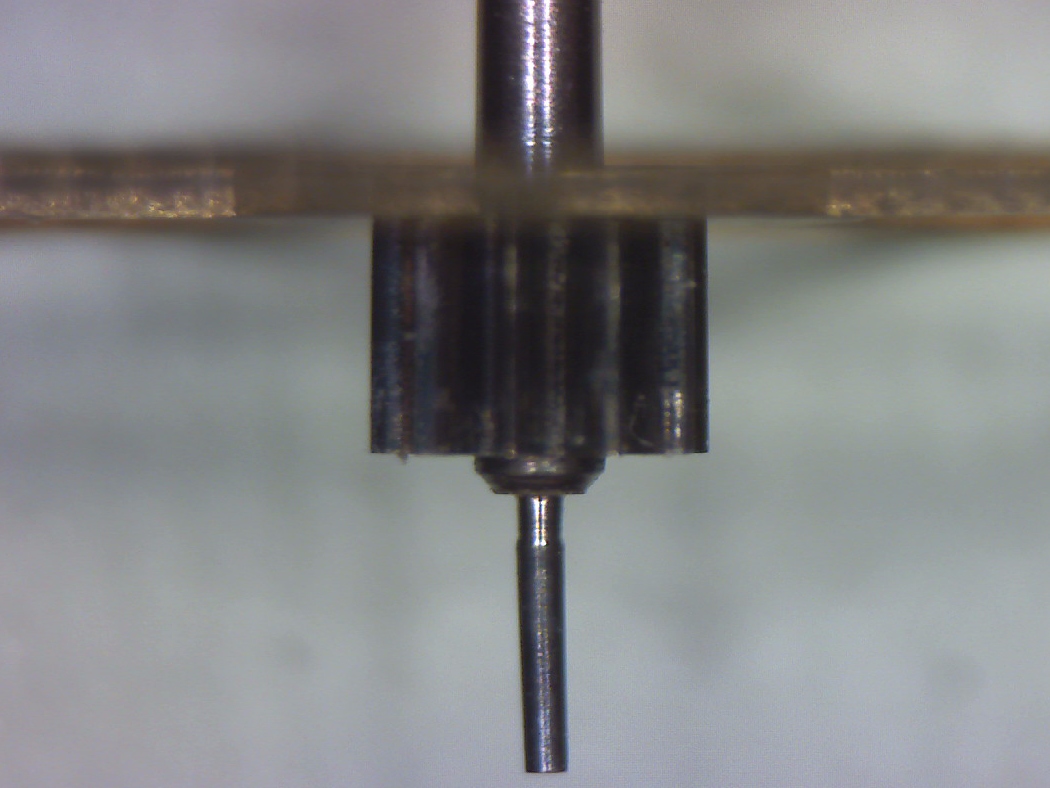 |
| The escape wheel seems to be quite all right with no damage to it. | 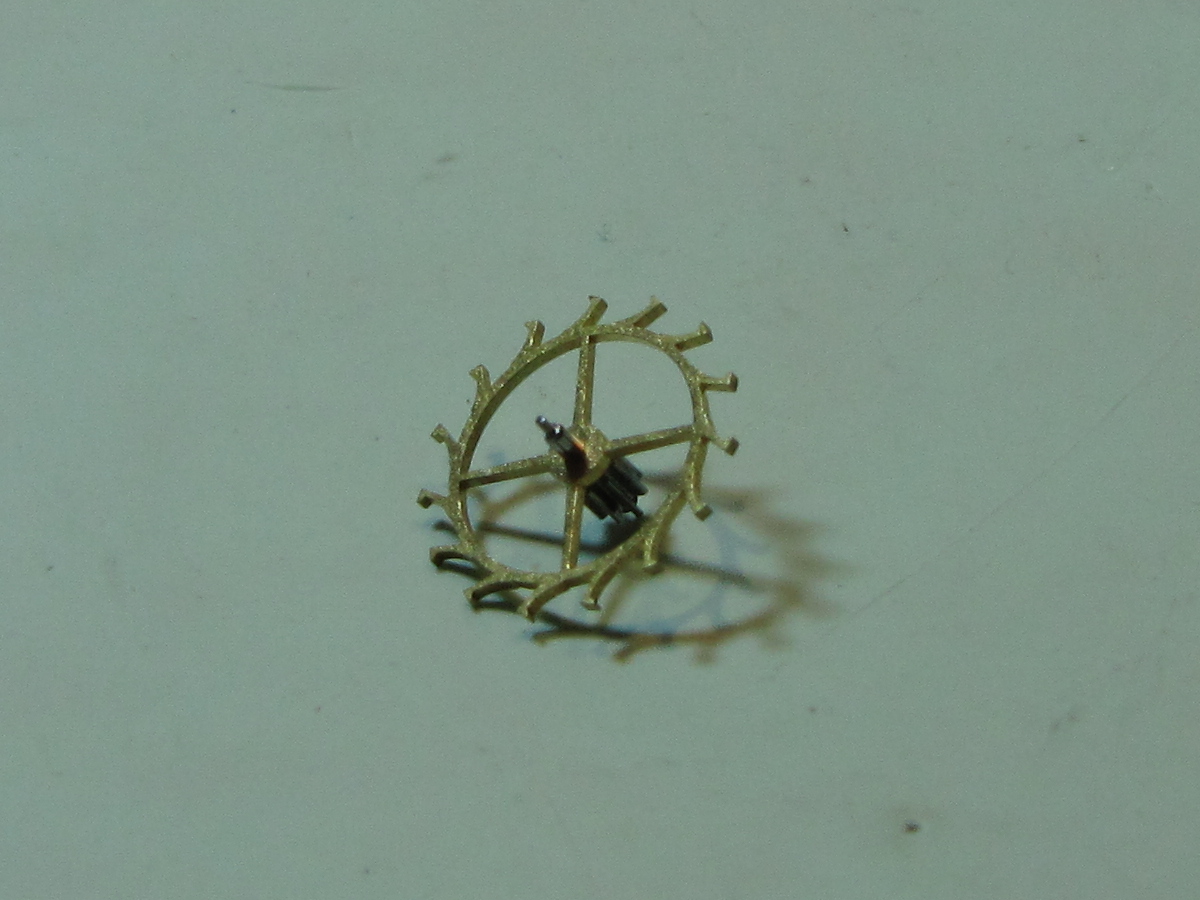 |
| However,
close examination under magnification reveals poor state of both
pivots.
Such a state of pivots must be rectified by burnishing them in Jacot lathe or by re-pivoting if worn too much. |
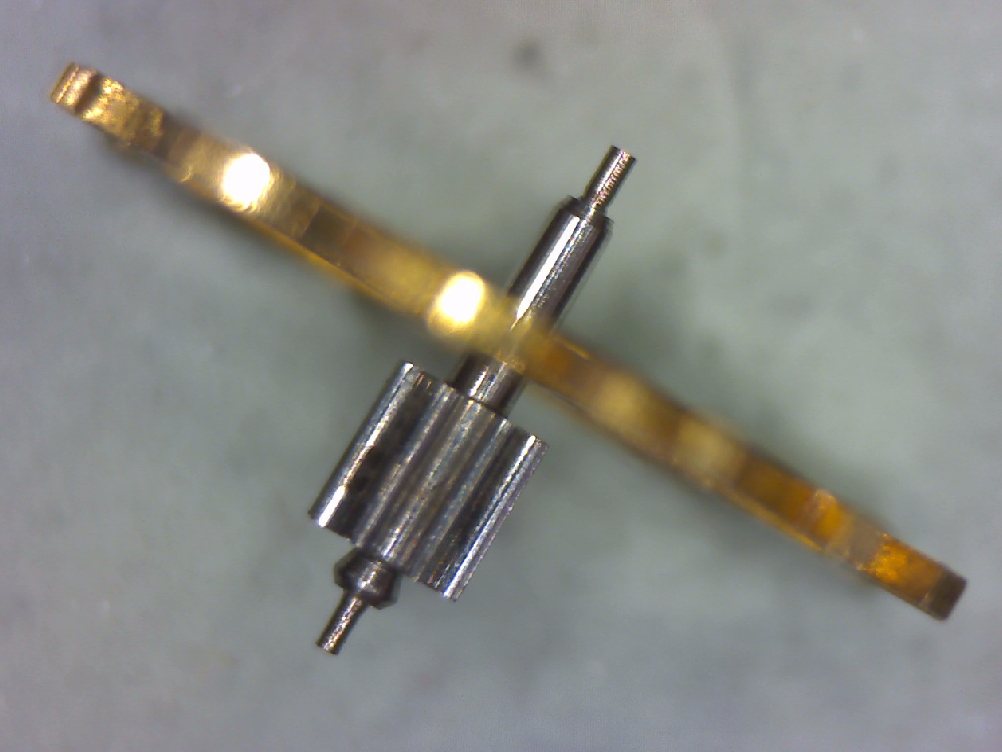 |
| The pallet does look all right on the initial examination. | 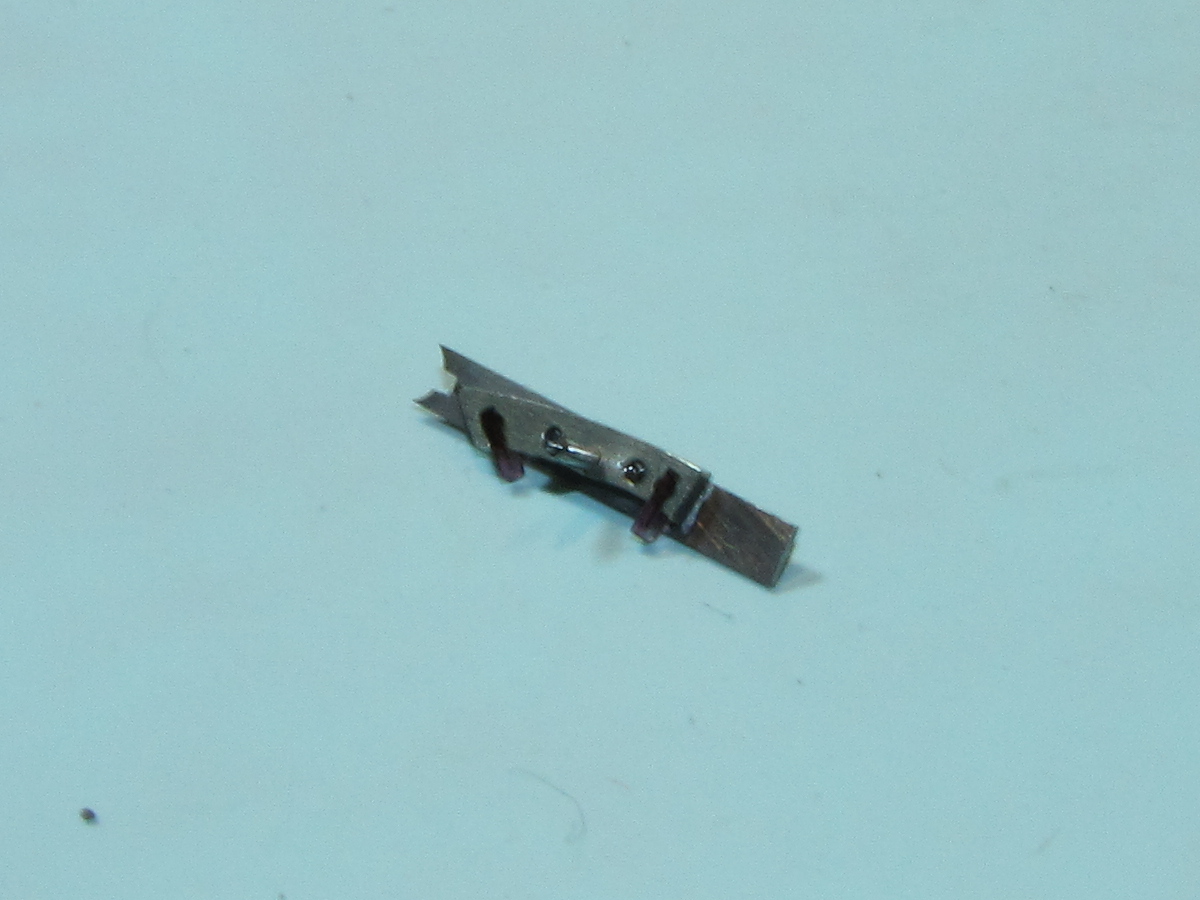 |
| Closer look, under the magnification shows that both, entrance and exit, stones are all right. | 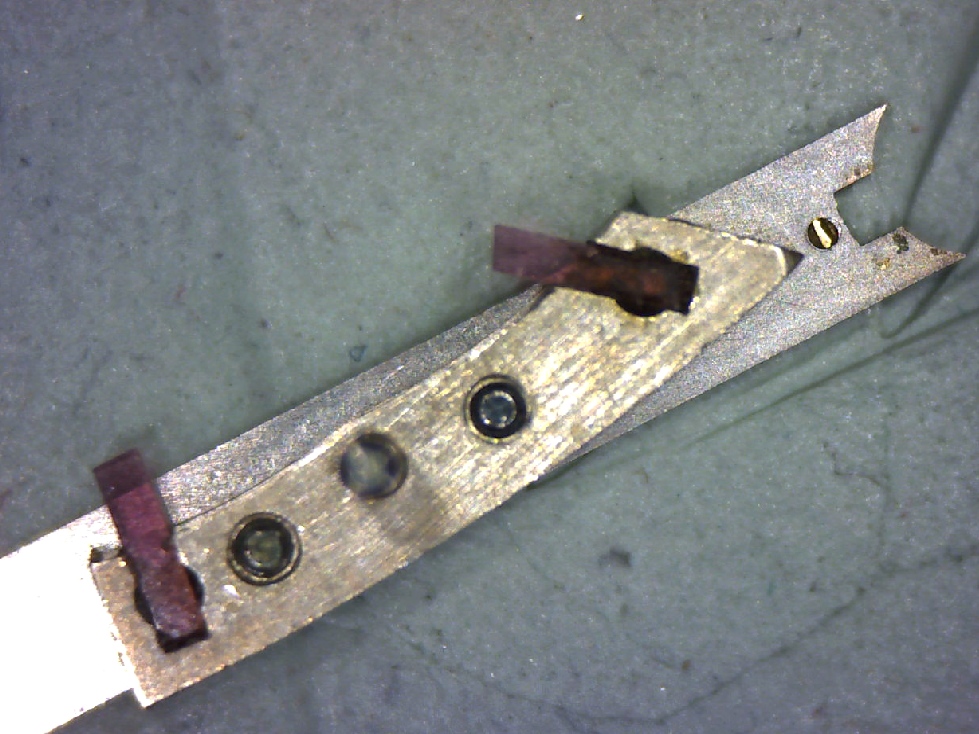 |
| Also, both pivots appear to be in good shape and do not require any intervention. |  |
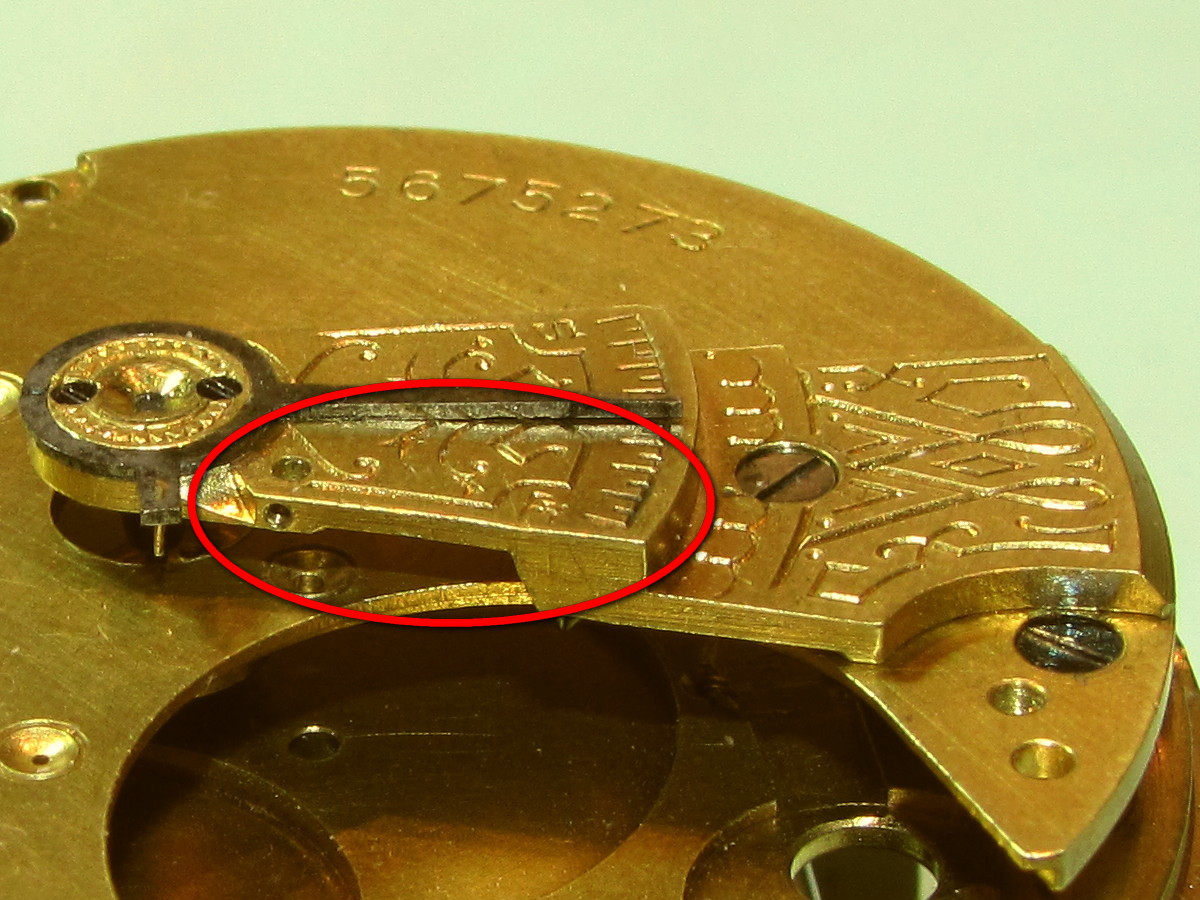
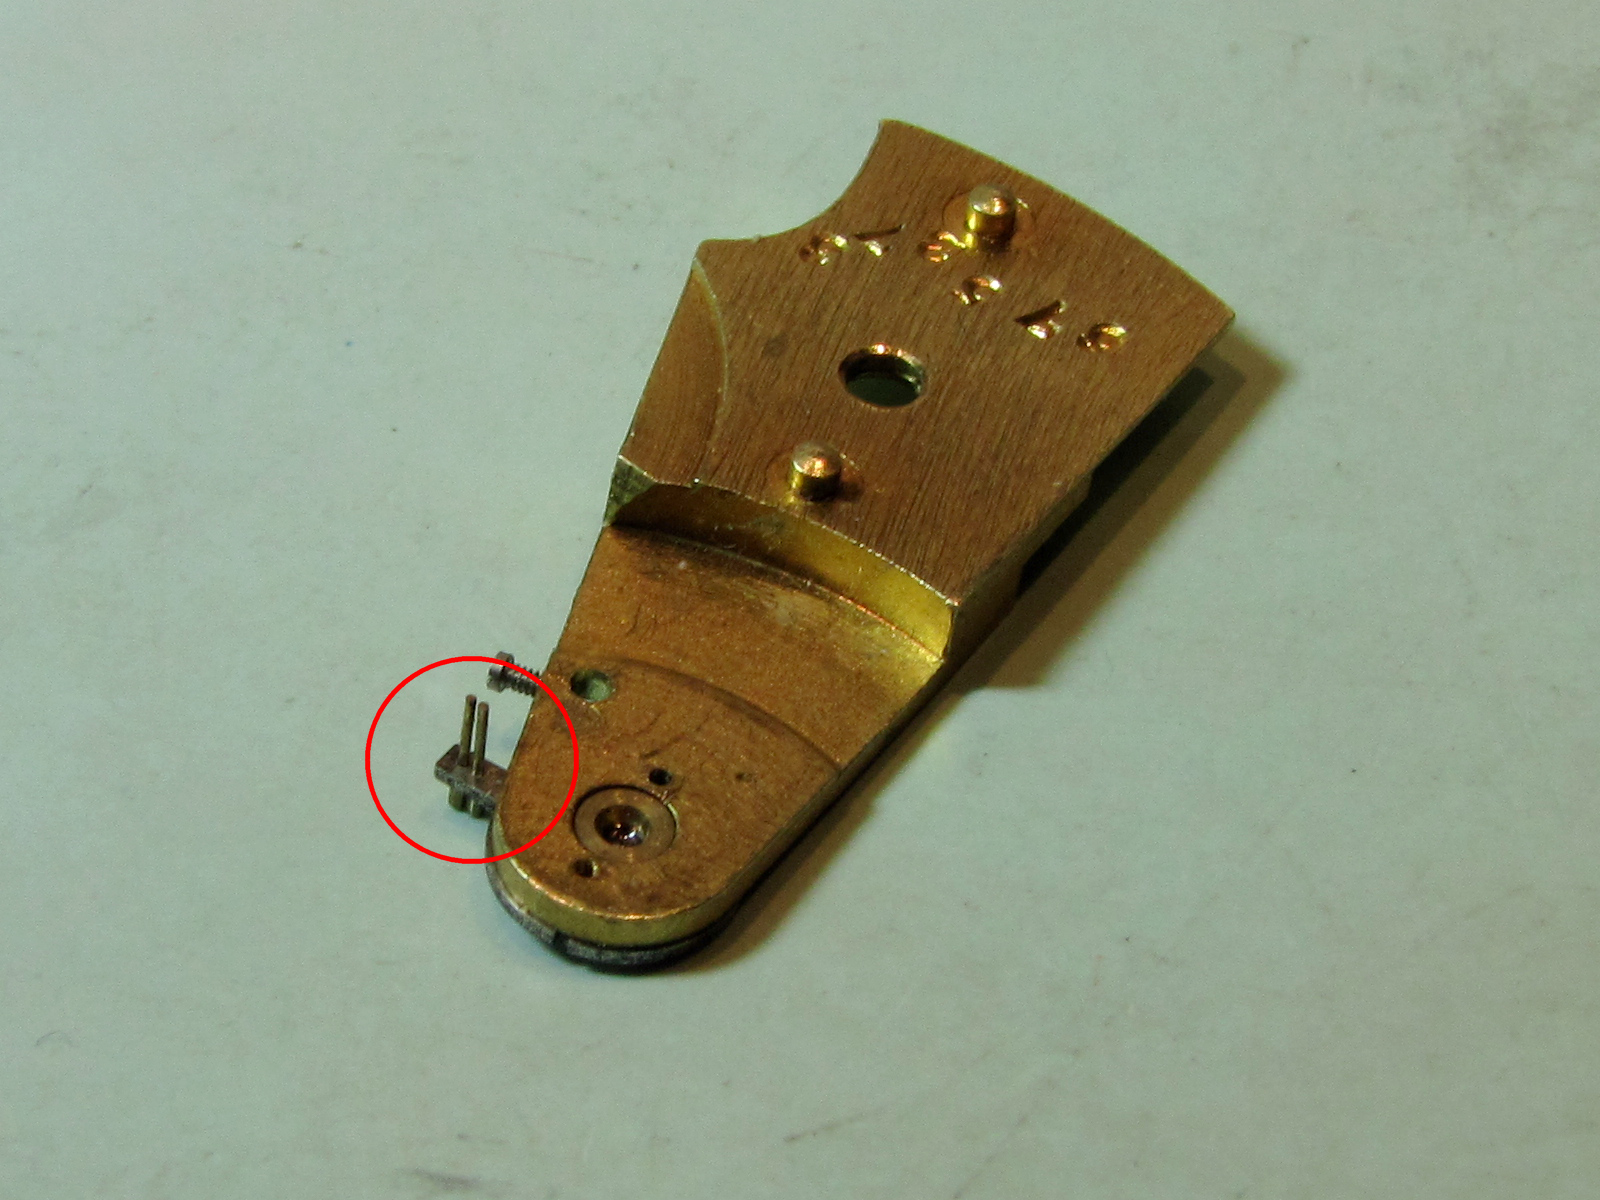
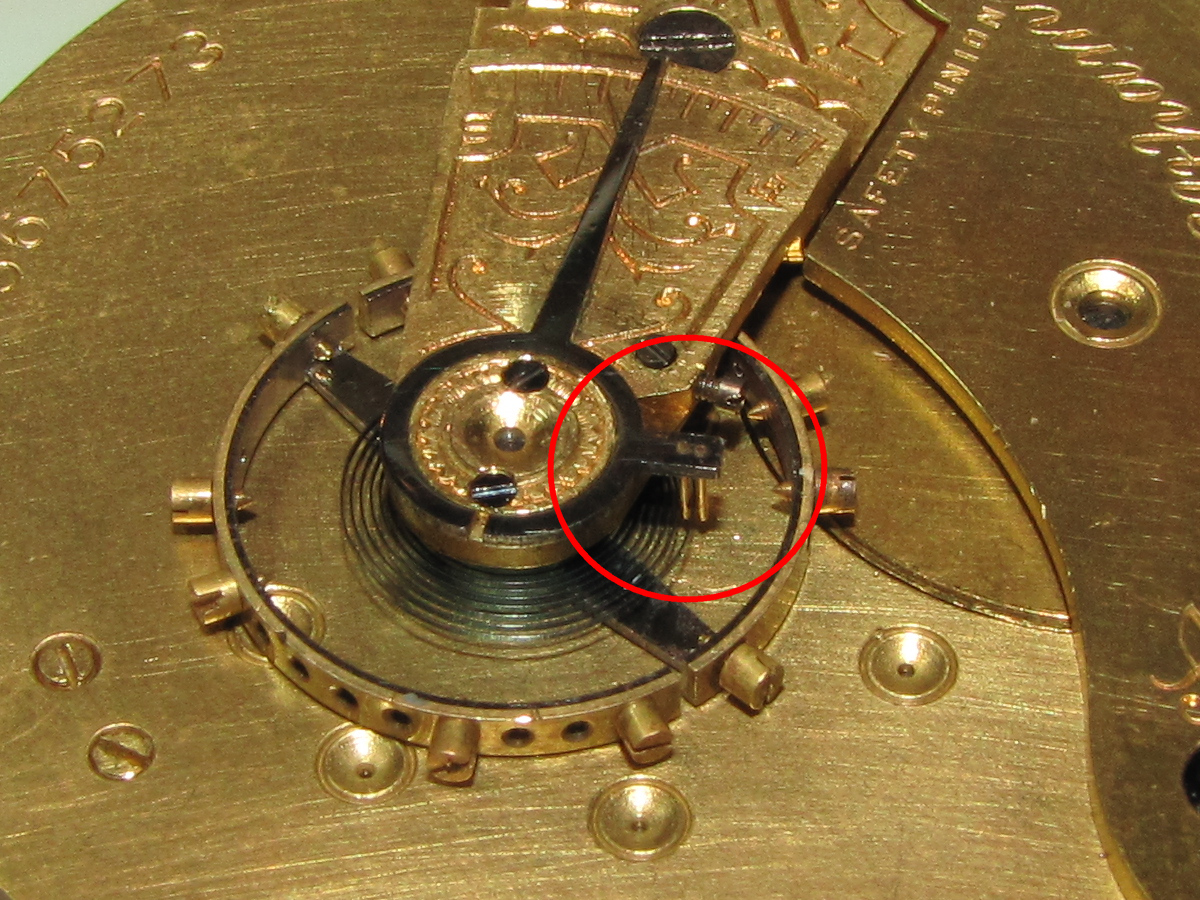
| However, there is
guard finger missing and it must be replaced, or the watch will not
function.
Image shows the remaining part of the original brass guard finger. |
|
| Here
is another bright idea.
When not being able to procure the correct mainspring, instead of the mainspring with "T" end, it seems that it was easier to modify the barrel to accept mainspring with a tongue end. One modification was not deemed enough so it was repeated on the opposite side of the barrel wall. If one fails the second one will not! |

|
| Sights,
like this one, raise a serious question about capabilities of many
watch repairers. One cannot stop wondering what would such a person do
to some really complicated movement if this is the result of what was
done to a simple one.
Also, as a tribute to a century long service which this watch has been faithfully working through, I shall document repairs of all the wear which has accumulated during the century. On the back cover of this watch there are numerous minute markings showing maintenance dates, made by watchmakers, which are witnessing all the years this watch has actually worked through. In my opinion the wear which this watch suffered, due to it's long use, is minor damage when compared to what was done to it in unskilled attempt to repair faults which are usual in a long life of a watch. |
|
|
******************************************************* |
|
| The first step prior to repairing all damage done to the watch was to thoroughly clean all of it's parts, to remove all dirt, corrosion, and all the metal particles hidden in dirt which may prove to be a problem during work. | |
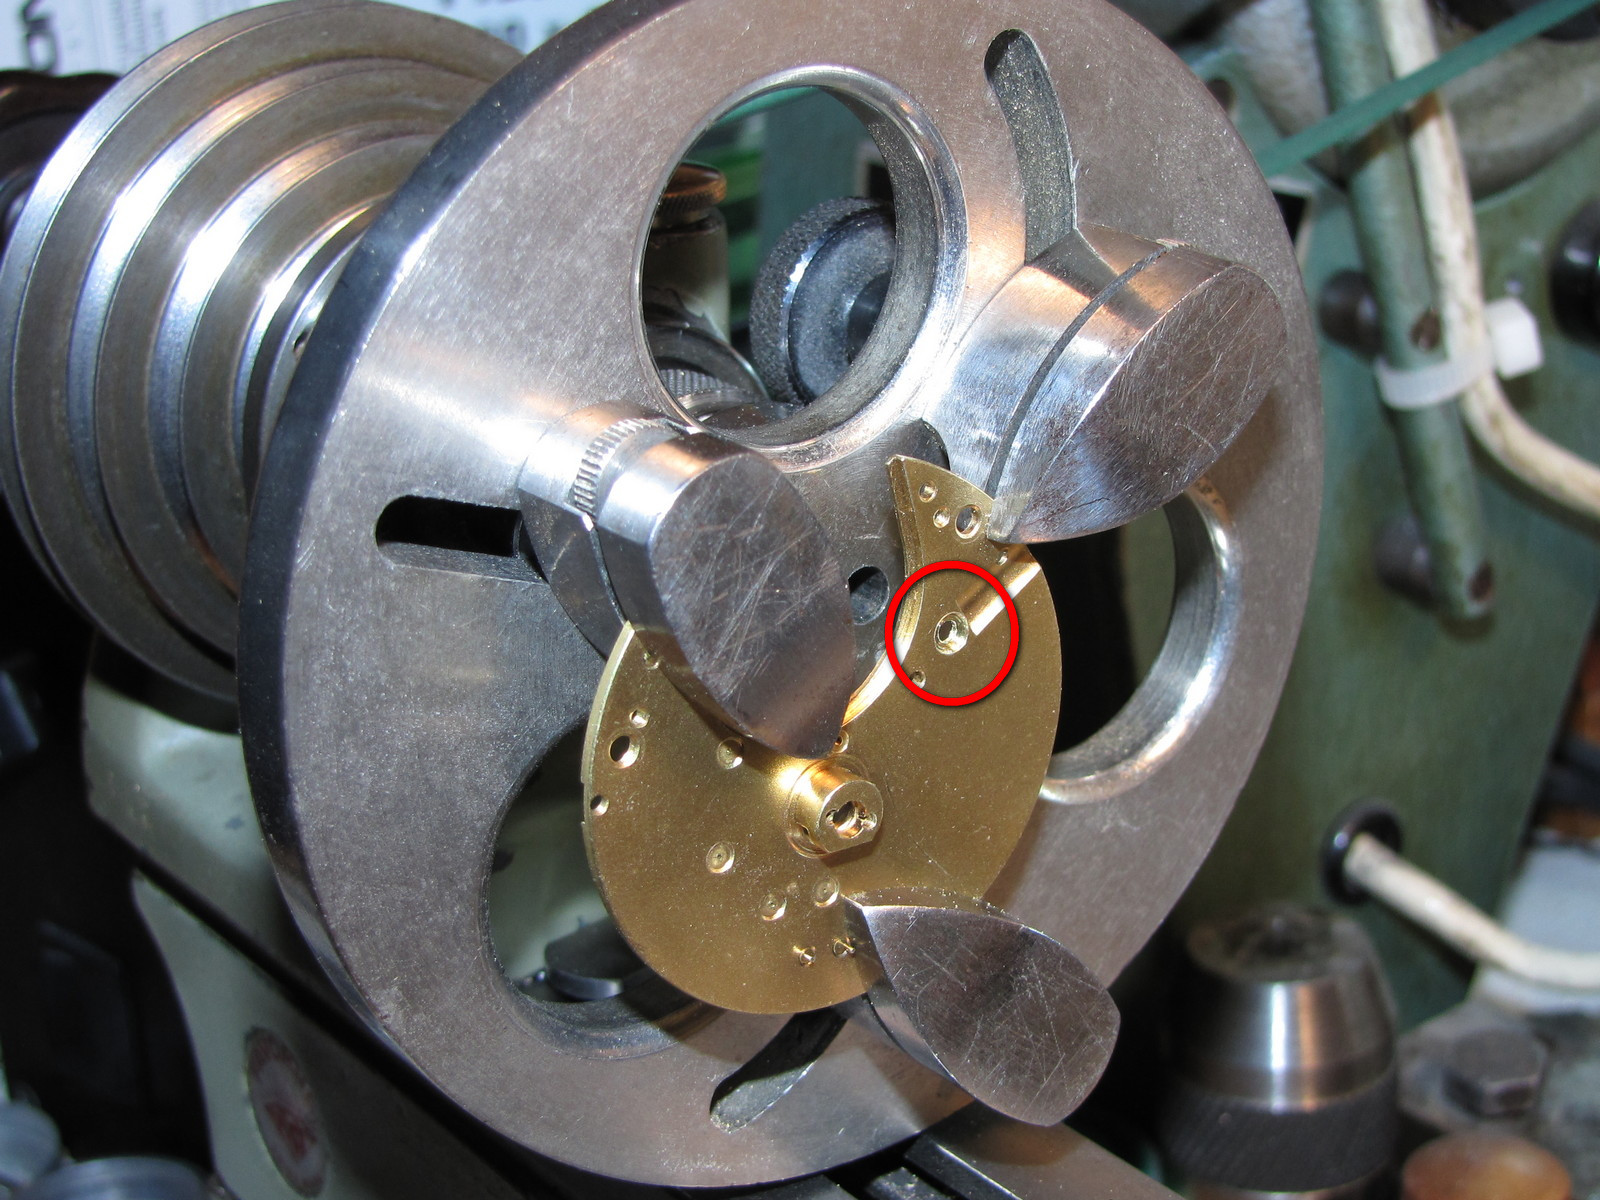
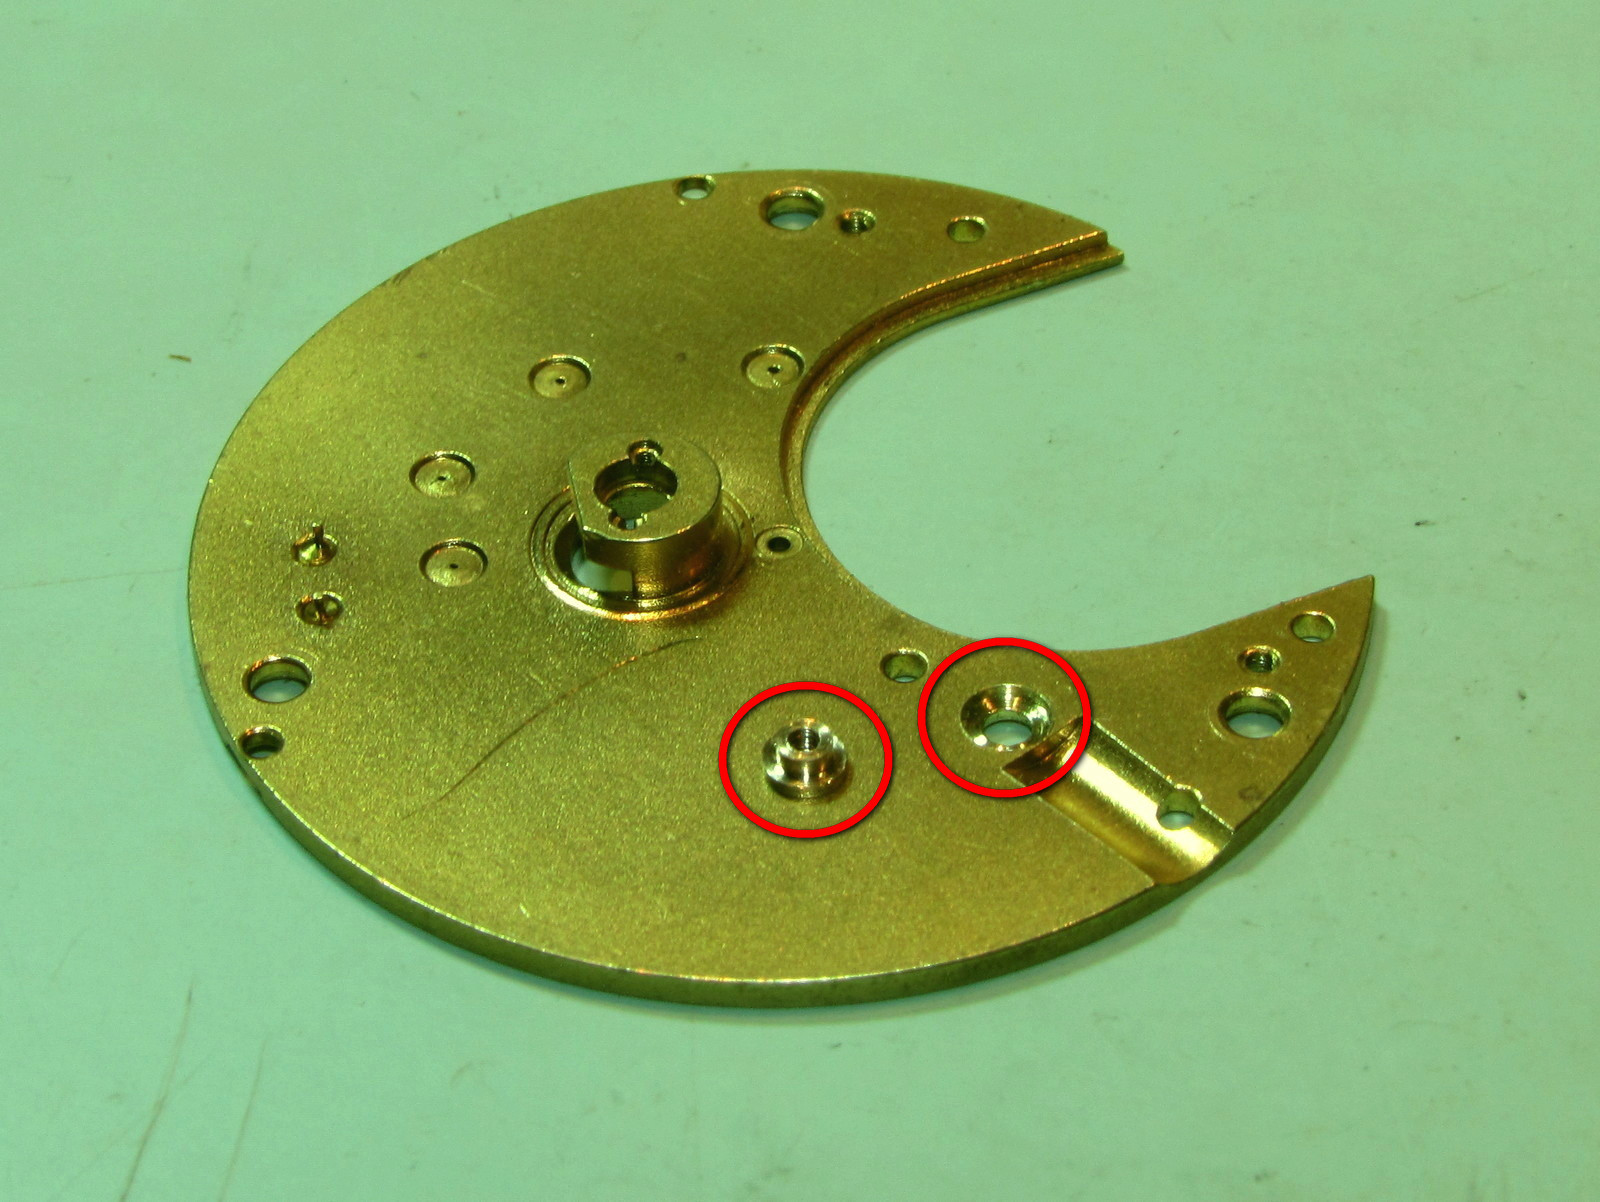
| The next step was to repair damage done to the upper plate and thus
ensure secure mounting of balance cock.
This required boring a centred two step hole in the upper plate using faceplate. |
|
| The image on the right shows bored hole with a finished brass bushing. Bushing was made to press fit in the hole with a jewelling tool. It was drilled through and threaded according to factory specs with a tap M1.2x0.25. |
|
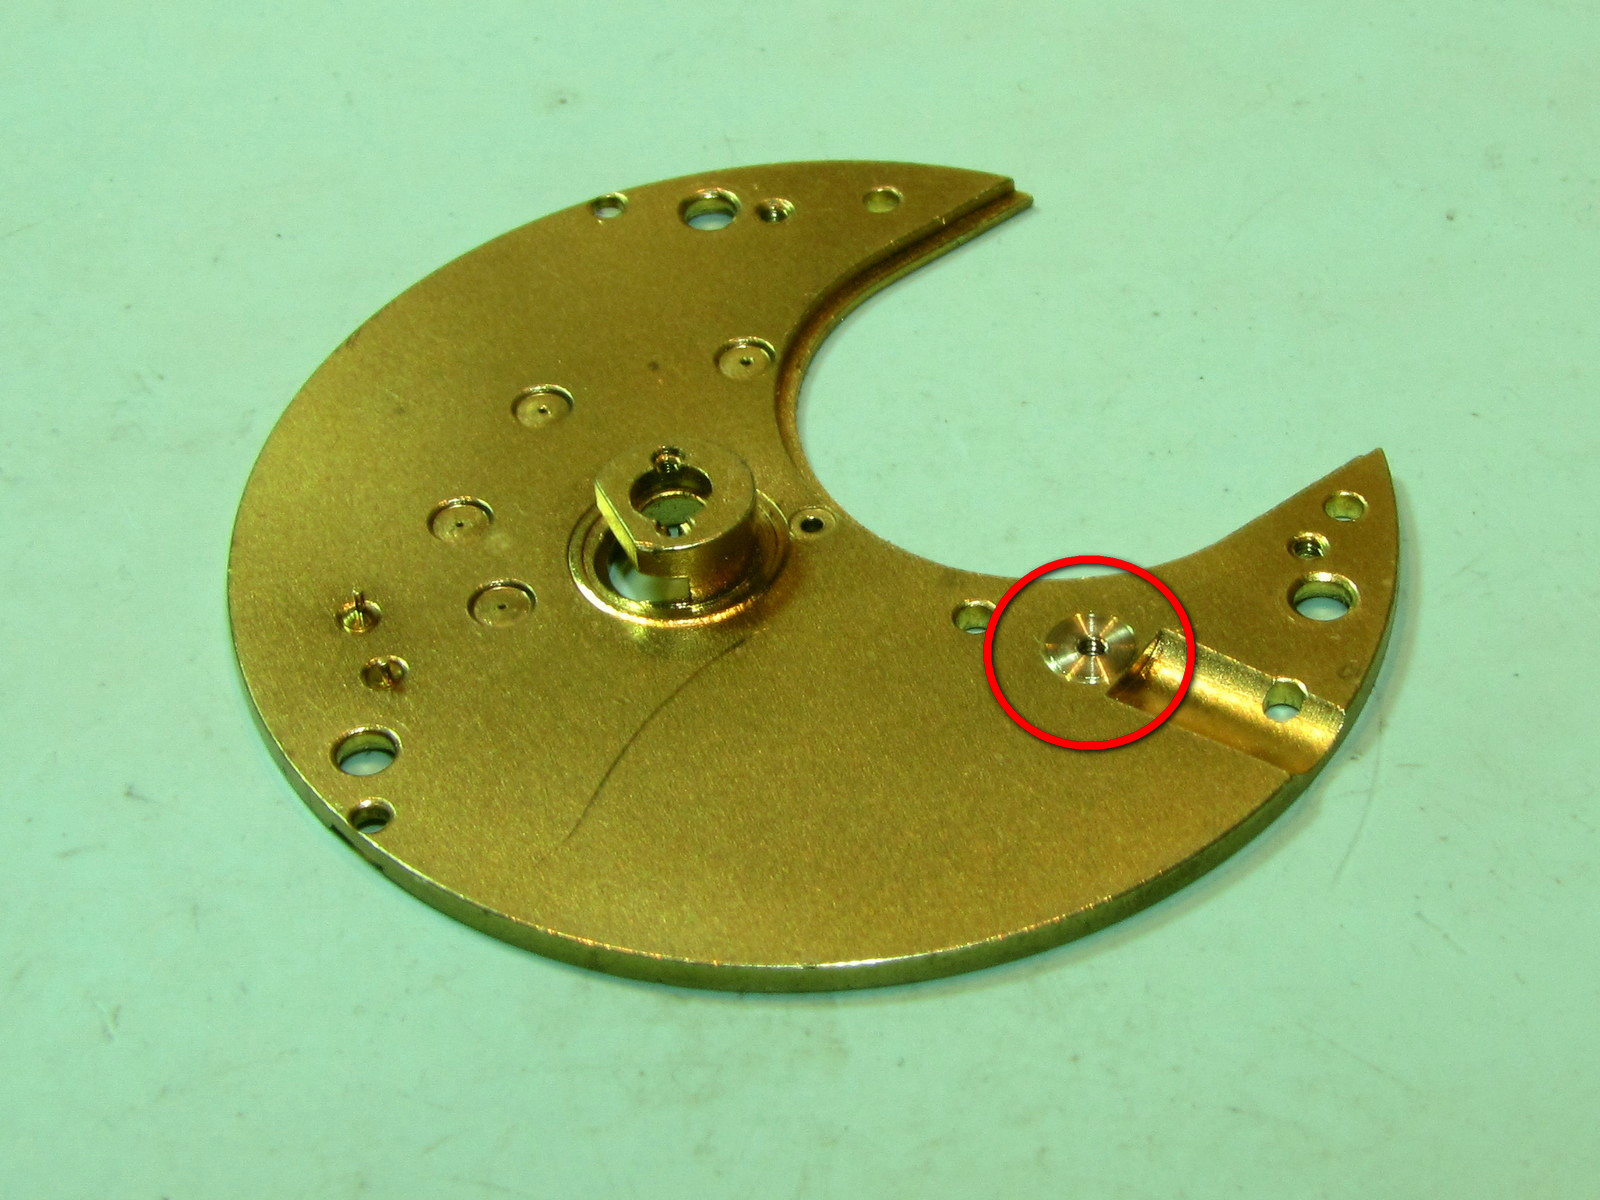
| This image shows bushing pressed into the plate intentionally reaching slightly below the plate surface as not to interfere with balance cock position. |
|
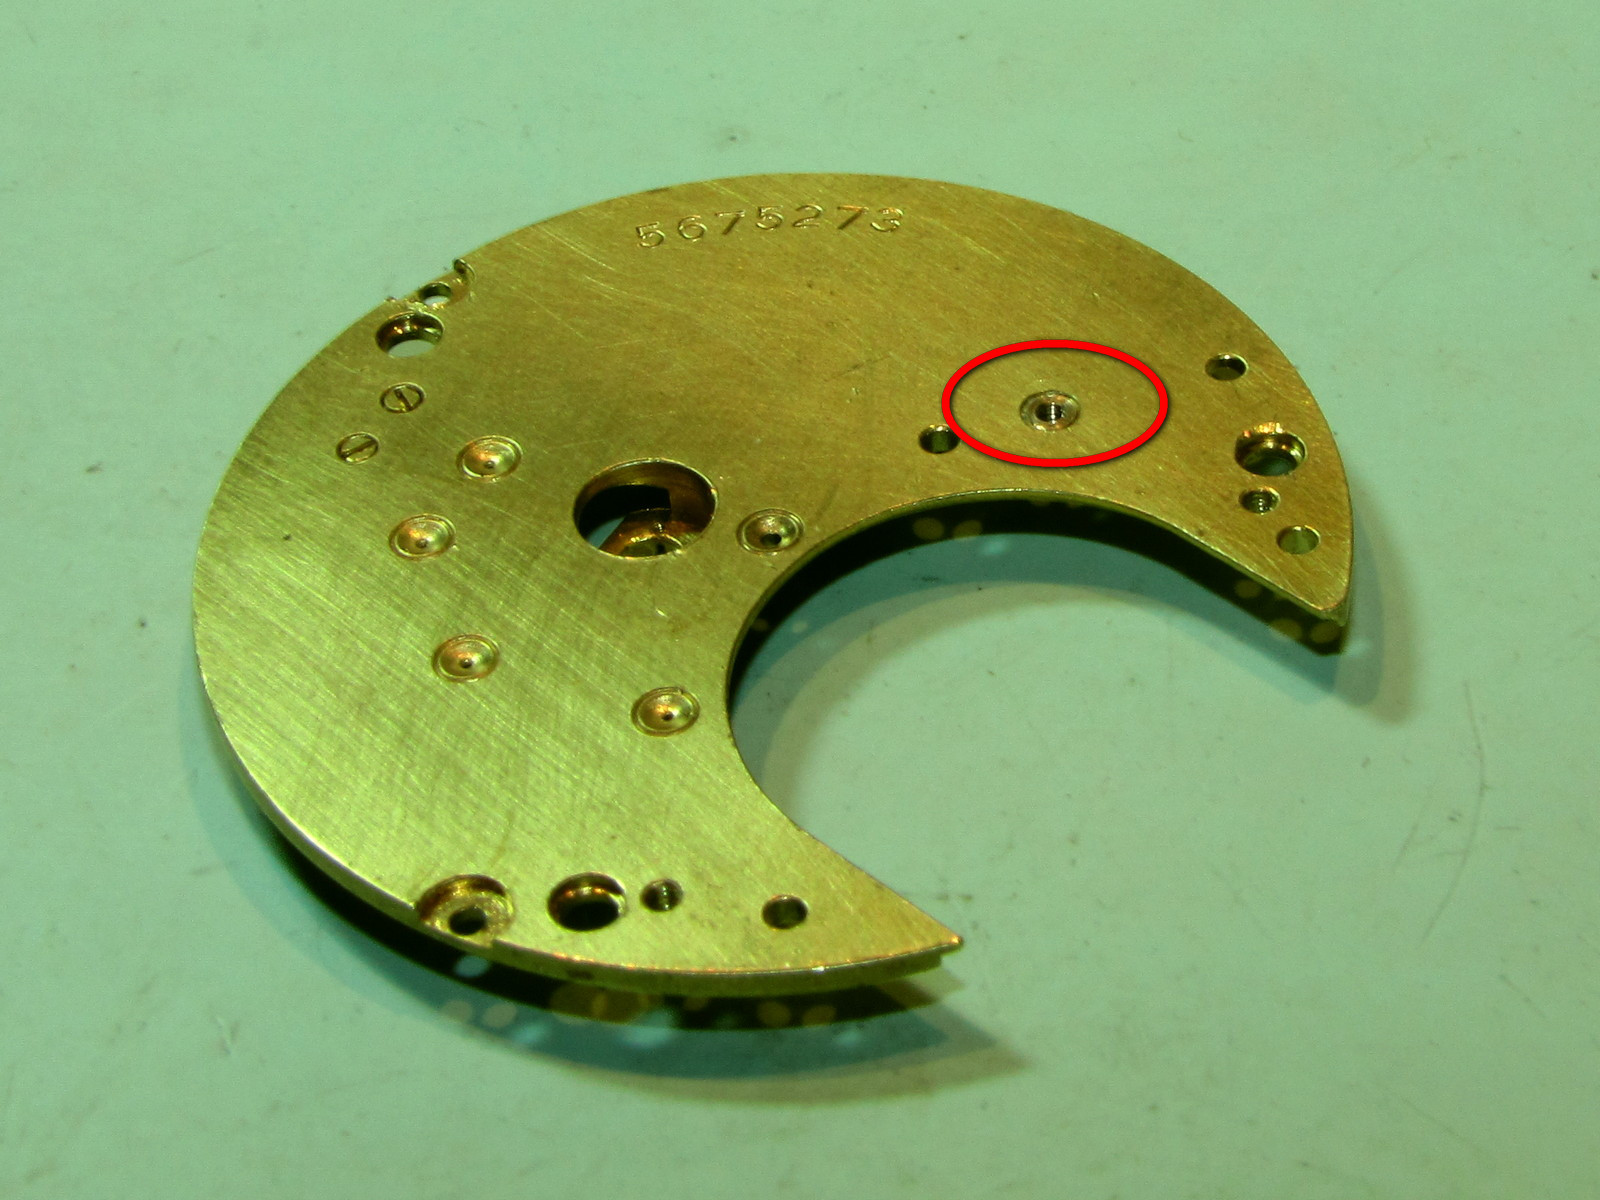
| This image shows the bottom side of the upper plate where the bushing was turned flush with the surface in lathe while held centred in faceplate. |
|
| As a
next step in restoring this watch I chose to repair the balance cock
and replace jewel settings as both jewels were broken. Using watchmaker's lathe and jewel chucks I turned new settings and burnished in new jewels with the correct size holes. The two jewel settings are differing in height, in order to provide the correct positioning of balance in relation to pallet fork and to provide clearance between balance wheel to balance cock, and between balance wheel and upper plate. |

|
| A close up of a jewel setting showing the burnished side. |

|
| I was just plain lucky as I happen to have assortment of unmounted pocket watch jewels of the same type and colour as are the rest of the jewels in this watch. |

|
| Next,
I corrected the nasty bend of the balance cock. It took a while to
accomplish it taking great care not to brake it, while correcting the
bend. Then, I mounted balance cock on to the upper plate together with jewel settings, end stones as well as balance staff and tested for balance staff end shake, ensuring that now all is as it should be. |

|
| Close-up
image of the balance cock showing barely but still visible trace of a nasty bend. I have removed the bend but the traces of it still remain. Examination under the microscope, at very high magnification, did not reveal any cracks in brass which might have occurred when the cock was originally bent. |
|
| *********************************************** | |
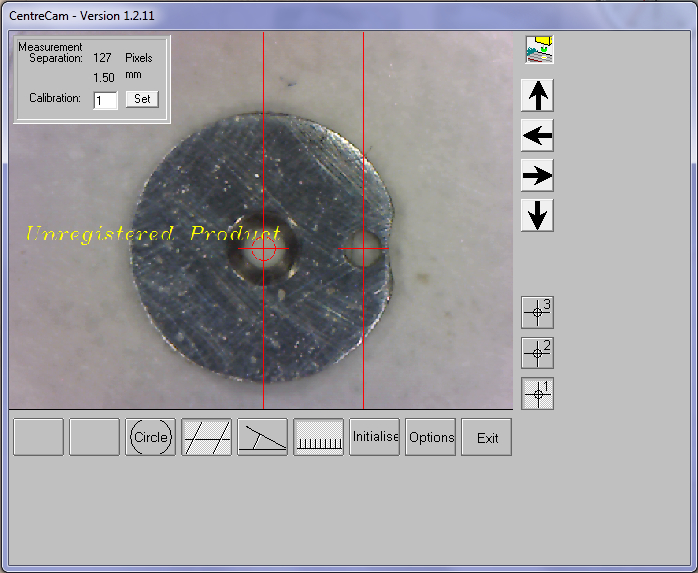
| The
next step was to establish whether the single roller is genuine part
of this watch, because the balance and balance staff certainly were
not. Single roller is small, so in order to measure it I used digital microscope. It was necessary to compare the sizes of roller with it's place in the movement, as well as to determine the size of the impulse jewel which is missing. By measuring the width of the fork I have thus established size of the impulse jewel arriving at 52/100 mm while diameter of fork guard pin is 30/100 mm. Here are the results in the form of a few images, making it possible for everyone to see how the process went. |
|
| Measuring
roller gave us the following results: -distance of the roller centre to the centre of the impulse jewel 150/100 mm |
|
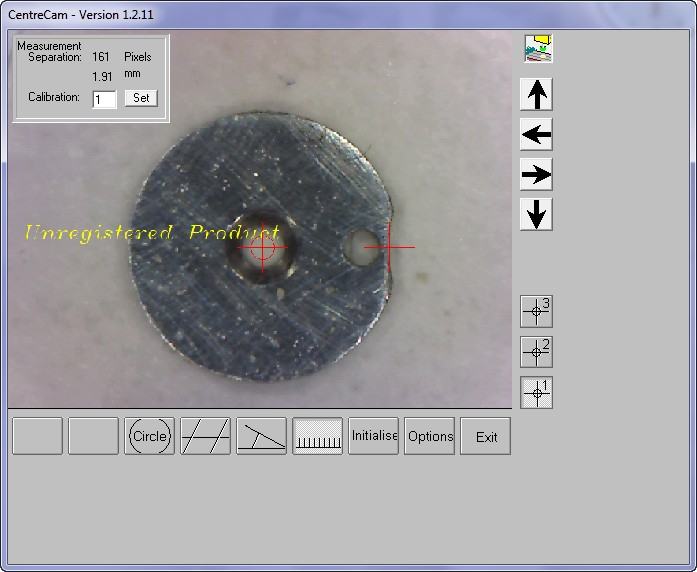
| -distance
from the roller centre to the centre of the guard pin 205/100
mm, ie half of the guard pin radius 15/100 mm 190 + 15 = 205 |
|
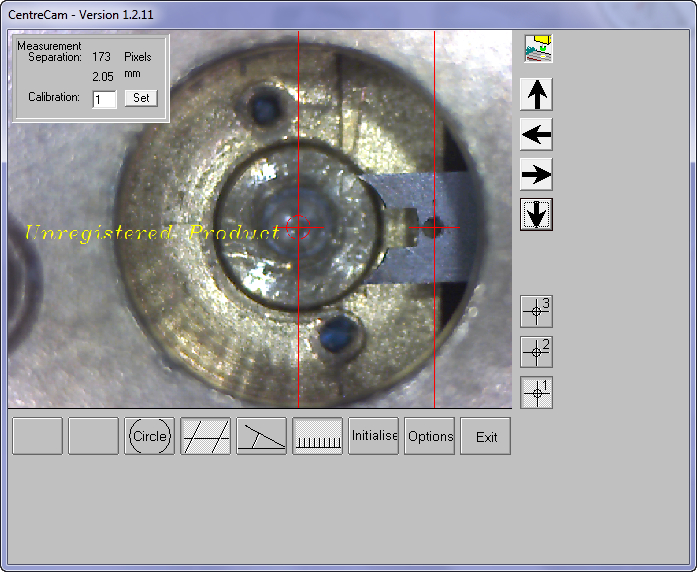
| Then,
using these two images we now have a critical distances, one is a
distance of one centre of the staff to the roller jewel centre and the
second is from staff centre to the centre of the fork guard pin. Now we must measure the same on the movement with a pallet fork mounted in, of course without the balance or the balance cock. |
|
| Measurement
of the movement gave us the following results: -distance of the staff centre to the centre of the impulse jewel 150/100 mm |

|
| -distance from the staff centre to the centre of the guard pin 205/100 mm |
|
| Measuring
the centre hole in the roller, the 60/100 mm and confirming as
matching to the balance staff when compared. Now comparing the other measured sizes of the roller to the movement shows quite clearly how this roller is part of this watch. |
|
| ******************************************* | |
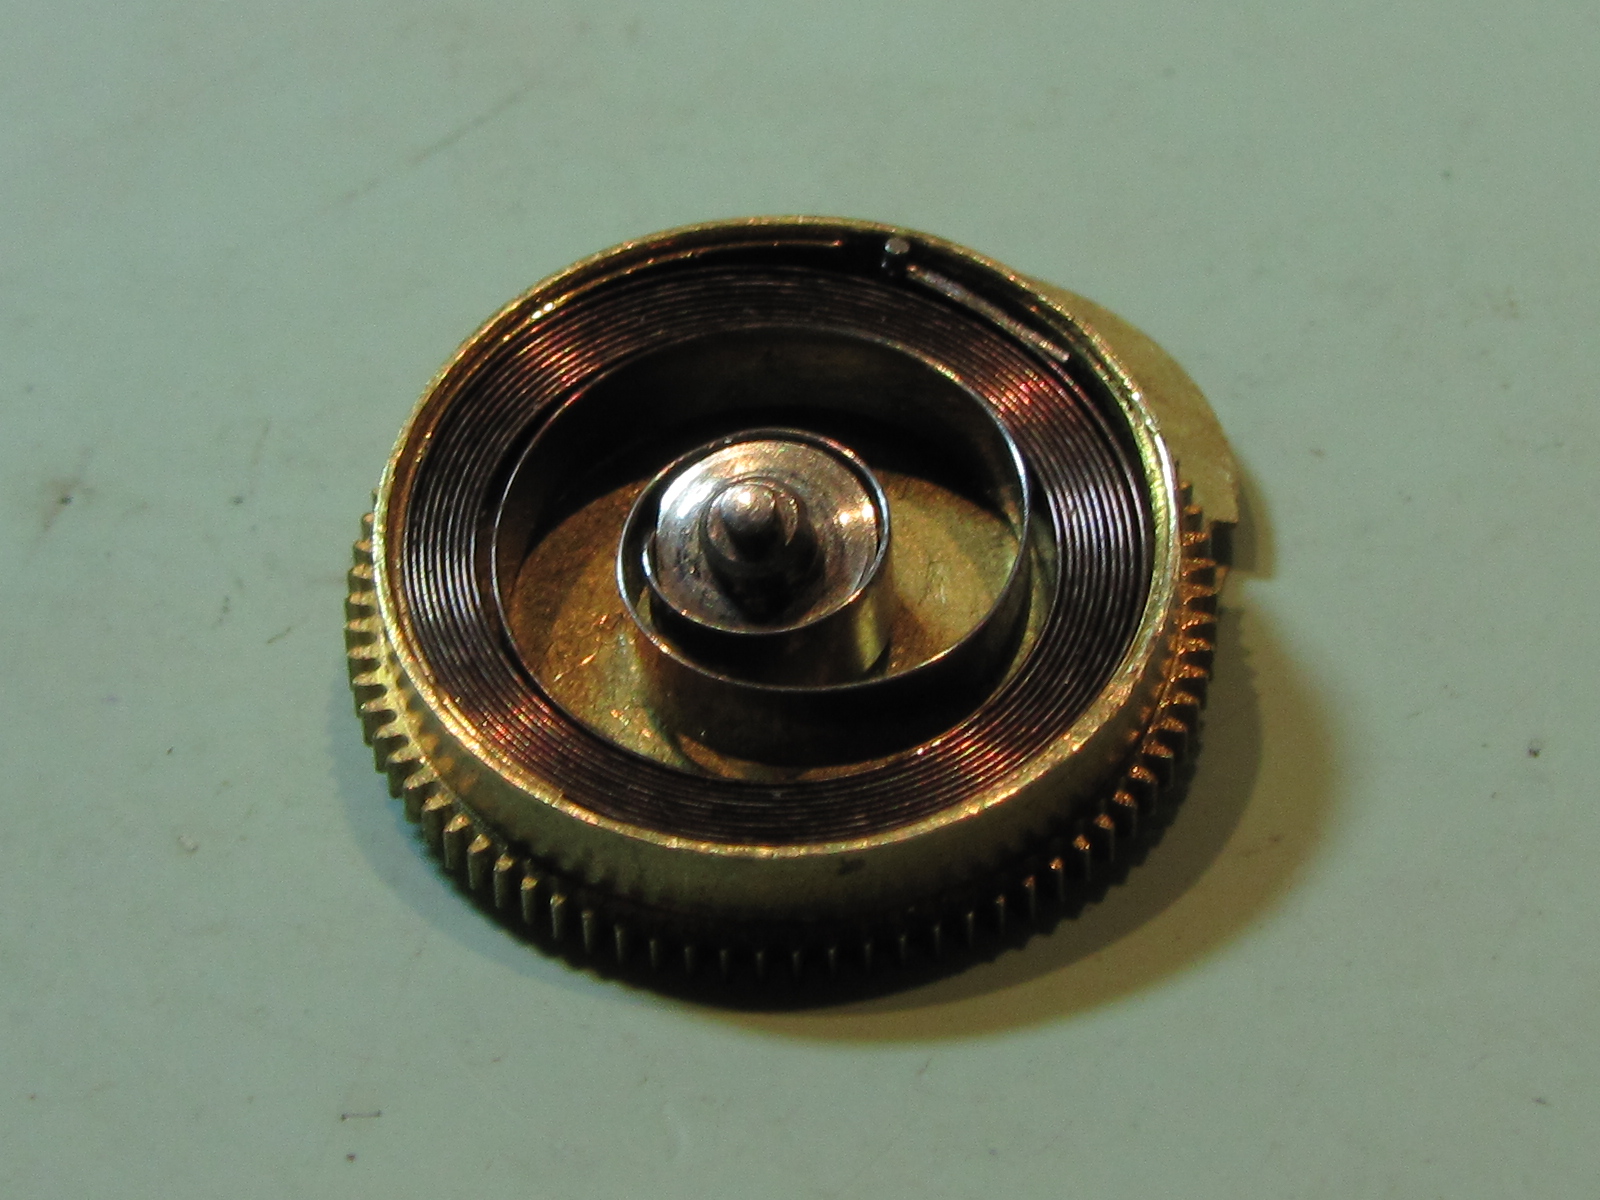
| My
next step is repairing the mainspring or rather replacing it with the
correct one. Waltham Materials Catalogue describes mainspring for
model 1883 as 2.90 to 3.00 mm wide, strength 0.21 to 0.225 mm and 525
mm (21") long. The mainspring barrel was modified to accept
tongue end mainspring while mainspring inside the barrel was only 2.40
mm wide. Checking my mainspring stock revealed that I do have mainspring of the correct dimensions, however it is with the tongue end. Another check of stock revealed that I do not have the correct size t ends either. |
|
| Another check of stock revealed that I do not have the correct size "T" ends either. |
|
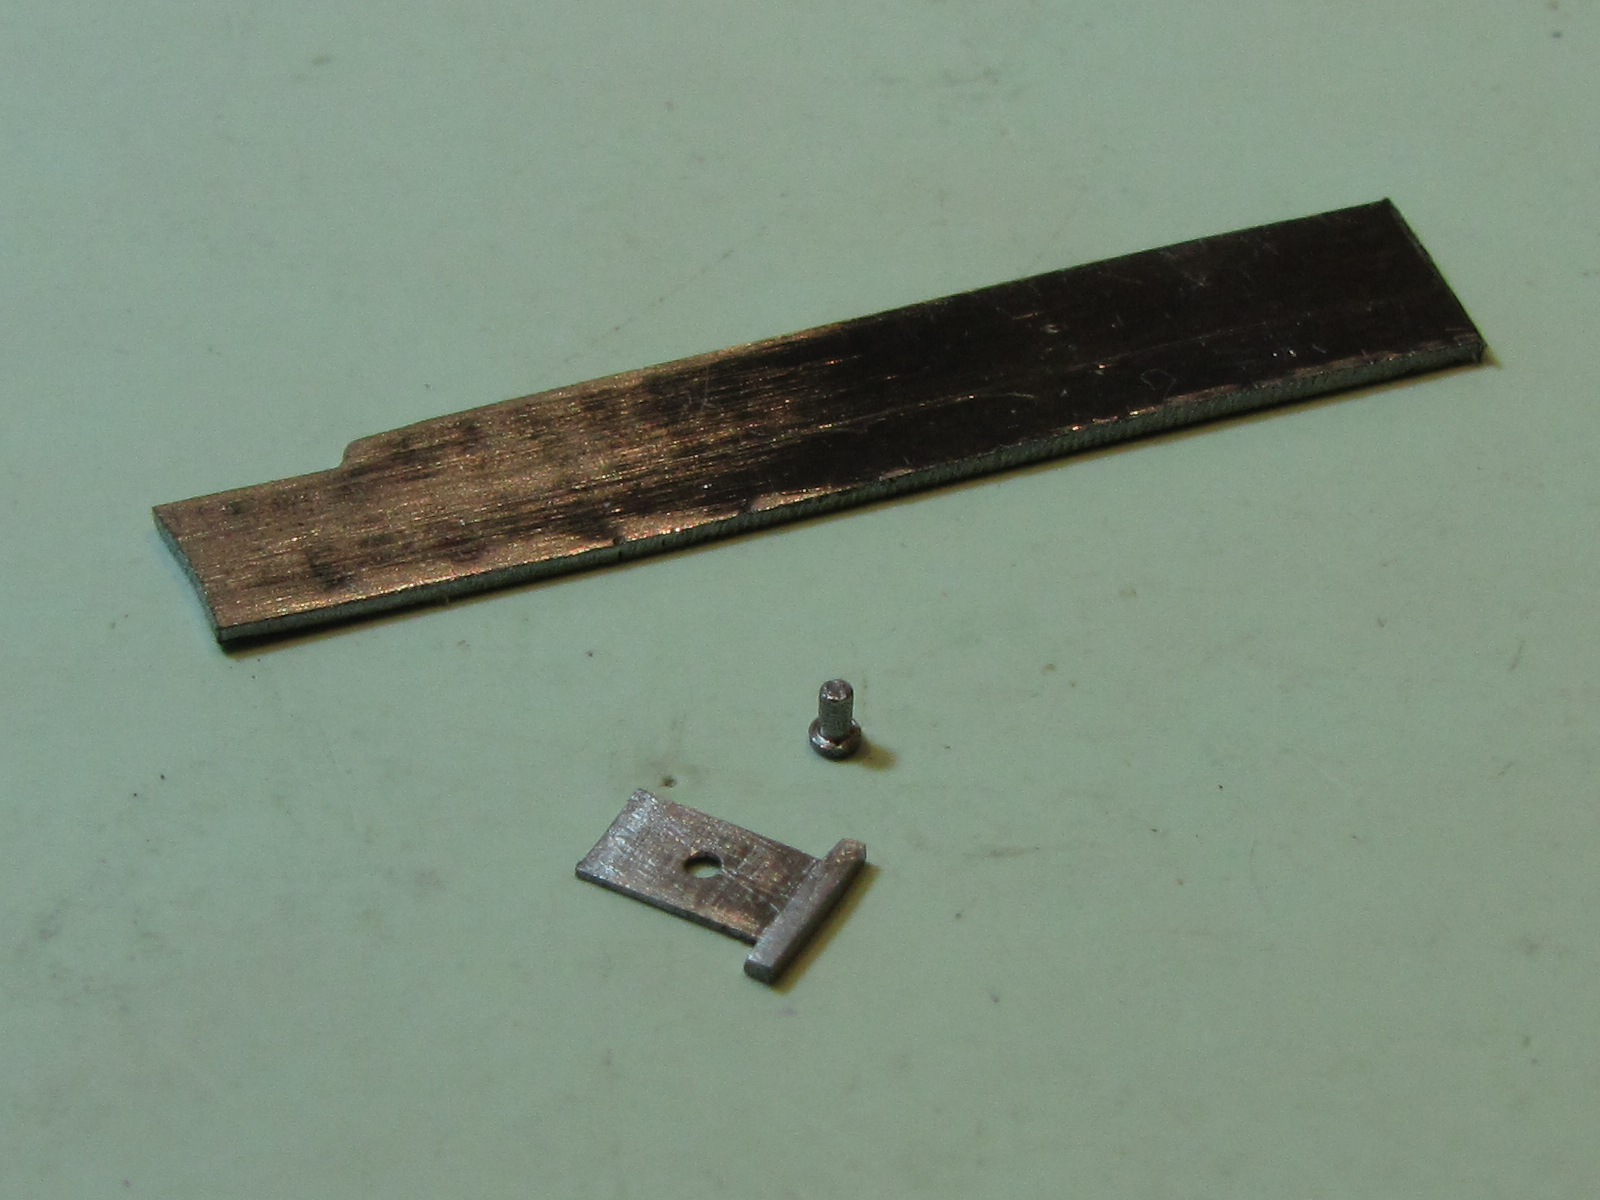
| This
led me to a decision of making the required "T" end as well
as a suitable mild steel rivet which I can then use to modify
mainspring which I have in stock. I found a flat piece of unhardened steel 0.6 mm thick and started filing it to the correct size. Barrel height is 4.0 mm and determines the width of "T" I filed the piece to size and then reduced its thickness to half. |

|
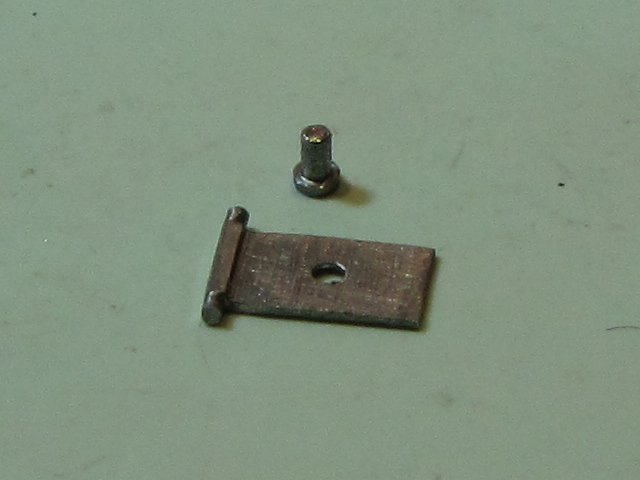
| The next step was to punch a hole in it and then in lathe turn a rivet which I will later on use to rivet mainspring and "T" end together. |

|
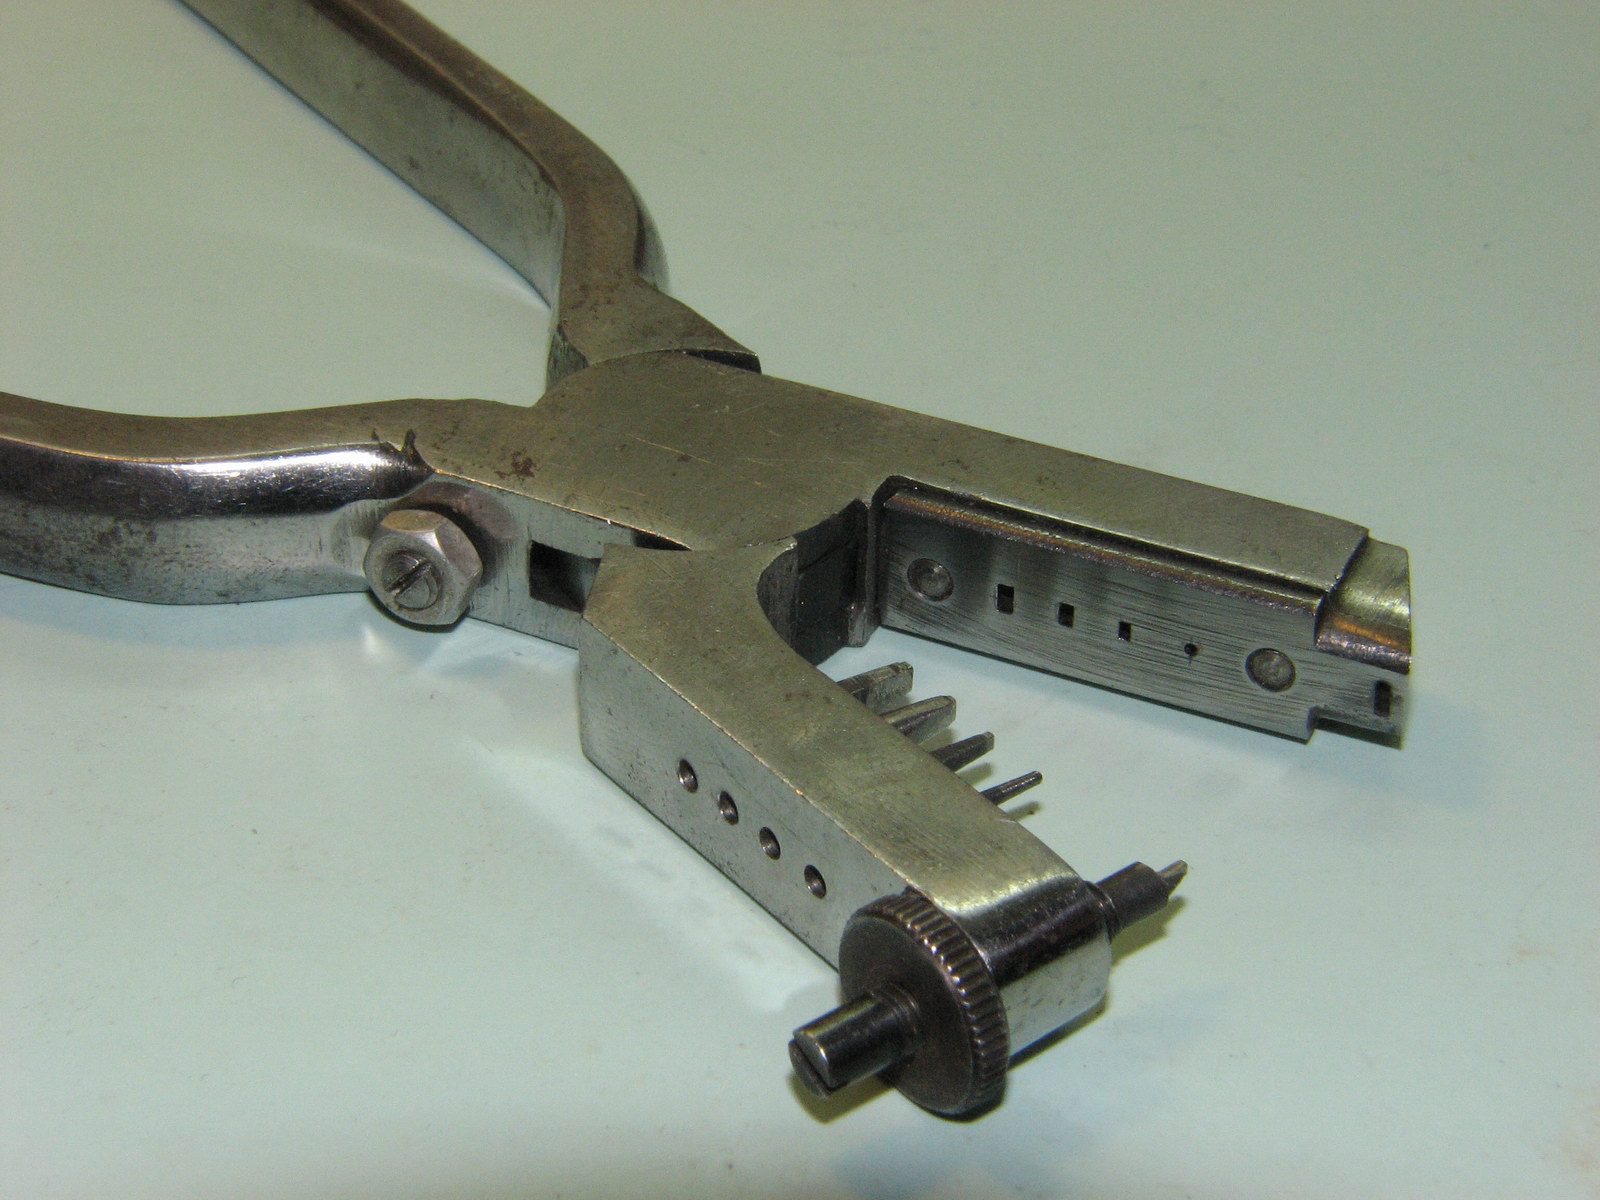
| To punch the hole through the steel I have used my old and trusted Favorite punching pliers, which were designed for just such a purpose. |
|
| I parted off the almost finished "T" from the rest of the sheet which I used previously to hold it while filing it to shape. |
|
| To finish the "T" end I rounded it's pivots so it will fit the holes in the barrel and barrel cover. |
|
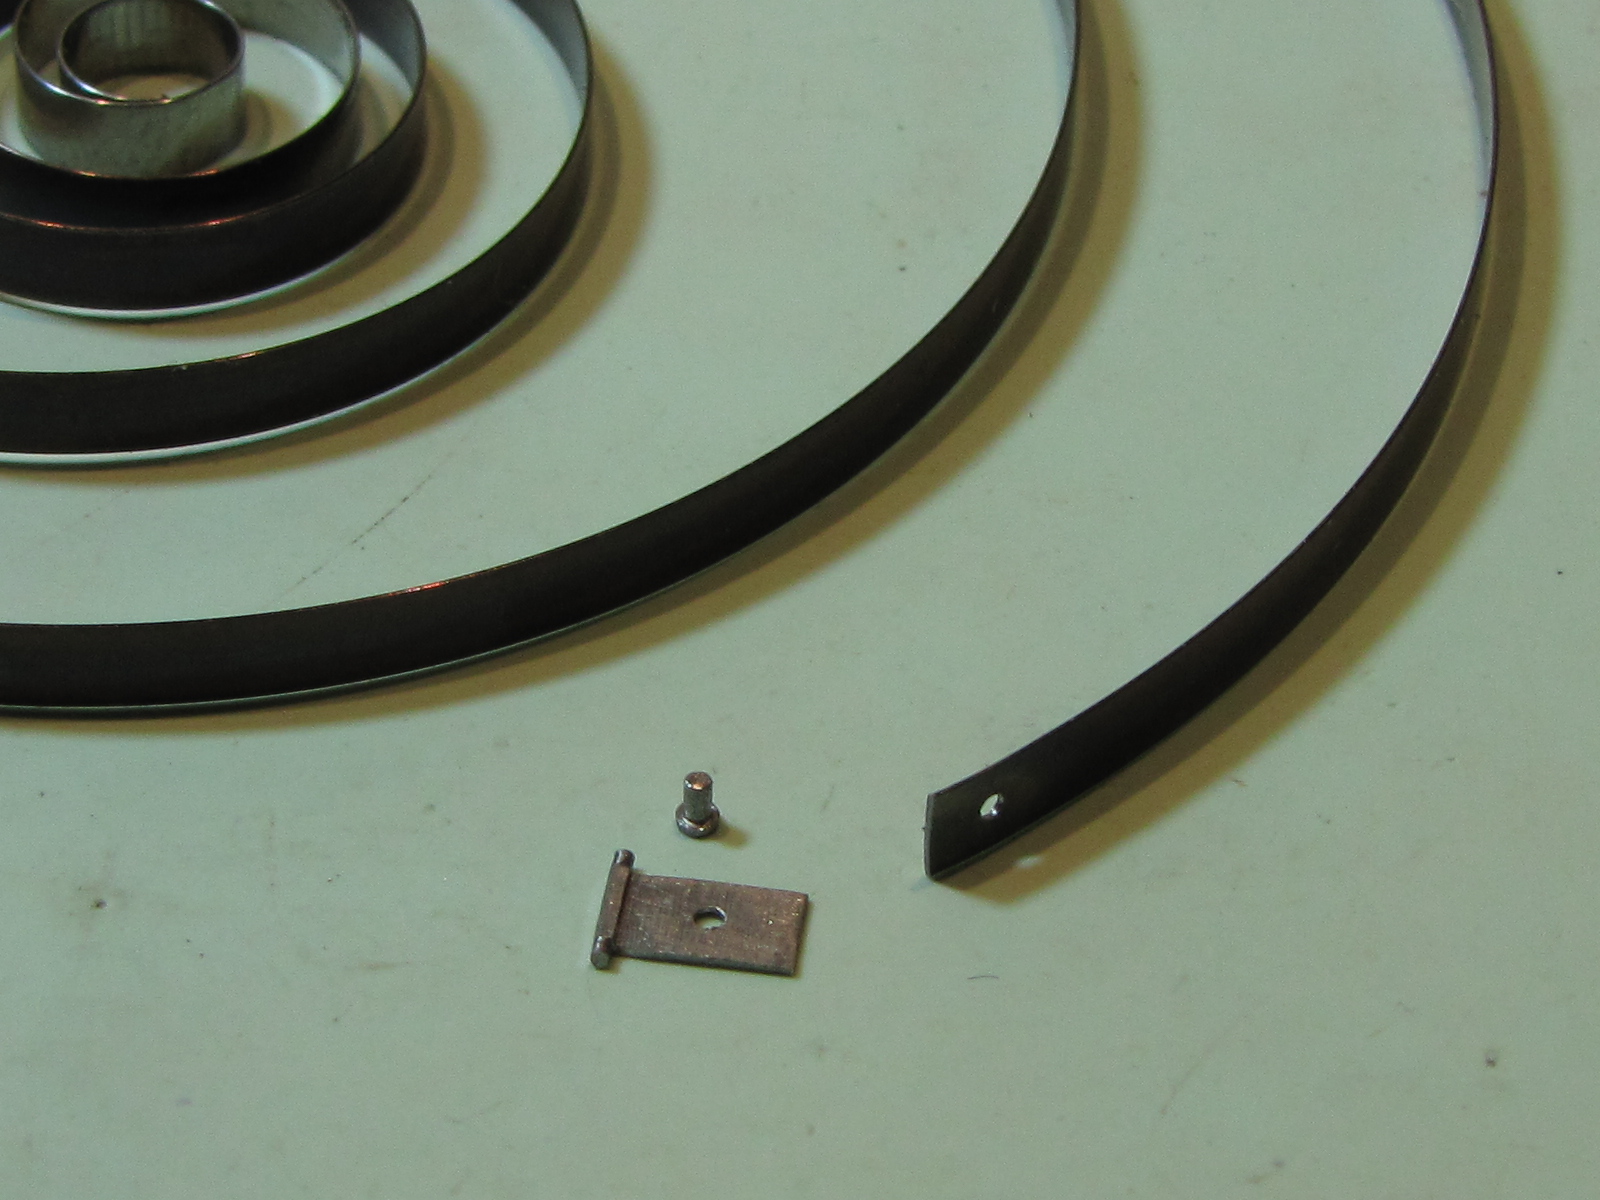
| The next step was to prepare the mainspring end to receive the "T" end. |
|
| After riveting the "T" end to the mainspring I filed off the excess part of the rivet so that it will not affect the mainspring. |

|
| The only thing left now to do was to put mainspring into the barrel using the mainspring winder. |
|
| I am
not very fond of the Bergeon products, and particularly not of
their mainspring winders. So the winder which I use for pocket watches is of classic English design and is of American make, the K&D #128. |

|
| The last step was to oil and close the barrel. Now ready to go into the movement and power the watch when fully restored. |

|
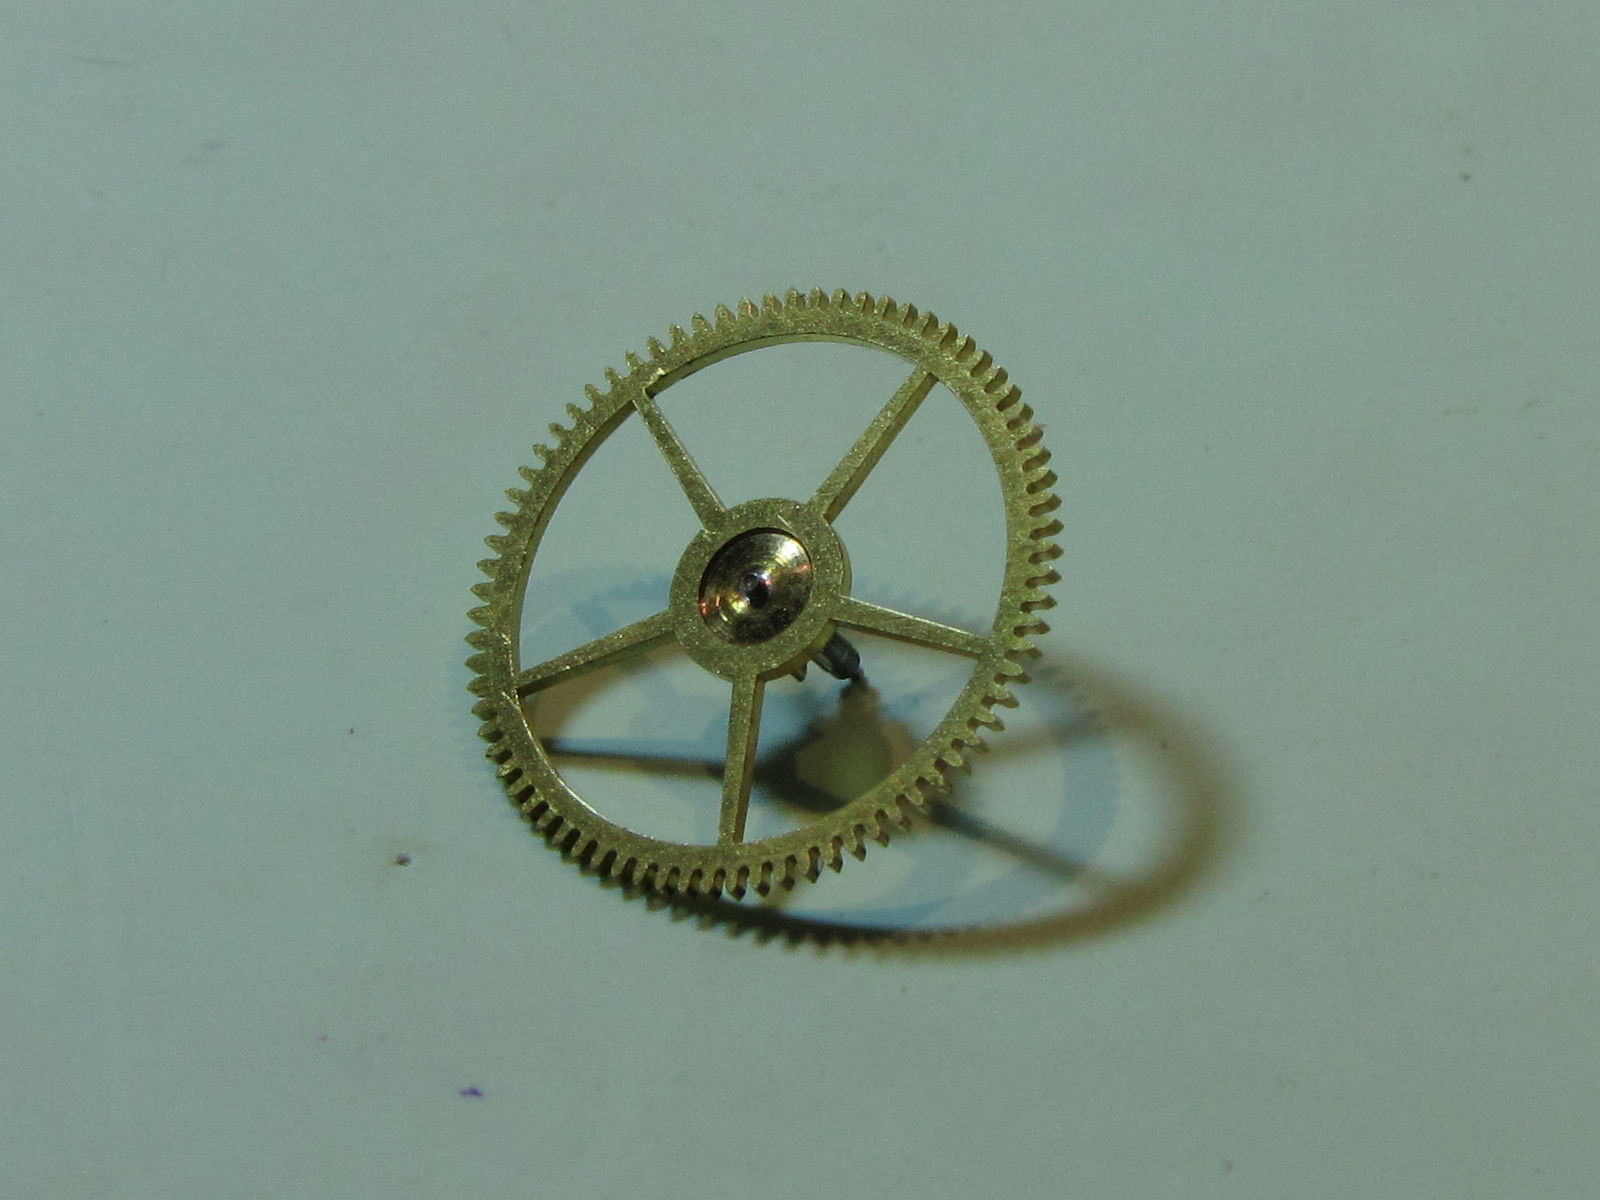
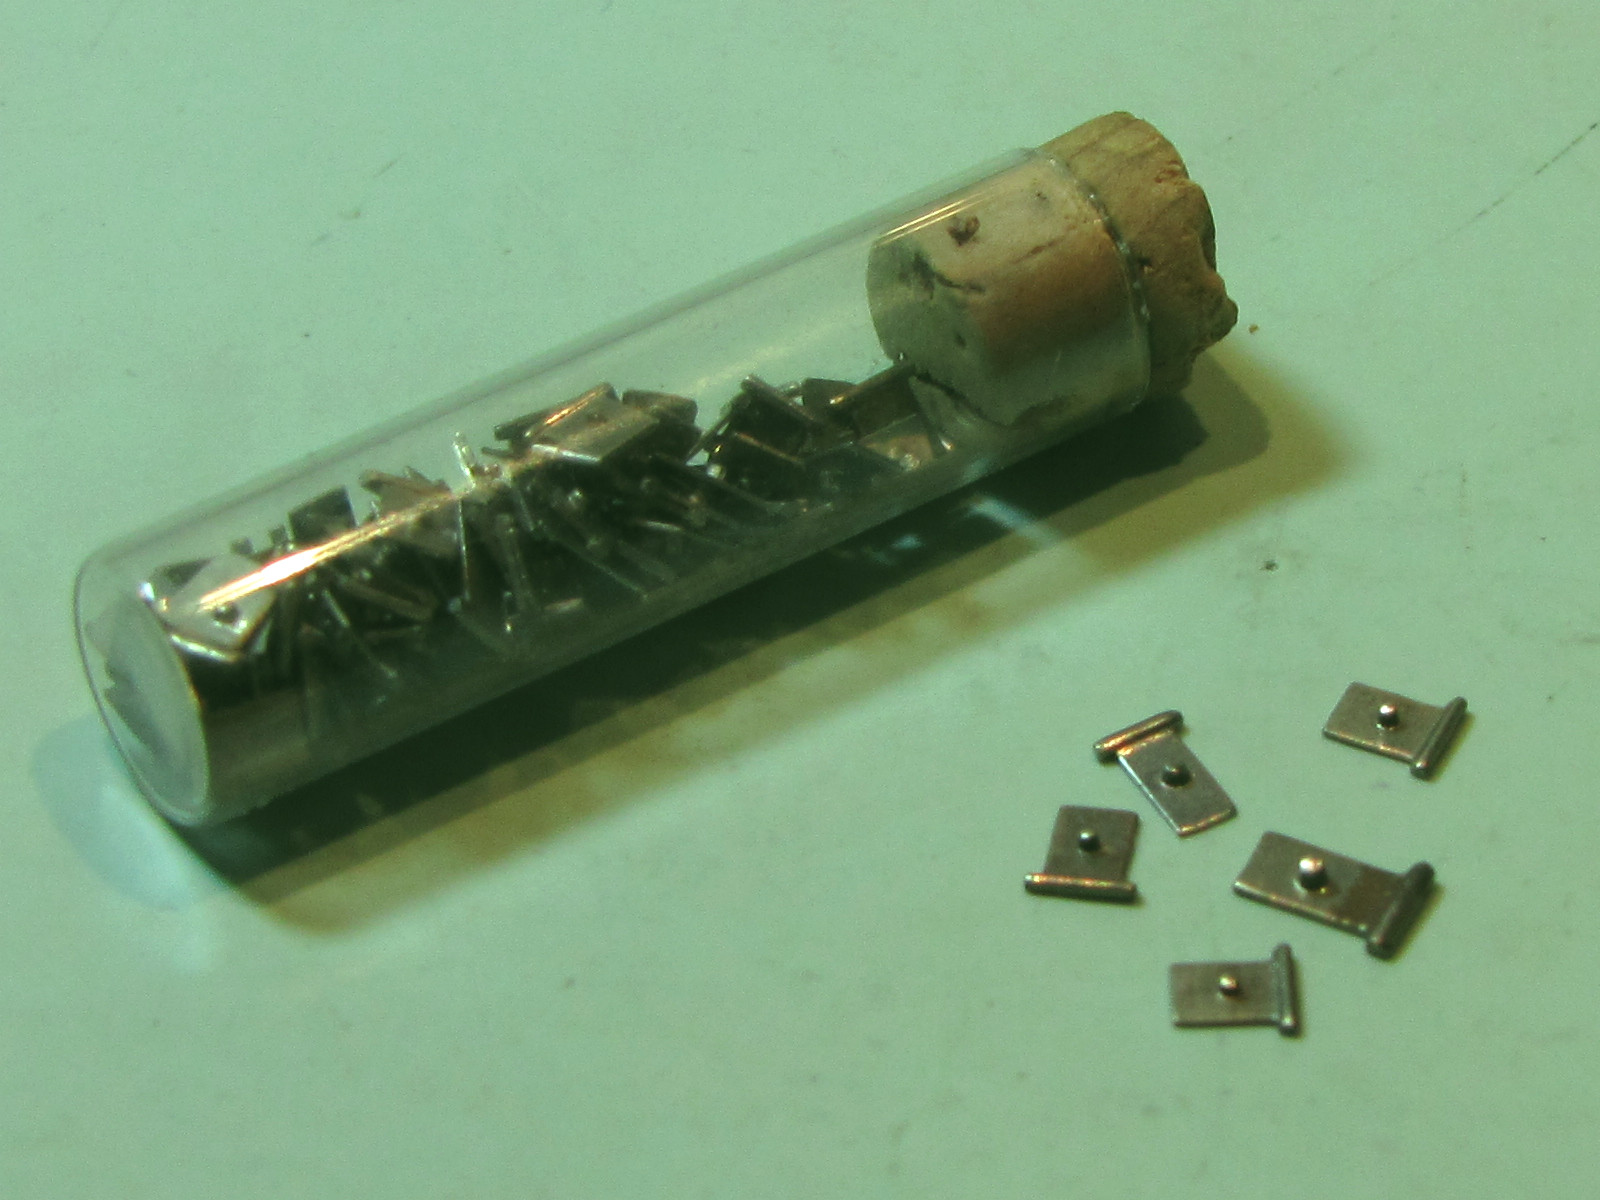
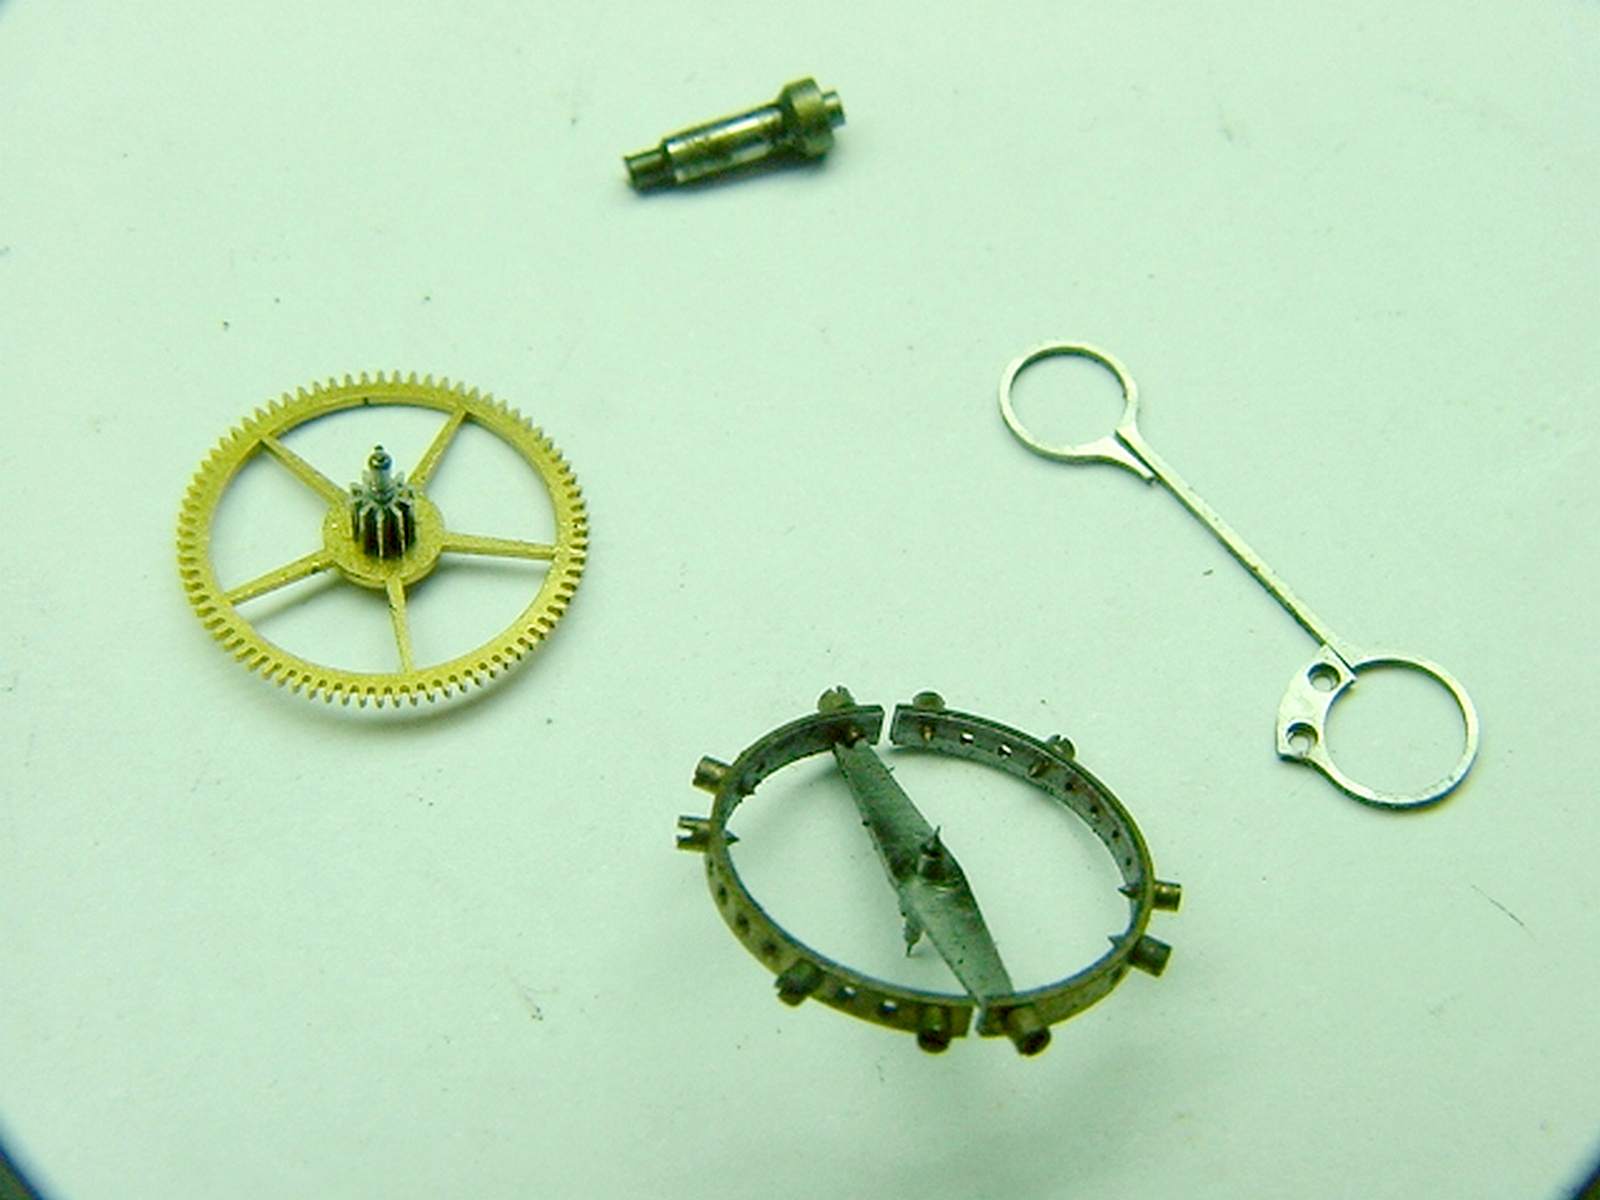
| After
receiving replacement balance wheel, which came without roller table
and without balance spring it was necessary to choose suitable balance
spring then to vibrate it so that it will oscillate in a watch
at a proper rate being 18000 half vibrations per hour. Also it
was necessary to pick a new roller jewel and set it with shellac into
the roller table. Apart from balance wheel there were few other parts which needed replacement as was shown previously. |
|
| New (old) parts which are going to be fitted into the watch replacing badly damaged ones. |
|
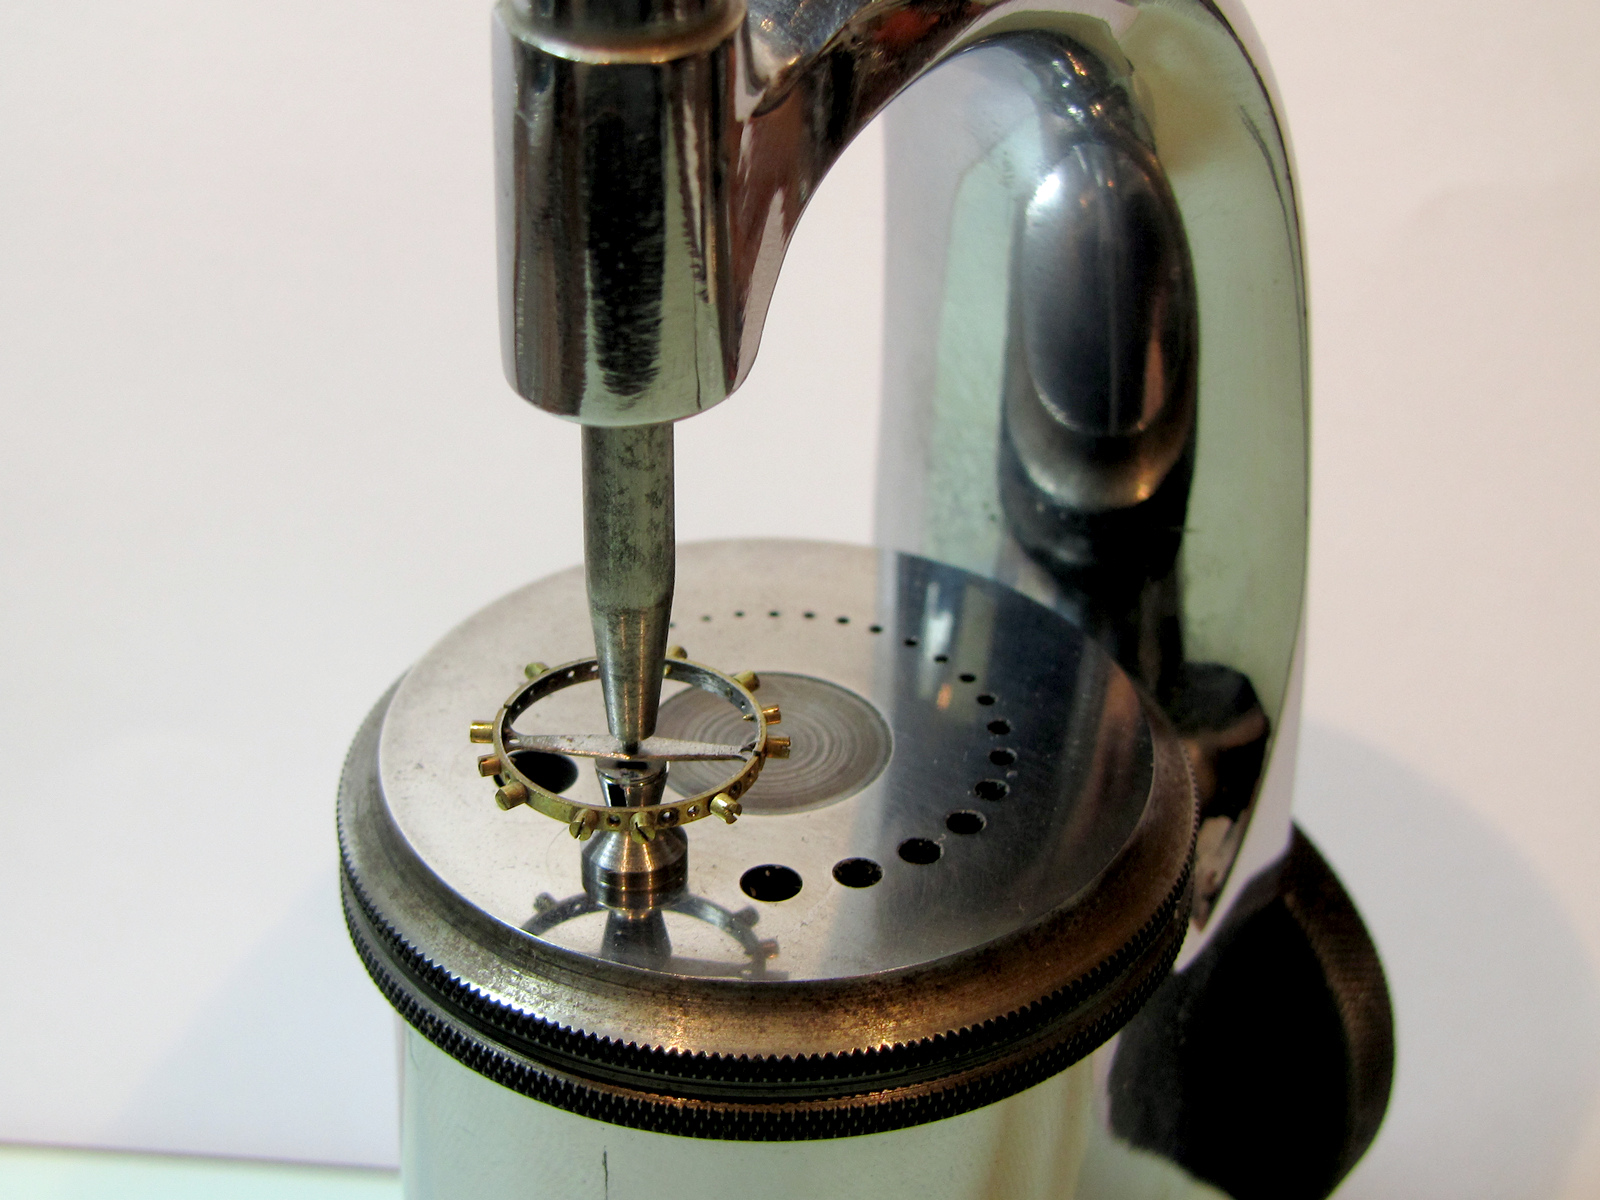
| Image to the right shows fitting of the single roller using staking tool using a special stump with a slot, which serves to protect jewel when driving roller table onto the staff. |
|
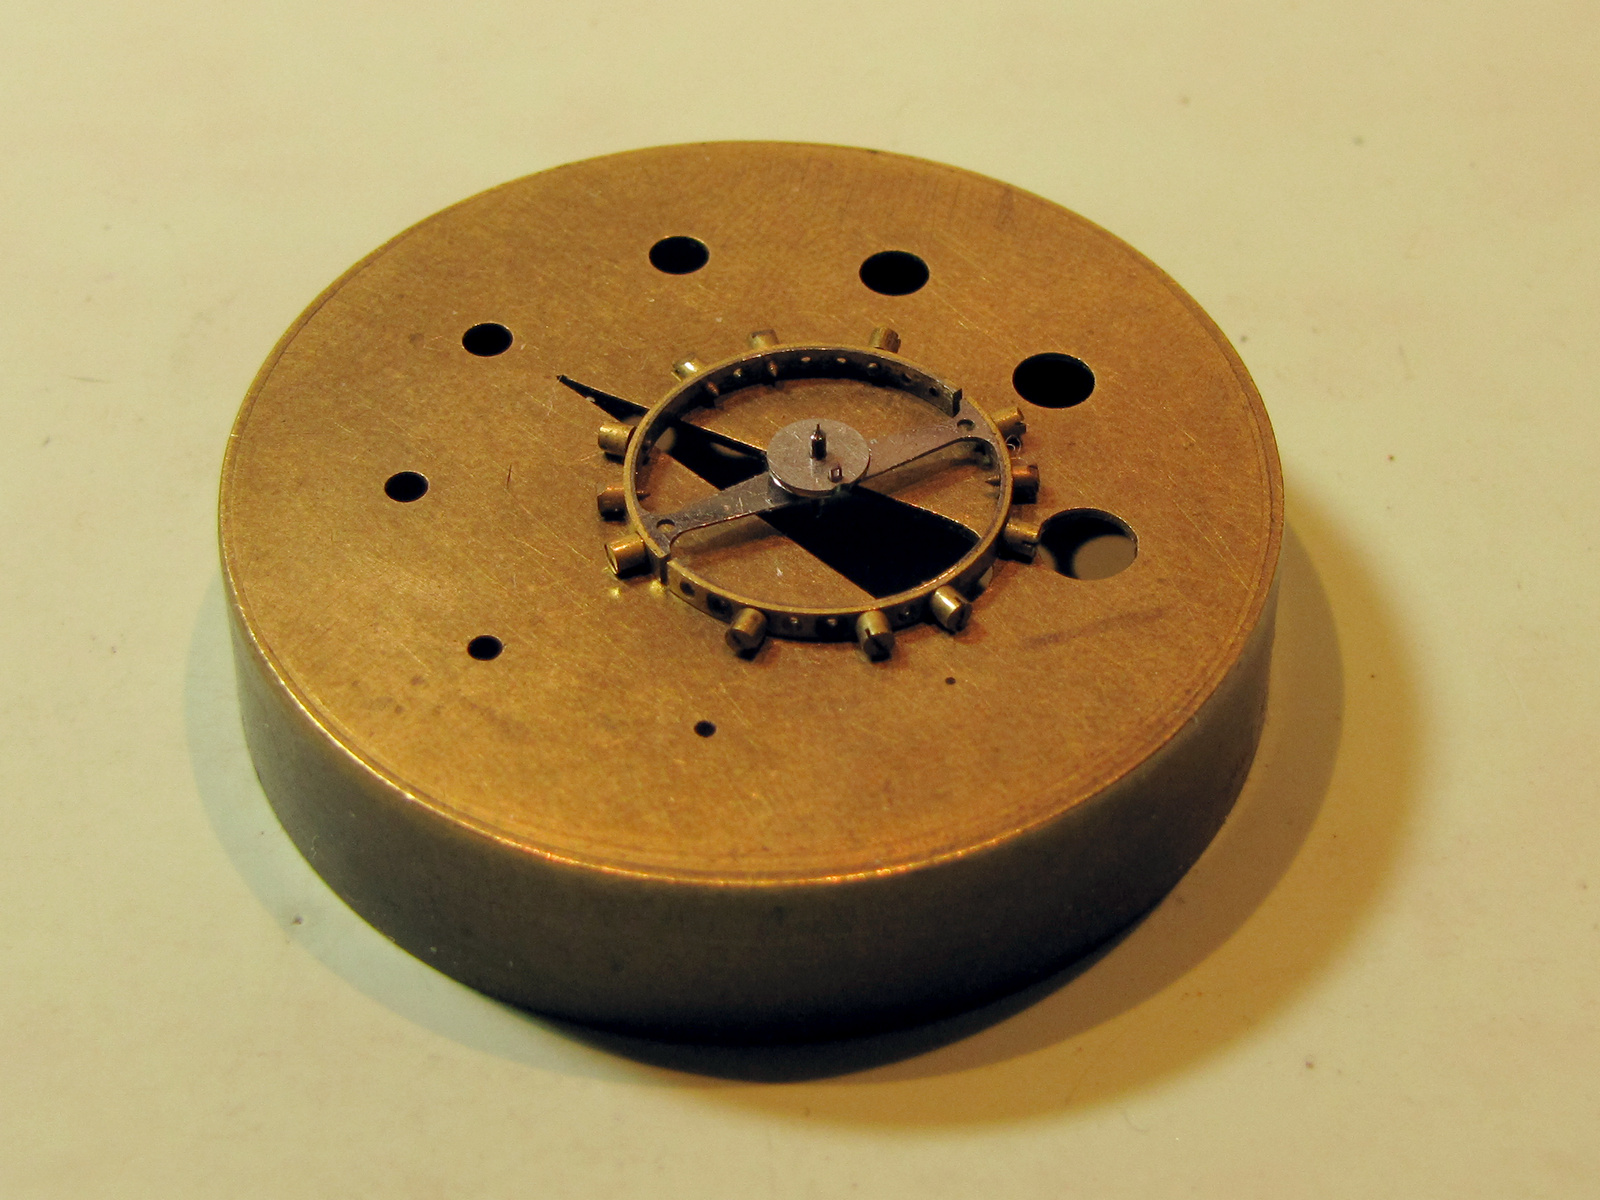
| This image shows bottom side of the balance with single roller and a jewel mounted in it. |
|
| The
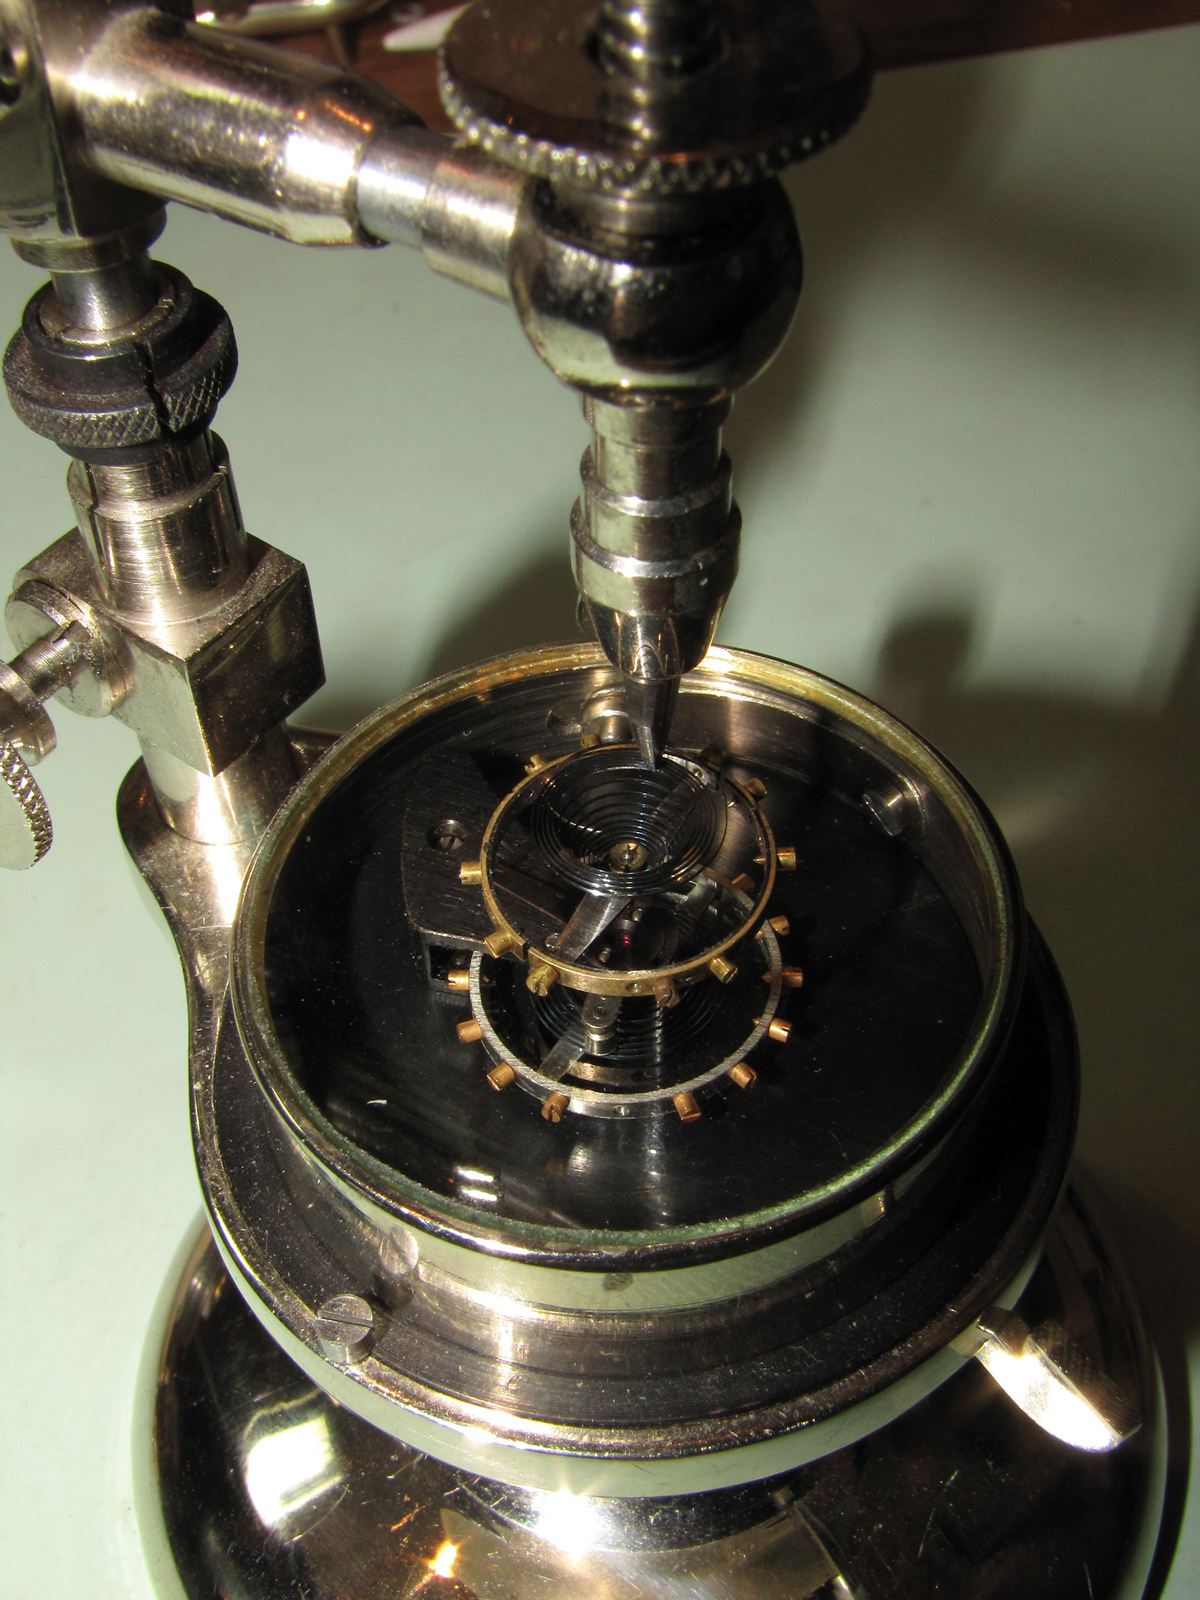
new (old) balance wheel needed a new balance spring. Searching my stock I found a suitable balance spring, which I then colleted and then vibrated in a vibrating tool to reach a pinning point at 18000 BPH. |
|
| After pinning stud to its place another check before mounting balance into the cock and placing into the watch. |

|
| It was
also necessary to replace regulator pins which were both
damaged. Before making new, it was worth looking if there were a suitable pair in Bergeon gauged selection as well as in a mixed assortment if not found. |

|
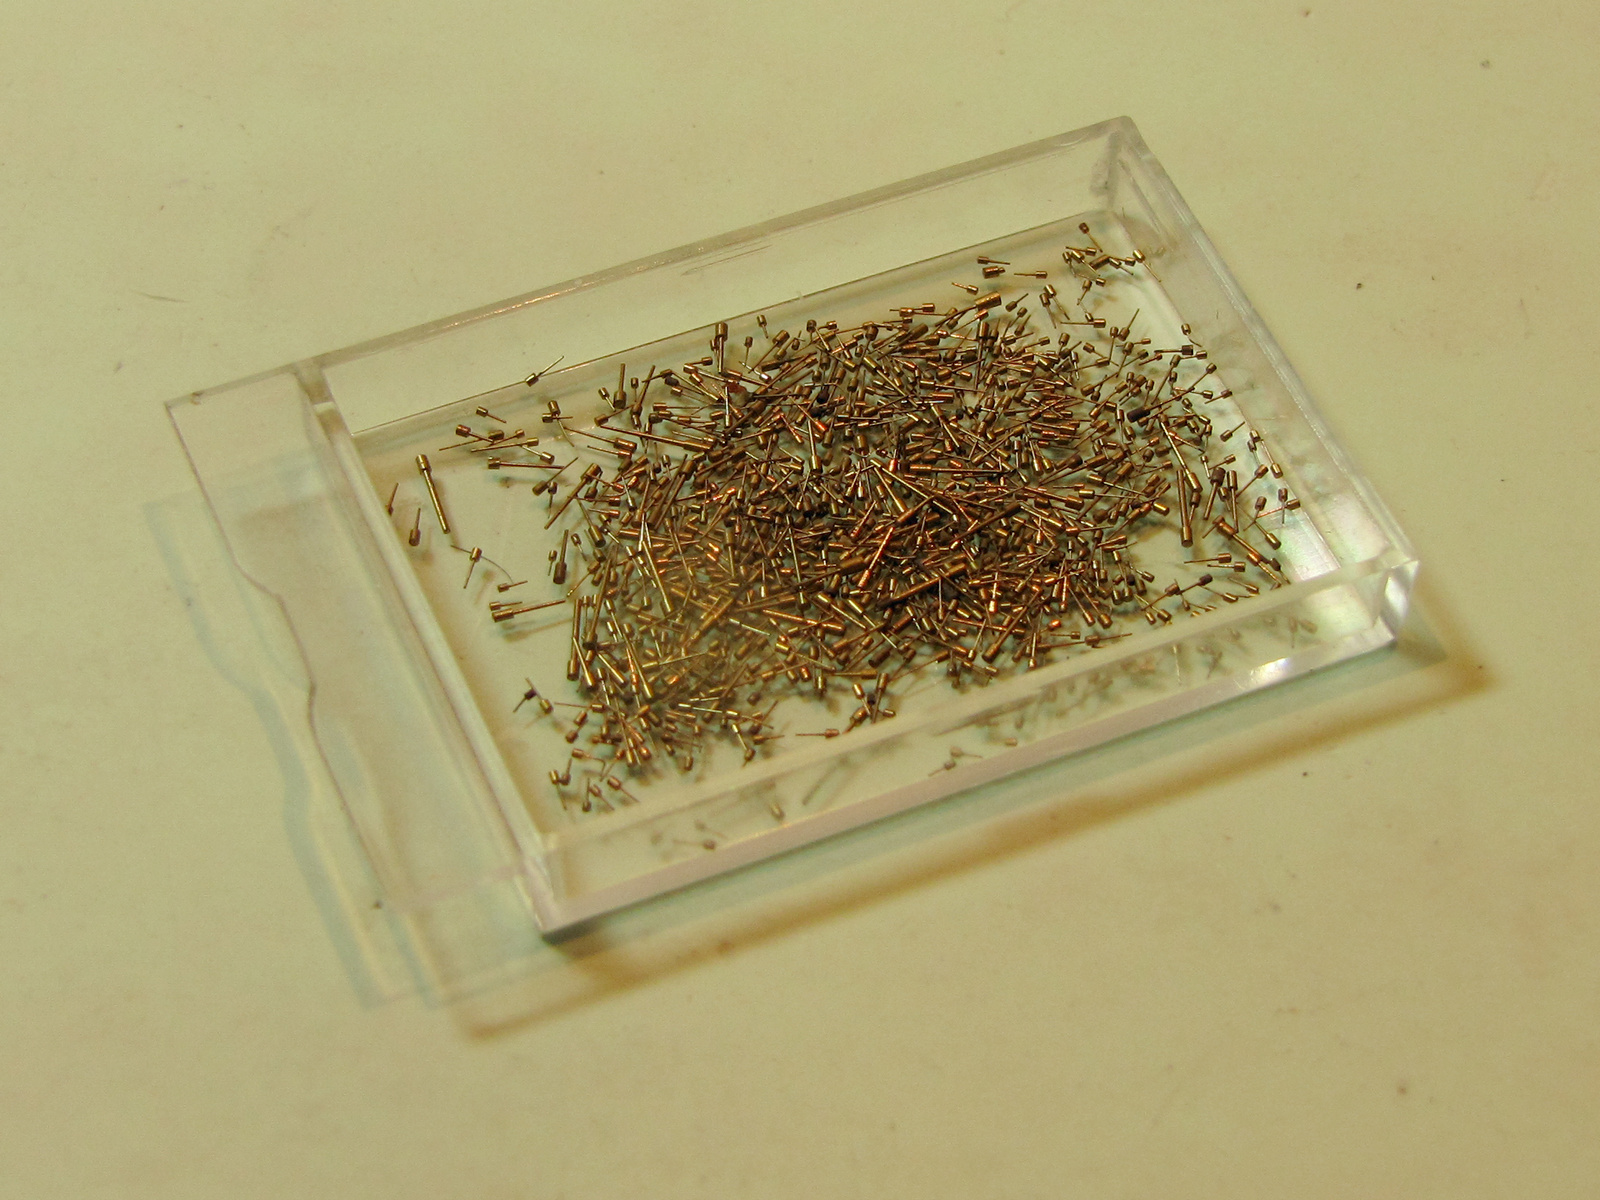
| Unfortunately
Bergeon gauged selection does not have pins of necessary diameter, so
I went looking within the mixed assortment. I was lucky here, after only few minutes of searching and measuring I found two pins 28/100 mm in diameter. |
|
| Here shown already mounted on a regulator and balance cock ready to check the height above balance wheel arms while still long enough to regulate the balance spring and thus timing rate. |
|
| Regulator pins with height adjusted and extra length removed, perhaps not easily seen, but the inner pin has been bevelled so that spring will not touch it when coils are expanding. |
|
| Movement assembled and running. Timing and testing it, checking the range of regulation in the extreme positions of regulator, with regulator set to the centre of scale for normal work. |
|
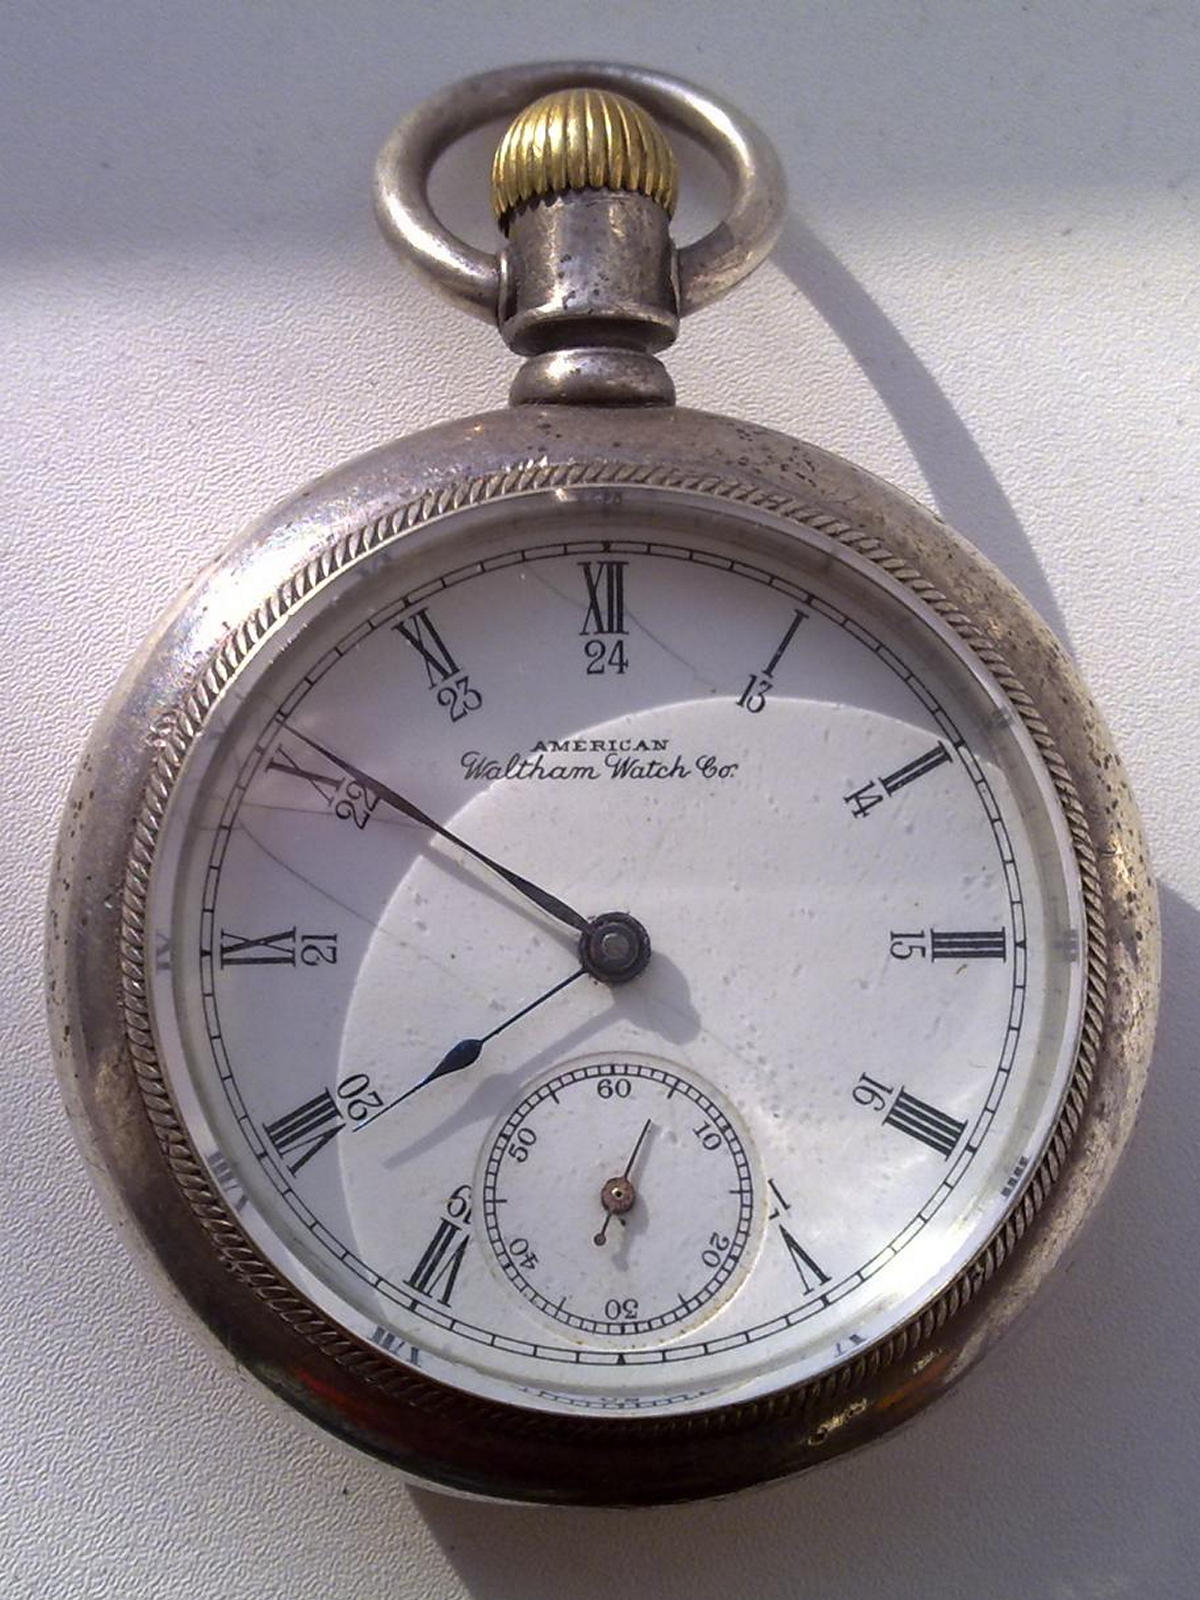
| One of
the most important aspects of watches is the appearance of a case and
of a dial. This image shows the looks of the case and of the dial when the watch got into the workshop. Case has several light dents on its circumference and dial has several hairline cracks. Dents shall present no big problem in removing, while dial shall have to undergo restoration if a thorough cleaning does not help. |
|
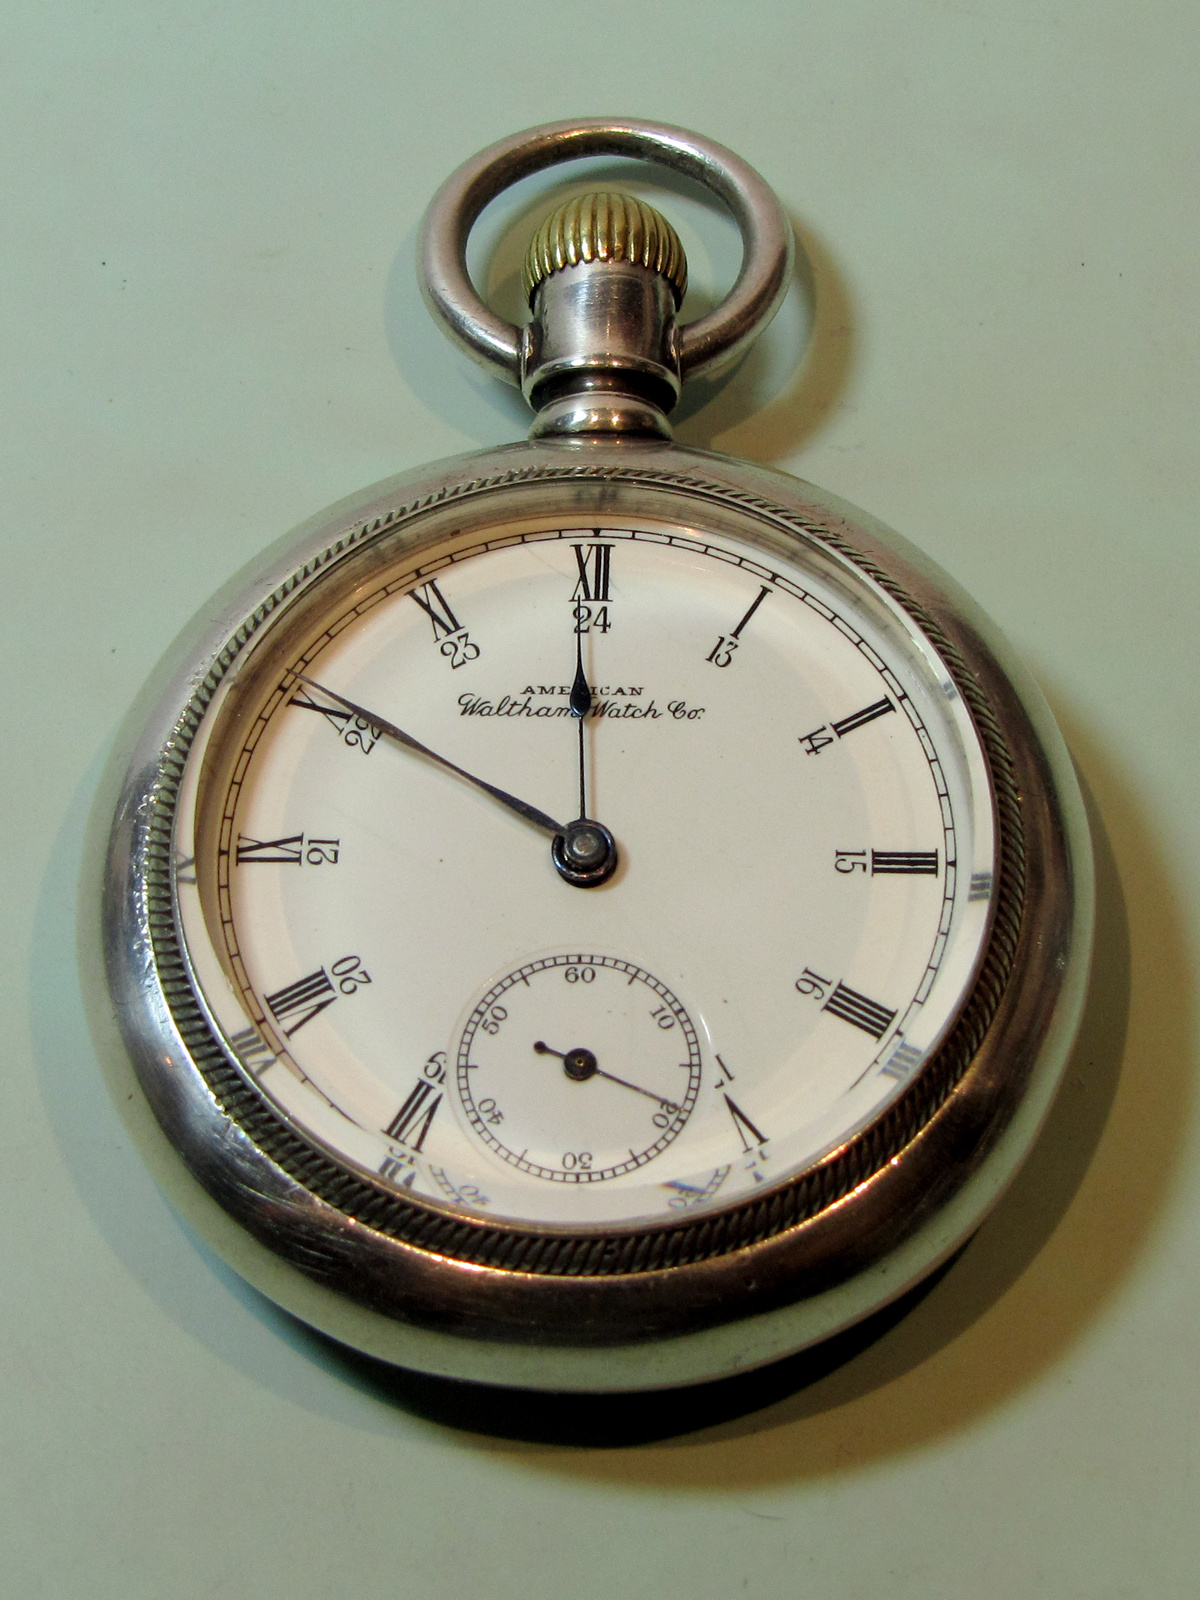
| Image
to the right shows the looks of the same dial after being restored. Of course enamel dials cannot be fully restored to as new condition, some of the hairline cracks are going to remain visible, although just barely. Years of use have taken the toll by embedding dirt into the cracks. The only remedy to this ailment is in complete dial remaking, or a replacement with a NOS dial which is without blemishes. |

|
| Well,
it would not be a complete job without fitting dial, hands
and finally casing the watch. |
|
| This watch is one hundred and twenty years old, unfortunately it has been heavily abused by someone who calls himself a watchmaker. | |
|
Although it is only a seven jewel movement it is my belief that it still deserves a renewed life. |
|
|
It has been a pleasure restoring this watch back to life, getting it close to its former state and performance. |
|
| All the images can be viewed in higher resolution by using right click and "view image". | |

|
|
| Copyright � 2004, 2011, 2014, 2015, 2016 by Dushan Grujich. All rights reserved. | |
| Copyright Notice | |
|
|
|