Dreamweaver MX

Getting Start
Choosing a workspace layout (Windows only)
In
Windows, the first time you start Dreamweaver, a dialog box appears that allows
you to choose a workspace layout. If you change your mind later, you can switch
to a different workspace using the Preferences dialog box.
Dreamweaver MX Workspace is
an integrated workspace using MDI (Multiple Document Interface), in which all
Document windows and panels are integrated into one larger application window,
with the panel groups docked on the right. Recommended for most users.
Note: Most of this help
system assumes that you’re using the integrated Dreamweaver MX workspace.
Dreamweaver MX Workspace,
HomeSite/Coder-Style is the same integrated workspace, but with the panel
groups docked on the left, in a layout similar to that used by Macromedia
HomeSite and Macromedia ColdFusion Studio, and with Document windows showing
Code view by default. This layout is recommended for HomeSite or ColdFusion
Studio users and other hand-coders who want a familiar workspace layout. To
choose this layout, select the Dreamweaver MX Workspace option, then select the
HomeSite/Coder-Style option.
Note: You can dock panel
groups on either side of the workspace in either of the integrated workspace
layouts.
Dreamweaver 4 Workspace is a
workspace layout similar to the one used in Dreamweaver 4, with each document
in its own separate floating window. Panel groups are docked together, but are
not docked into a larger application window. Recommended only for Dreamweaver 4
users who prefer to use a more familiar workspace.
About windows and panels
This section briefly
describes some elements that appear in both the floating and integrated
workspace layouts. For more information on specific windows and panels, see Using windows and panels in Dreamweaver.
The Welcome window provides
tips on setting up your workspace for various purposes, and information on new
features for those who have used previous versions of Dreamweaver.
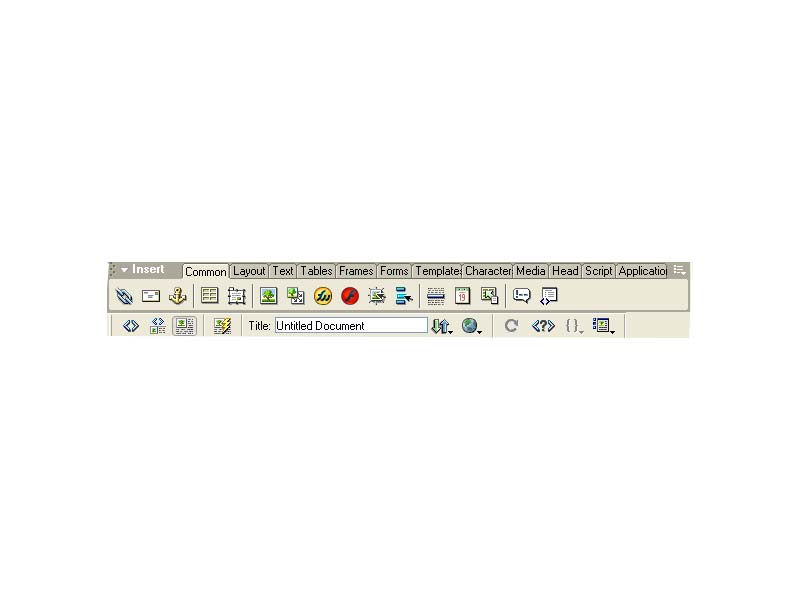
The Insert bar contains
buttons for inserting various types of “objects,” such as images, tables, and
layers, into a document. Each object is a piece of HTML code that allows you to
set various attributes as you insert it. For example, you can insert an image
by clicking the Image icon in the Insert bar. If you prefer, you can insert
objects using the Insert menu instead of the Insert bar.
The Document toolbar
contains buttons and pop-up menus that provide different views of the Document
window (such as Design view and Code view), various viewing options, and some
common operations such as previewing in a browser.
The Standard toolbar (not
displayed in the default workspace layout) contains buttons for common
operations from the File and Edit menus: New, Open, Save, Save All, Cut, Copy,
Paste, Undo, and Redo. To display the Standard toolbar, choose View >
Toolbars > Standard.
The Document window displays
the current document as you create and edit it.
The Property inspector lets
you view and change a variety of properties for the selected object or text.
Each kind of object has different properties. (Not expanded by default in
Coder-style workspace layout.)
The tag selector in the
status bar at the bottom of the Document window shows the hierarchy of tags
surrounding the current selection in Design view. Click any tag in the
hierarchy to select that tag and all its contents. (Not visible in Code view,
so not visible by default in Coder-style workspace layout.) For more
information, see Editing code with the tag selector.
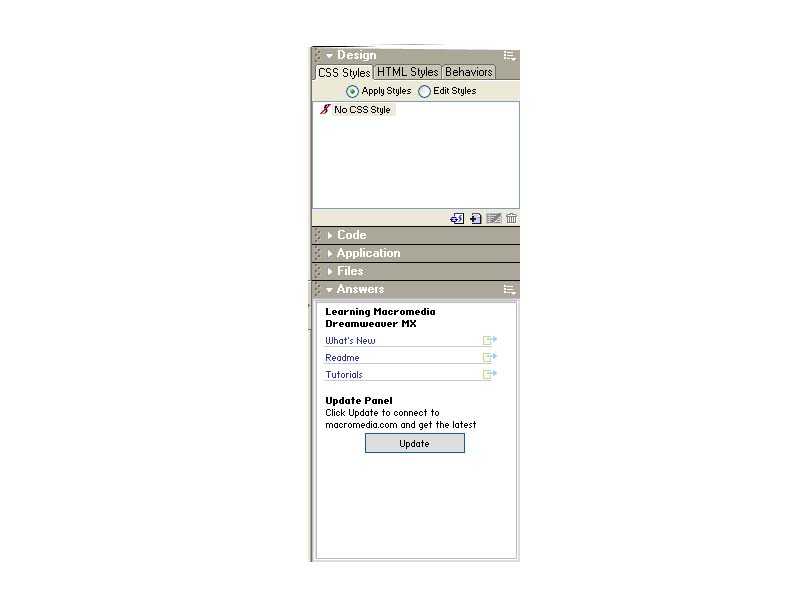
Panel groups are sets of
related panels grouped together under one heading. To expand a panel group,
click the expander arrow at the left of the group’s name; to undock a panel
group, drag the gripper at the left edge of the group’s title bar.
The Site panel allows you to
manage the files and folders that make up your site. For more information, see About the Site panel. It also provides a view
of all the files on your local disk, much like Windows Explorer (Windows) or
the Finder (Macintosh).
The Launcher bar (not
displayed in the default workspace layout) displays buttons in the status bar
for opening and closing your most frequently used panels and inspectors. To
display the Launcher bar and specify which icons appear in it, see Setting Panels preferences.
Dreamweaver provides many
other panels, inspectors, and windows not shown here, such as the History panel
and the Code inspector. Most panels can be docked together into panel groups.
To open Dreamweaver panels, inspectors, and windows, use the Window menu. A
check mark next to an item in the Window menu indicates that the named item is
currently open (though it may be hidden behind other windows). To display an
item that isn’t currently open, choose the item name from the menu.
If you can’t find a panel,
inspector, or window that’s marked as open, choose Window >
Arrange Panels to neatly lay out all open panels.
Working with the New Document dialog box
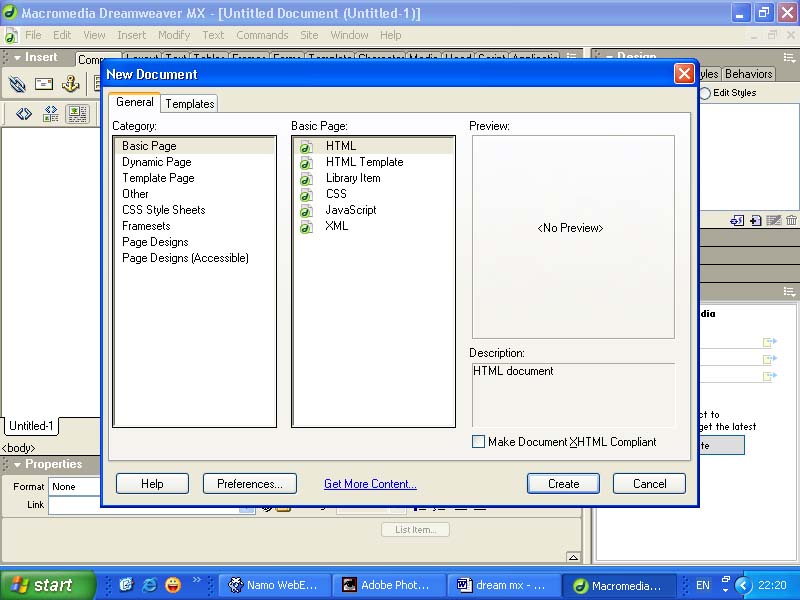
The New Document dialog box
provides you with several choices for selecting a new document to work in. You
can create a new document in the following ways:
- You
can start with a blank document.
- You
can use a template that defines how a document looks, and sets which parts
of a document can be edited.
To open the New Document
dialog box:
- Choose
File > New.
The New Document dialog box
contains two tabs: General and Templates.
The General tab contains
various document types you can use to create a new blank page. You can select a
new blank document from the Basic Page, Dynamic Page, and Frameset categories.
Create a page based on a special file type such as CSS, JavaScript, VBScript or
Text files by selecting a document in the Other category. The Templates
category provides you with a choice of document types from which you can create
a blank templates: HTML templates as well as templates in which you can insert
server behaviors.
The CSS Style Sheets, Page Designs,
and Pages Designs (Accessible) categories, provide you with pre-built design
files you can use to create your own pages. In the case of CSS style sheets,
you can copy a pre-designed styles sheets then apply it to your document.
Depending on the type of
document you select, other options appear in the dialog box; for example, if
you select HTML document you have the option of making the document XHTML
compliant, and when you select a Page Designs file, you have the option of
creating a document or creating a template.
The Templates tab contains a
list of your defined Dreamweaver sites. You can choose a template from any of
the listed sites to create new documents based on that template.
Select a category to see a
list of available document types in the Document list to its right. Clicking a
document in the list provides you with a description, and in the case of Page
Designs, CSS Style Sheets, and Framesets categories document, a preview of the
selected document.
You can use the Preferences
option located at the bottom of the New Document dialog box to set default
document preferences, such as a document type, encoding, and a file extension.
Additionally, you can set an option to automatically open a new document
without using the New Document dialog box. For information about setting
document preferences see Setting New Document
preferences.
Use the Get More Content link
in the New Document dialog box to go to the Dreamweaver Exchange to download
more page design content.

Creating a new blank document
You can use the New Document
dialog box to select the type of document you want to create.
If you typically work with a
specific document type, you can set a default document and automatically open a
new document based on the default document you’ve defined. For information, see
Setting New Document preferences.
Saving a document
When you save a document,
avoid using spaces and special characters in file and folder names. In
particular, do not use special characters (such as é, ç, or ¥) or punctuation
(such as colons, slashes, or periods) in the names of files you intend to put
on a remote server; many servers change these characters during upload, which
will cause any links to the files to break. Also, do not begin a filename
with a numeral.
Opening existing documents
In Dreamweaver, you can open
an existing HTML document or any dynamic document type, even if it wasn’t
created in Dreamweaver. You can open the document and use Dreamweaver to edit
it taking advantage of Design view or Code view authoring.
You can also open non-HTML
text files, such as JavaScript files, XML files, CSS Style Sheets, or text
files saved by word processors or text editors.
Certain files open in Code
view only and allow you to make edits to the code in the file, such as a CSS
document. You can update the document while working in Dreamweaver, then save
the changes in the file.
If the document you want to
open is a Microsoft Word 97, Word 98 or Word 2000 file which was saved as HTML,
you may want to import the document into Dreamweaver rather than open it. When
you import a Word HTML file Dreamweaver prompts you to clean up the extraneous
markup tags Word inserts into HTML files. You can use the Clean Up Word HTML
command to set a page background color and to clean up CSS Style Sheet
formatting in the imported document.
Note:
JavaScript, text, and CSS Style Sheets open in Code view by default. For
information about changing setting an external text editor for viewing these
types of files, see Launching an external editor for
media files.
Dreamweaver applies the
clean up settings to the new document and a log of the changes appears.
Changing the document title
The title of an HTML page
helps site visitors keep track of what they’re viewing as they browse, and
it identifies the page in the visitor’s history and bookmark lists. If you
don’t title a page, the page will appear in the browser window, bookmark lists,
and history lists as Untitled Document. Note that giving the document a
filename (by saving it) is not the same as giving the page a title. To locate
all untitled documents in your site, use the Site > Reports command; see Using Reports to test a site.
The
title appears in the title bar of the Document window (and in the toolbar, if
it’s showing). The filename of the page and the folder the file is saved
and appears in parentheses next to the title in the title bar. An asterisk
indicates the document contains changes that have not yet been saved.
Setting a background image or background page
color
To define an image or color
for the page background, use the Page Properties dialog box. If you use both a
background image and a background color, the color appears while the image
downloads, and then the image covers up the color. If the background image
contains any transparent pixels, the background color shows through.
Presenting Content with Tables
Tables are a powerful tool
for presenting tabular data and for laying out text and graphics on an HTML
page. A table consists of one or more rows; each row consists of one or more
cells. Although columns aren’t usually explicitly specified in HTML code,
Dreamweaver allows you to manipulate columns as well as rows and cells.
Note: Many designers use
tables to lay out web pages. Dreamweaver provides two ways to view and
manipulate tables: Standard view, in which tables are presented as a grid of
rows and columns, and Layout view, which allows you to draw, resize, and move
boxes on the page while still using tables for the underlying structure
Inserting a table
Use the Insert bar or the
Insert menu to create a new table. For information on creating accessible
tables in Dreamweaver, see Authoring for
accessibility.
Adding content to a table cell
You can add text and images
to table cells the same way that you add text and images outside of a table.
For more information, see Inserting and Formatting Text and Inserting Images.
When you add or edit content
in your table, you can save time by using the keyboard to navigate the
table.
Resizing tables
You can resize an entire
table or individual rows and columns. When you resize an entire table, all of
the cells in the table change size proportionately.
Note: If a table’s cells
have explicit widths or heights specified, resizing the table changes the
visual size of the cells in the Document window but does not change the
specified widths and heights of the cells.
Changing column widths and row heights
You can change the width of
a column or the height of a row by using the Property inspector or by dragging
the borders of the column or row. You can also change cell widths and heights
directly in the HTML code using Code view.
If you have trouble
resizing, you can clear the column widths or row heights and start over.
Tip: You can specify widths
and heights as either pixels or percentages, and you can convert from pixels to
percentages and back. For more information, see Viewing and
setting table properties.
Adding and removing rows and columns
To add and remove rows and
columns, use the commands in the Modify > Table submenu.
Tip: Pressing Tab in the
last cell of a table automatically adds another row
to the table.
Using Frames
Frames provide a way to
divide a browser window into multiple regions, each of which can display a
different HTML document. In the most common use of frames, one frame displays a
document containing navigation controls, while another frame displays a
document with content.
For example, your frame
layout might consist of three frames: one narrow frame on the side that
contains a navigation bar, one frame that runs along the top, containing the
logo and title of the website, and one large frame that takes up the rest of
the page and contains the main content. Each of these frames displays a
separate HTML document.
In this example, the
document displayed in the top frame never changes as the visitor navigates the
site. The side frame navigation bar contains links; clicking one of these links
changes the content of the main content frame, but the contents of the side
frame itself remain static. The main content frame on the right displays the
appropriate document for whichever link the visitor clicks on the left.
A detailed discussion of all
the ways to design and use frames, and the code required for hand-coding them,
is beyond the scope of this chapter. If you need detailed information about the
code used in advanced frame layouts, see a book about frames and framesets.
About frames and framesets
A frame is a region in a
browser window that can display an HTML document independent of what’s being
displayed in the rest of the browser window.
A frameset is an HTML file
that defines the layout and properties of a set of frames, including the number
of frames, the size and placement of the frames, and the URL of the page to be
initially displayed in each frame. The frameset file itself doesn’t contain
HTML content to be displayed in a browser, except in the noframes section (see Handling browsers that can’t display frames);
the frameset file simply provides information to the browser about how a set of
frames should be displayed and what documents should be displayed in them.
To view a set of frames in a
browser, enter the URL of the frameset file; the browser then opens the
relevant documents to display in the frames. The frameset file for a site is
often named index.html, so that it displays by default if a visitor doesn’t
specify a filename.
Note that a frame is not a
file. It’s easy to think of the document that’s currently displayed in a frame
as an integral part of the frame, but the document isn’t actually part of the
frame—any frame can display any document.
Note: The word page can be used loosely to
refer either to a single HTML document or to the entire contents of
a browser window at a given moment, even if several HTML documents are
being displayed at once. The phrase “a page that uses frames,” for
example, usually refers to a set of frames and the documents that initially
appear in those frames.
You can format all of your
frames and framesets through the Property inspector. You can set scrolling on
or off, set width and height, name each frame, and more. For more information,
see Viewing and setting frame properties and Viewing and setting frameset properties.
A site that appears in a
browser as a single page comprising three frames actually consists of at least
four separate HTML documents: the frameset file, plus the three documents
containing the content that initially appears inside the frames. When you
design a page using framesets in Dreamweaver, you must save each of these four
files in order for the page to work properly in the browser. For more
information about how to create successful web pages that use frames, see About creating frame-based web pages in Dreamweaver.
Creating a predefined frameset
Predefined framesets make it
easy for you to select the type of frameset you want to create.
There are two ways to create
a predefined frameset: using the Insert bar and using the New Document dialog
box. The Insert bar allows you to create a frameset and display the current
document in one of the new frames; the New Document dialog creates a new empty
frameset.
The predefined frameset
icons in the Frames category of the Insert bar and in the Framesets category of
the New Document dialog box provide a visual representation of each frameset as
applied to the current document.
When you apply a frameset
using the Insert bar, Dreamweaver automatically sets up the frameset to display
the current document (the document in which the insertion point is located) in
one of the frames. The blue area of a predefined frameset icon represents the
current document, and the white areas represent frames that will display other
documents.
Creating and editing a frameset
Before creating a frameset
or working with frames, make the frame borders visible in the Document window’s
Design view by choosing View >Visual Aids > Frame Borders.
To create a frameset:
Choose a splitting item
(such as Split Frame Left or Split Frame Right) from the Modify >
Frameset submenu.
The window is split into
frames, and the document you started with appears in one of the frames.
Adding Content
Use the visual tools in
Dreamweaver to add a variety of content to your web pages. Add and format
elements such as text, images, colors, movies, sound, and other forms of media.
Be sure to make your pages accessible to visitors with disabilities.
Inserting and Formatting Text
Macromedia Dreamweaver MX offers
several ways for you to add and format text in a document. This chapter describes
how to insert text, set font type, size, color, and alignment attributes,
as well as how to create and apply your own custom styles using HTML styles
and Cascading Style Sheet (CSS) styles.
Inserting and formatting HTML text
Formatting in Dreamweaver is
similar to using a standard word processor. Use the Text > Paragraph Format
submenu or the Format pop-up menu in the Property inspector to set the default
formatting style (Paragraph, Preformatted, Heading 1, Heading 2, and so on) for
a block of text. To change the font, size, color, and alignment of selected
text, use the Text menu or the Property inspector. To apply text formatting
such as bold, italic, code, underline, and so on, use the Text > Style
submenu.
You can also combine several
standard HTML tags to form a single style, called an HTML style. For example,
you can manually apply HTML formatting using a combination of tags and
attributes, and save that formatting as an HTML style; it’s stored in the HTML
Styles panel. The next time you want to format text using that combination of
HTML tags, you can simply select the saved style from the HTML Styles panel.
HTML styles are supported by almost all web browsers and save time over
manually formatting text.
Another kind of style,
called a CSS style (CSS stands for Cascading Style Sheets), lets you apply text
and page formatting with the advantage of automatic updating. You can store CSS
styles directly in the document or, for more power and flexibility, in an
external style sheet. If you attach an external style sheet to several web
pages, all the pages automatically reflect any changes you make to the
style sheet. To access CSS styles, use the CSS Styles panel or the CSS
mode of the text Property inspector. For more information about using the text
Property inspector to apply HTML or CSS styles, see Setting Text property options
Manual HTML formatting and
HTML styles apply formatting using standard HTML tags (such as b, i, font, and code) that are supported by all
popular web browsers. CSS styles define the formatting for all text in a
particular class or redefine the formatting for a particular HTML tag (such as h1, h2, p, or li). CSS styles are supported
only by the web browsers Netscape Navigator 4.0 and later versions, and
Microsoft Internet Explorer 4.0 and later versions.
You can use CSS styles, HTML
styles, and manual HTML formatting within the same page. Formatting is applied
in a hierarchical manner, manual HTML formatting overrides formatting applied
by an HTML style or CSS style, and CSS styles embedded in a document override
external CSS styles. See About Cascading Style
Sheets.
Adding text to a document
There are a number of ways
to add text to a Dreamweaver document. You can type text directly in the Dreamweaver
document window, or you can cut and paste or import text from other documents.
Adding paragraph spacing
Dreamweaver works similarly
to many word processing applications: you press Enter (Windows) or Return
(Macintosh) to create a new paragraph. Web browsers automatically insert a
blank line of space between paragraphs. You can add a single line of space
between paragraphs by inserting a line break.
Setting and changing fonts and styles
Use options in the Property
inspector or the Text menu to set or change font characteristics for selected
text. You can set the font type, style (such as bold or italic), and size.
When you use the Property
inspector to apply bold or italic style, Dreamweaver automatically applies the <strong> or <em> tag, respectively. If you
are designing pages for viewers with 3.0 or older version browsers, you should
change this preference in the General category of the Preferences dialog box
(Edit > Preferences).
HTML font sizes are
relative, not specific, point sizes. Users set the point size of the default
font for their browsers; this is the font size that they will see when you
select Default or 3 in the Property inspector or Text > Size submenu. Sizes
1 and 2 will appear smaller than the default font size; sizes 4 through 7 will
appear larger. Also, fonts generally look larger in Windows than on the
Macintosh, though Macintosh Internet Explorer 5 uses the same default font size
as Windows.
Tip: One way to ensure
consistency with font size is to use CSS styles with your font size set in
pixels. For more information on CSS, see About
Cascading Style Sheets.
Aligning text
You align text on the page
using the Property inspector or the Text > Align submenu. You can center any
element on a page using the Text > Align > Center command.
Note: You can align and
center complete blocks of text; you cannot align or center part of a heading or
part of a paragraph.
Inserting Images
Images are commonly used to
add graphical interfaces (such as navigation buttons), visual appeal (for
example, photographs), or interactive design elements, such as rollover images
or an image map.
In Macromedia Dreamweaver
MX, you can work in Design view or Code view to insert images in a document. As
you add images in a Dreamweaver document, you can set or modify image
properties and view the changes directly in the Document window.
To set up an efficient web
design workflow, you can select an image editor preference, and automatically
launch it to edit images while you work in Dreamweaver.
Inserting an image
When you insert an image
into a Dreamweaver document, Dreamweaver automatically generates a reference to
the image file in the HTML source code. To ensure that this reference is
correct, the image file must be in the current site. If it is not in the
current site, Dreamweaver asks whether you want to copy the file into the
site.
You can also add images as
dynamic content; for information, see Making images
dynamic.
Resizing an image
You can visually resize
elements such as images, plug-ins, Macromedia Shockwave or Flash movies,
applets, and ActiveX controls in the Design View of the Dreamweaver Document
window. Visual resizing helps you determine how an element affects the layout
at different dimensions.
Resizing changes the width and height attributes of the element
back to their original size. The W and H fields in the Property inspector
display the current width and height of the element as you resize it. The
element’s file size does not change.
Bitmap elements such as GIF,
JPEG, and PNG images may become distorted if you increase or decrease their width and height attributes. To maintain the
same aspect ratio, hold down the Shift key while you resize a bitmap. However,
it is recommended that you visually resize bitmaps in Dreamweaver only to
determine the layout. After you have determined the ideal size for your image,
edit the file in an image-editing application. Editing the image may also
reduce its file size and thus reduce download time.
Elements can be visually
resized to a minimum of 8 x 8 pixels. To adjust the width and height of an
element to a smaller size (for example, 1 x 1 pixel), use the Property
inspector to enter a numeric value.
To return a resized element
to its original dimensions, in the Property inspector, delete the values in the
W and H fields, or click the Reset Size button.
Inserting and playing media objects
You can insert a Flash movie
or object, QuickTime or Shockwave movie, Java applet, ActiveX control, or other
audio or video objects in a Dreamweaver document.
You use the Media category
of the Insert bar or the Insert menu to select the type of object you want to
insert in a document. Flash movie and objects, Shockwave, Applets, and ActiveX
have defined buttons. Use the Netscape Navigator plug-in button to insert other
media files. For more information, see Inserting
Netscape Navigator plug-in content.
In most cases, a dialog box
appears letting you select a source file and specify certain parameters for the
media object.
Tip: To prevent such dialog
boxes from appearing, choose Edit > Preferences > General or Dreamweaver
> Preferences > General (Mac OS X) and deselect the Show Dialog When
Inserting Objects option. To override whatever preference is set for showing
dialog boxes, hold down the Control (Windows) or Option (Macintosh) key while
inserting the object. (For example, to insert a placeholder for a Shockwave
movie without specifying the file, hold down Control or Option and click the
Shockwave button.)
Dreamweaver automatically
inserts the necessary HTML source code to make the object or placeholder appear
on the page. To specify a source file, set dimensions and other parameters and
attributes, use the Property inspector for each object.
Linking and Navigation
Once you’ve set up a
Dreamweaver site to store your website documents and have created HTML pages,
you’ll want to create connections from your documents to other documents.
Macromedia Dreamweaver MX
provides several ways to create hypertext links to documents, images,
multimedia files, or downloadable software. You can establish links to any text
or image anywhere within a document, including text or images located in a
heading, list, table, layer, or frame.
For a visual representation
of how your files are linked together, use the site map. In the site map you
can add new documents to your site, create and remove document links, and check
links to dependent files (see Using the
site map).
There are several different
ways of creating and managing links. Some web designers prefer creating links
to nonexistent pages or files as they work, while others prefer creating all
the files and pages first, then adding the links. Another way to manage links
is to create “placeholder” pages which stand in for the final file and let you
add links quickly and check them before you have actually completed all the
pages. For more information about checking links
Creating links
The HTML tag for creating a
hypertext link is called an anchor tag or an a tag. Dreamweaver creates an anchor tag for objects, text, or
images you create links from. You can create links to other documents and
files, and links to specific places in a single document using the a href tag.
For example, if you select
the text Home Page in
the Document window, then create a link to a file named home.htm, the HTML
source code for the link looks like this:
<a href="home.htm">Home Page</a>
If you are creating a link
to a specific place in a document, first create a named anchor
(for example, a
name="MainMenu"). Then create a link within the page that
refers to that named anchor (for example, a href="#MainMenu").
Before creating links, make
sure you understand how document-relative paths, site root-relative paths, and
absolute paths work (see About document locations
and paths).
Using Dreamweaver, there are
several ways to create local links (links between documents in the
same site):
- Use
the site map to view, create, change, or delete links.
- In
the Document window, select text or a page element, and then use Modify
> Make Link to select a file to link to.
- Use
the Property inspector, by selecting text or a page element in the
document, and then using the Property inspector folder icon or
Point-to-File icon to select a file to link to or typing the path of the
file.
Note:
Typing URLs or paths to a file can lead to incorrect paths and links that don’t
work. To ensure that the path is correct, use the folder icon to browse to your
link.
- In
the Document window, select text or a page element, choose Make Link from
the context menu, and then select a file to link to.
To create an external link
(to a document on another site), you must type the absolute path
(with proper protocol) in the Property inspector. Make sure that you enter
the entire path (including http://) when creating external links.
Linking files and documents
You can use the Property
inspector and the Point-to-File icon to create links from an image, an object,
or text to another document or file. For information about using the site map
to create links, see Creating and modifying links in the
site map.
A
hypertext link with the name of the linked file is placed at the bottom of the
selected HTML file. This method works well when you are building your site and
you want to create links across the site quickly.
Linking files and documents
You can use the Property
inspector and the Point-to-File icon to create links from an image, an object,
or text to another document or file. For information about using the site map
to create links, see Creating and modifying links in the
site map.
A
hypertext link with the name of the linked file is placed at the bottom of the
selected HTML file. This method works well when you are building your site and
you want to create links across the site quickly.
Creating a hyperlink
You can add hyperlink text
to link to another file.
Testing a Site
Before uploading your site
to a server and declaring it ready for viewing, it’s a good idea to test it
locally. (In fact, it’s a good idea to test and troubleshoot your site
frequently throughout its construction—you can catch problems early and avoid
repeating them.)
You should make sure that
your pages look and work as expected in the browsers you’re targeting, that
there are no broken links, and that the pages don’t take too long to download.
You can also test and troubleshoot your entire site by running a site report.
Previewing pages in browsers
It’s a good idea to test
your pages by previewing them in browsers often throughout the design and
creation process. By using this strategy, you can catch errors early and not
copy or repeat them.
You can preview a document
in your target browsers at any time; you don’t have to save the document first.
All browser-related functions work, including JavaScript behaviors, document-relative
and absolute links, ActiveX controls, and Netscape Navigator plug-ins, provided
that you have installed the required plug-ins or ActiveX controls in your
browsers.
Content linked with a
root-relative path does not appear when you preview documents in a local
browser (unless you select the Preview Using Temporary File option in
Preferences; see Previewing pages in browsers).
This is because browsers don’t recognize site roots—servers do. To preview content
linked with root-relative paths, put the file on a remote server, then choose
File > Preview in Browser to view it (see Site
root-relative paths).
You can define up to 20 browsers for previewing. All the browsers you define appear on the Preview in Browser menu. It’s a good idea to preview in the following browsers: Internet Explorer 4.0, Netscape Navigator 4.0, and at least one text-only browser, like Lynx.