| Black Powder Bottle Rockets Most people have hear of the legendary "bottle rocket". A rocket launched from a beer bottle or other sturdy container that whistles on its' way up followed by a loud report with a white flash for the finish. These are mass produced in china using a moulded plastic tube as the body, whistle mix for the main thrust, a layer of clay containing a passfire hole in which Chinese paper fuse goes to a flash header. Figure 1 shows a typical gross of commerical bottle rockets. |
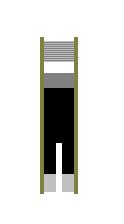
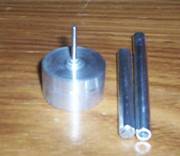
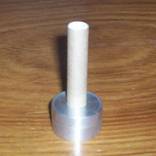
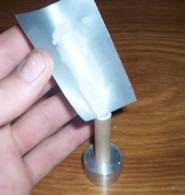
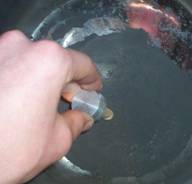
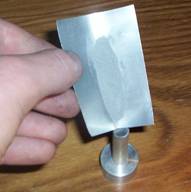
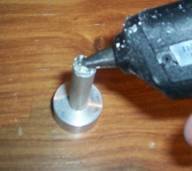
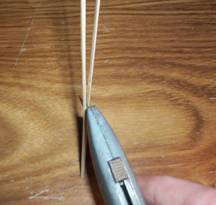
| The rockets described in this article are of similar size, however performance wise these little rockets are sure to top any commercial rocket! Commercial rockets will typically reach heights of around 20m at the most, these will attain heights of over 50m! The cost is much lower and you get the satisfaction of doing it all yourself. Custom headers can be made if you are bored of the same old report. The propellant is simple meal powder ball milled to a fine consitency, this also makes rocket production faster as these can be rammed as opposed to pressed if one were to use whistle mix. The fisrt aspects of any new project is to have the coreect tooling. Bottle rocket tooling can be as simple as a nail through a piece of wood or to the opposite extreme, custom machined from aluminium with a steel spindle length. One could always opt for the cheaper way and drill their own nozzles but performance will not be as consistant as when using tooling. The nozzle diameter for these rockets is 2mm and a core length of 10mm will ensure these rockets take off like a bat out of hell. Tooling can also be purchased from wolter pyro tools for $48 at the time of writing. Figure 2 is a cross section diagram of one of these black powder bottle rockets. A small clay nozzle followed by a meal powder charge, flash, tissue paper and then hot glue. Construction The first part to these rockets is the tube. Since 1/4" paper tube cannot be easily found it is easier to roll your own. If you wish to make many of these for a mass launch I suggest you purchase some tubes from www.pyrotube.com. The tubes are of high quality and well do you well. A typical one of these tubes uses an 25cm x 4cm long strip of 80gsm white printer paper. This is rolled over a 1/4" former followed by 3 turns of 30gsm kraft paper. This is glued with diluted white glue or as I sometimes prefer a glue stick because it is not so messy but still provides a strong tube I will be using the aluminium tooling for this article shown in figure 3. You can buy alumnium tooling from Rich Wolter for $48 USD at the time of this writing. www.wolterpyrotools.com Place the tube over the spindle (figure 4) and try to keep the tube as upright as possible, with such a small tube it tends to wobble a tad. If this is your first time making these rockets it would be a good idea to measure how many grams of clay you use to form the nozzle, this way you get the same result every time. I use about 1-2g of fine bentonite clay - ball milled kitty litter works great. Use either a piece of folded paper to pour in the clay or use a section of alumnium from a coke can. Thanks to Dan Williams for this great idea. Now tap the base of the spindle gently on your work space to settle most of the clay around the spindle. Now insert your hollow drift into the tube. Push it down by hand over the spindle until you feel the resistance of the clay. This is so you don't damage the spindle by ramming it without the drift being over the spindle! I have ruined several alumnium spindles this was, the main reason I decided to machine myself another spindle with a stainless steel spindle length. A few light blows from a small hammer is all that is needed. Be careful not to split the tube at this stage as it is very easy to do. It is not like a larger rocket which needs to be rammed hard. Now comes the charging of the meal powder. I have tried the funnel and wire method commonly used to charge thin tubes but I find it too time consuming. I have devised a way that measures the powder increments and takes little time. Figure 6 shows this method. That's right, simply pick up the whole setup and push the tube into the meal powder. Pick it up and push it in a few times to get more powder in. Now it looks like it is full but not to worry. Tap the base gently like before with the clay, this will settle the meal powder. I like to fill it up like this so I can use the solid drift to compress the first increment and not worry about hitting the spindle. These rockets really don't require many increments that a larger rocket would. I normally do it in 2 or 3 steps with a few solid blows from a hammer. Leave around 10mm of empty space for the header of the rocket. What good is a rocket that goes up and doesn't do something cool at the end of it's flight? This is just a basic flash report for the rocket. If you want you could try other things such as flying fish fuse but these things can't lift much remember to keep it small. Standard 70/30 flash works well for this purpose. One could try colored flash for somethign different. Using a clean piece of funny or soda can funny device pour in about 5mm of loose flash ontop of the meal powder* With your solid drift lightly press it down by hand. It doesn't need to be compacted it is just to save space as flash is very fluffy like. Now a small bit of crumpled up tissue paper is put over the flash and again pressed lightly to save space. The purpose of the tissue paper becomes clear just now. To seal the end of the tube hot melt glue is used. I use a low temp glue gun, but I still don't feel safe having hot things around flash. The glue is poured until level with the top of the tube seen in figure 8. Once cooled the motor assembly is finished. *If you are not using 70/30 flash such as colored flash which is incompatable with sulfur int he meal powder, use a buffer of a small increment of sulfurless meal powder. The final steps to the bottle rocket are to fuse and add a guide stick. For such a small rocket you can't use very large sticks as they weight it down too much. I have found bamboo kebab sticks work great. 9" standard size are perfect however, to give these little rockets maximum height we save on weight here by splitting the stick in half. Not only does this provide a flat surface to attach to the motor you save money by getting 2 for 1! Start by placing the stick on a solid surface and taking a sharp blade push it into the center of the stick. This will cause a small split. Run the blade down to the end of the stick. Turn it around and split the entire length such as in figure 9. To attach the quide stick a few turns of scotch tape holid it in place shown in figure 10. Now all you that is left is to fuse the rocket. Having a 2mm nozzle leaves you with 3 options, thin black match which is often not reliable through small holes, thermolite which is fairly expensive or use some 2mm Chinese visco. If you can't find this thin visco thermolite works well. I use 2" inserted fully into the core, it holds fairly well. However if you are going to be storing or transporting these around I suggest you take a tip from the commercial rockets. Simply use 1 turn of scotch tape to hold the fuse to the stick. Thsi will ensure your fuse remains where it is needed. One thing to make these a little more exciting would be to add a few % of metal powder to the meal to give a nice spark trail. However when metal is added ramming becomes more hazardous so extra care should be taken. Happy bottle rocketing! |
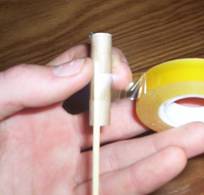
Figure 1: Typical commercial bottle rockets Figure 2: Cross section of motor Figure 3: Spindle, solid rammer and hollow rammer Figure 4: Tube on spindle ready for charging Figure 5: Charign with clay Figure 6: Charging with meal Figure 7: Pouring flash into header Figure 8: Hot melt glue to seal the flash header Figure 9: Splitting kebab stick Figure 10: Attaching guide stick |
 |
 |
 |
 |
 |
 |
 |
 |
 |
 |