In the course of writing this series, I have installed many programs, many of which hack into the system in an attempt to add features or jazz up the look of the Amiga's OS. While most are well written, and work well with the Amiga, some programs can cause unforeseen problems, such as weird conflicts with other programs. A good example of this is DefIcons from the NewIcons system, which conflicts with the Siamese v2 Amiga/PC networking package.
One of the problems I faced was maintaining a stable system to use, in the midst of testing new and possibly problematic programs. Often I need to test two similar programs, which would not or were not intended to work together, such as DirOpus Magellan, MBench and Scalos, which all offer Workbench replacements.
While it is possible to manually install and uninstall programs when you need to, I found this inconvenient and messy. It would be nice, I decided, simply to have several Amiga's, each with a different setup. Sadly, I cannot afford a herd of Amigas, so another solution was required. Luckily, the Amiga can boot from a number of devices, including multiple partitions of a hard drive.
A hard drive partition is an area of the hard drive prepared for use so the system can access it. Partitions can be as big as the entire hard drive, or you may want several smaller partitions. Partitioning a hard drive correctly offers a number of benefits. You can install your programs on one partition, and save all your data on another. This cuts down on disk fragmentation, and speeds up program loading.
For my purposes, I wanted several partitions, one with a stock install of the Amiga OS, so I always have a stable and 'clean' OS to use, and one or two for installing and testing new programs.
Don't forget your toolbox!
The Amiga has a program called HDToolbox, located in your sys/tools drawer. This is a very powerful and scary program, so...
*** W A R N I N G ***
This article is meant for fairly advanced users. You should have a fair grasp of all things Amiga before attempting this. Be very careful when using HDToolbox!!! If you make a mistake, or change the wrong settings, you could not only lose everything on your hard drive, you could actually disable it entirely, to the point where a skilled technician could bring it back. If you don't feel confident with technical details of this nature, you may want to have a knowledgeable friend or dealer handle this for you. Neither I nor Amazing Computing can take any responsibility for any damage cause by attempting to follow these instructions. One last note, I'm using WB3.0 for this article, earlier or later releases may be slightly different, but the basic operation should be the same.
Still want to go on? O.K.!
Protect your Data!
Step 1: Back up your hard drive! Partitioning your hard drive will erase everything. Pay special attention to data, system or program settings, anything that would be hard to replace. If you don't have a commercial disk backup program like Diavolo, there are several good backup programs on Aminet in the disk/bakup directory. Abackup.lha is a good one. And in fact, Amiga OS 2.04 and up supply a serviceable backup program called HDBackup, look for this in your tools drawer.
Marshal your forces
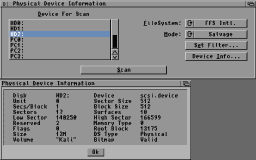
Figure 1:Dave Haynie's Disk Salv
Step 2: If you don't already have it, download Dave Haynie's Disk Salv from Aminet, DiskSalv11_32.lha in the disk/salv directory, or buy it from your favorite Amiga dealer. (See Figure 1) Disk Salv can help with a number of disk problems, and every Amiga owner should have this. Use the Make Boot program to make a floppy rescue disk, in case something goes wrong. You should also make a copy of your Workbench disk, and should also have a few other files on hand (you may need several floppies). LHA, (and maybe LZX if you use that), your favorite text editor, Ed will work (it's in your C: drawer). You may also want to include any necessary drivers and software, such as SCSI, Accelerator, CDROM drivers if you may need to access them, and they require any special files. All this may sound like a lot of work, but it's good idea to have all this even if you don't plan on partitioning your drive. A good emergency kit can save you a big headache. Finally, gather your Amiga OS disks. Make sure you have all the disks, including the Install disk which should have came either with your Amiga or your hard drive.
A look inside HDToolbox
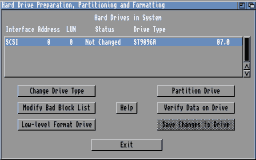
Figure 2:The HDToolbox opening screen
Step 3: Take a look at Figure 2. The box on top shows what kind of drive(s) you have. If you have a 1200 or 4000, don't be alarmed if your IDE drive interface is listed as SCSI. This was done for compatibility with older software. There are three gadgets on the left side- LEAVE THEM ALONE!!! They are way beyond the scope of this article, and you should not touch them unless you know what you are doing. The "low level format" (which NOT the same as the regular format disk menu item in Workbench!) in particular can be bad for IDE drives, and can render some IDE drives useless. Most newer drives will simply ignore this, but don't take a chance.
Figure 3:The heart of partitioning a drive
The button we're most concerned with now is the partition drive button on the right side. Click on it. Now you should see the actual partitioning window (See Figure 3). The long horizontal bar is a visual representation of your hard drive. Depending on you're configuration, you may have one or more sections in the bar. Each section is a partition. The information directly below shows the size of the partition. You can click on each partition to make it active (it turns black). Then you can use the slider (blue arrow) below to resize it. You can also use the gadgets below to Delete a partition, make a new partition, change back to the default setup, or get help.
Below that you can see more information. Notice the Advanced options box is checked. This is required if you are going to make additional boot partitions, but we'll leave most of the options at their default. The Partition Device Name box allows you to enter a name for your partition. Usually this will be something like HD0 (under OS 2.04 it might be DH0,) HD1, HD2, etc. The is another box labeled bootable. If you want to boot your Amiga from that partition, this needs to be selected. If it is selected, you can enter the boot priority in the gadget below it. This will normally be 1 for the main boot drive, the one you wish to use under normal circumstances. Other partitions should be set to 0. The Amiga will boot from the highest priority drive (1) unless you use the boot menu (more on this later) to select a different drive to boot from.
We're going in!
Now to the fun part. Let's say you have one big partition, and want to have four, one main boot partition, and program partition, one data partition, and another secondary boot partition for testing all the weird stuff I've covered in This Old Workbench. Boot from your Workbench Install disk, then run the HDToolbox program. Select Partition Drive. To make room for the three new partitions, first you need to resize the original one. Click on the partition, then drag the blue arrow left to the size you want. This is our main boot partition. Make sure the bootable box is checked. Check the Advanced Options, and make sure the Boot Priority is set to 1.
Click on the create button, and then click on the empty space to the right of the partition you just resized. Again use the blue arrow to resize it to the size you want. Enter a name for the new partition in the Partition Device Name gadget. You should follow your original partition's naming scheme. If it was HD0, then the next partition should be HD1. Since this will be our program partition we will leave the Bootable box unchecked.
Two more to go! Repeat the process, click on New Partition, click on the empty space to the right of the last partition, resize it, and give it a name. This will be the data partition.
Finally, let's make the secondary boot partition. Click on new, and click on the empty space to the right. Since this is the last partition, you won't need to resize it. Give it a name, and click on the bootable box. Make sure the Advanced Options box is checked, and enter a 0 (zero) in the Boot Priority gadget, if it isn't already 0.
Click on each partition, and make sure the settings are O.K. You want the first partition to be bootable, with a boot priority of 1, the second and third not to be bootable, and the fourth to be bootable with a boot priority of 0.
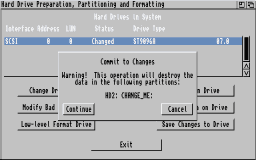
Figure 4:This is your last chance to bail!
If you make a mistake or decide not to go through with it, click on cancel and exit. You should be safe, with no damage done. If you're happy with the changes, click on OK, and then Save Changes to Disk. A warning message will pop up (See Figure 4). Clicking on Cancel is your last chance to bail. Click on Continue, and the changes you made will be saved to the HD. Click on exit, and HDToolbox will inform you that you must reboot. Make your your Amiga Install disk is in your floppy drive and click on OK.
After rebooting (if all went well) you will need to reformat all the partitions. Click on the partition (which will most likely have a funny looking name) and select Format Disk under the Icons menu. Next you will need to reinstall or restore from backup the Amiga OS and all your programs and data.
Finally, in order to boot from the secondary boot partition, you will need to use the Amiga's Boot Menu. To access this, hold down both mouse buttons while booting. Click on the Boot Options button, and select the partition or drive you wish to boot from the Select Boot Drive box on the left. You can also you the Control Active Devices box the the right to disable any drives or partitions. If you disable a drive, the Amiga won't even see it when you boot. This may be useful when testing unknown programs for possible viruses, to prevent any chance of contagion to your other partitions.
Last Rites
If something bad happens, you can use the Default Button in the HDToolbox partition window to get reasonable values for your hard drive partitions again. One last warning- some programs invite exploration and fiddling. HDToolbox is not one of those. Don't change anything unless you you know what you are doing. The actions I've detailed in this article should be safe and effective (I've done this procedure dozens of times without mishap), but if you are careless or too curious, you could end up with a useless hard drive.