 |
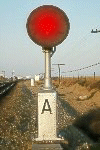
| Signal Lights Made By: Andy |
|
|
| Materials and tools you will need: 1.Dremel Tool 2.Hobby Knife 3.Magnet Wire (Radio Shack #278-1345) 4.Heat Shrink Tubing 5.Telephone wire 6.1000 Ohm (1K) Resistor 7.Brass Tubing 8.Signal Head Covers (IHC) 9.2mm L.E.D.'s 10.Enamle Paint (Blck or Gray) 11.Solder Iron & Solder 12.Super Glue 13.100 Grit Sand Paper 14. Barrier Power Strips |
| Let's Start 1.Use your Dremel Tool and cut off about 3 inches of brass tubing. 2.Use the Dremel grinding disk, and grind a hole about 1/4 inch from the top. 3.Use the Signal Head and grind the other hole. 4.Feed the red magnet wire from the top. Allow about 1 ft of slack at the buttom. 5.Do the same for the green magnet wire. 6.Solder the Cathodes of the L.E.D.'s to the brass tube. (This is your ground) 7.Wrap and solder the red magnet wire to the red L.E.D. 8.Wrap and solder the green magnet wire to the green L.E.D. 9.Mount the signal head into position. 10.Carefully pull the access wires through the brass tube. 11.Glue the signal head into place. 12.Sand and solder the copper magnet wire to the brass tube. (Make the wire long as you need it.) 13.Heat shrink the solder joint. 14.Use the telephone wire and remove the red and green wires, 15.Solder the red telephone wire to the red magnet wire. 16.Solder the green telephone wire to the green magnet wire. 17.Heat shrink both solder joints. 18.Paint brass tube. 19.Let dry. |
| Installation 1.Drill hole in layout. 2.Fed signal light wires through. 3.Solder a 1000 Ohm (1K) reisitor to the copper wire. 4.Solder a black telephone wire to the other end of the resistor, 5.Heat shrink the connection. 6.Connect Wires to a Barrier Power Strip. 7.Add you power and switches |
 |