When I bought my bike I didn't realise how bad the wheel rims were. They looked pretty good from the outside although there was one spot where rust was bubbly through which I hadn't noticed. However, when the tires were removed the extent of corrosion was very widespread. After coming to terms with the disappointment and then how much it was going to cost I started looking for advice on the Web. I found this site which has an article on rebuilding wheels. This gave me the encouragement to do it myself and as a result I think a good result was achieved. http://204.29.80.50/restore/wheel/wheel.html
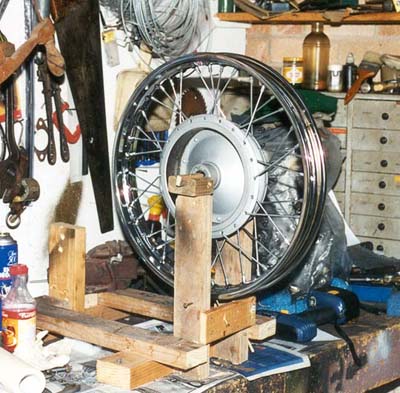
In order to setup up the wheel you need a stand and I used the homemade engine stand with some modification. On top of the two front timber pieces I mounted two U shaped pieces of wood cut from treated pine lattice surround timber. This has a groove to take the lattice and was ideal to sit the axle in. The axle was then held in place by a wooden wedge that was screwed down to hold the axle firmly. Two long self drilling screws (with the point filed down) were then screwed in from the side and front to provide the guide as to how the rim was running. These could be adjusted in and out as needed.
The steps I followed were:
When the wheel is complete I would degrease the inside (inside tire) and paint with zinc rich paint to reduce the chance of rust and don't forget rim tapes to protect the tube from the spoke nipples.
I bought my rims and spokes from British Spares and found them OK and a better price than buying from local or British dealers. The rear was a CWC rim and I suspect the other was an Italian chromed rim. The CWC was of a higher quality but most would not notice unless they looked very closely. I used zinc plated spokes as the bike will be used on club registration and will not see daily use. Bathurst is a fairly dry climate so rust is not a great problem. I was told by one local wheel builder that stainless rims are a lot harder to pull up true and he favoured chromed steel. In the end I decided the old rims had lasted 30 years of continuous use so the new ones should see out my lifetime.
The sludge trap seems to be a feature of a number of British cycle engines and is left the task of keeping the oil free of solid particles. It doesn't seem to do this very well and I have often wondered why a cartridge oil filter was not installed. In my knowledge only the Commando fitted a cartridge filter.
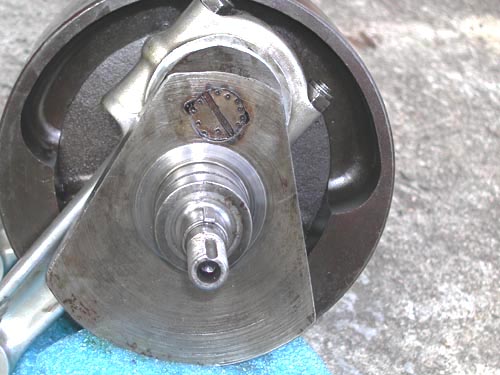
Removal of the trap and the cleaning of the hollow in the crankshaft is an essential part of an engine rebuild. To get the sludge tube out you must first remove the slotted plug on the crank web. Frequently before attempting to remove the plug it is necessary to drill out centre punching on the plug used to prevent it unscrewing while the engine is running. When drilling these punch marks out it is important not to remove any of the crankshaft metal. Start from the plug side of punch mark and move the drill towards the outside. It is claimed that if metal is removed from the crankshaft around the punching it will create a weak spot which can result in fatigue cracks forming and resultant crank failure. For an example of incorrect drilling see the photo below of my crank.
Having drilled out the punch marks you will have now found out that a impact driver doesn't work very well at unscrewing the plug. You can try using a method I found on a Web site dedicated to The BSA A10 Super Rocket.
http://www.geocities.com/MotorCity/Downs/9472/endplug.html.
This method worked very well for me with a slight modification. After drilling the large hole I then used a triangular file to cut six grooves into the hole. This in effect created a hexagonal hole which I hammered a chopped off piece of 10mm allen key into. Then just use your socket spanner to remove the plug. When buying the new plug make sure you buy an allen key headed plug. These are available from SRM or British Spares. Don't destroy your best allen key but buy one from a cheap tool shop.
More words have been written about the main bearing problems of the A65 and the virtues of various modifications that seek to rectify this claimed weakness than any other BSA topic. The most well known conversion is that work pioneered by Devimead which was then taken over by SRM. I don't think anyone has any doubt that the conversion produces a stronger better lubricated crankshaft but is the cost worthwhile. The cost to send the necessary parts to SRM in Wales for machining would be very high and many claim that the standard design is quite adequate.
From my observations the crankshaft main bearing design with oil being fed through the timing bush and end float being controlled by a thrust washer is no different to most car engine designs of the time. The problem seems to arise when through engine tuning, extra stresses are placed on the bottom end. The A10 used the same system and yet you don't hear the same condemnation of its bottom end.
The link below contains some interesting correspondence between British Cycle Supply Co and Andy Hall regarding some
A65 concerns including the main bearing conversion.
http://www.accesswave.ca/~weekend/BSAquestions.htm
Although referring to the A10 engine many of the issues addressed in this article also can be applied to the A50 / A65 engine. This article covers:
http://www.bsaoc.demon.co.uk/a10_2.htm
Always ensure that you have sufficient ring gap. This is checked by using the piston skirt to push the ring down into the lower unworn part of the bore. Ring gap can be adjusted by filing the ends. make sure that the rings are free in the grooves without excessive up and down play. Gaps should be staggered around piston (120 degrees) with none facing directly to front or back When replacing rings, any markings should always face upwards. If there is a taper on the inside it should face upwards. Any taper on the outside should go down.
We know that most of the wear in the cylinder occurs close to the top with a lip tending to form at the very top. To check the extent of bore wear we need to compare the bore diameter at the bottom where little wear occurs with the diameter close to the top. Few of us have expensive inside micrometers so we need to find a simpler way.
We can achieve this by pushing one of the piston rings down into the bore using the piston skirt to ensure the ring is square to the bore. The ring gap is then checked at the top and bottom using a feeler gauge. Subtract the bottom gap from the top gap and then divide by 3.14 (pie) to convert to the bore wear. Remember that ring gap is a component of the circumference of the bore whereas the wear is a component of diameter.
Using this technique I determined that my bore had 1.5 thousandths of an inch wear from top to bottom. This was confirmed when checked with an inside micrometer by my machinist. So although crude in method, it can produce a very useful result.
Tuning tips for the A10 by Eddie Dow - many of these points would apply to the A65
The achilles heal of many British bikes has been the poor oil filtration. Usually all that is used are a fine mesh at the sump pickup and the oil tank outlet. These only remove large particles such as shattered con rods etc. For many the solution is to change oil frequently but metal particles can still travel around the motor and embed themselves in the surface of bronze bushes. This creates an abrasive surface that accelerates wear. Big end shells can be badly scoured by these metal particles.
The solution is to fit a paper element oil filter and here we get into uncertain waters as there is much disagreement on their use. Filters have received bad publicity in the past as a result of incorrect cartridges being used. These have apparently been fuel filters and have been too fine and as a result have blocked up rapidly. Unless a bypass valve is provided, soon no oil is being returned to the tank and oil starts to build up in the sump. However, there are many people who swear by the use of oil filters and have used them for an extended time. Certainly a close watch should be kept on the return oil flow to the oil tank and filters changed every 2000miles.
There are a number of kits available which should provide the right solution. One uses a cartridge of the type used by Norton Commandos and another one that employs a Triumph Trident element.
Some opinions on oil filters taken from the BSA mailing group on Yahoo
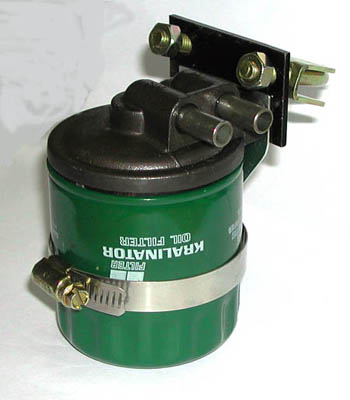
| This kit is produced by TT components in England and can be purchased from British Spares in NZ. This model is designed for the T120 and clamps to a frame tube using a muffler clamp. To fit to a A65 it would be necessary to make a mounting bracket to suit. |
|
|
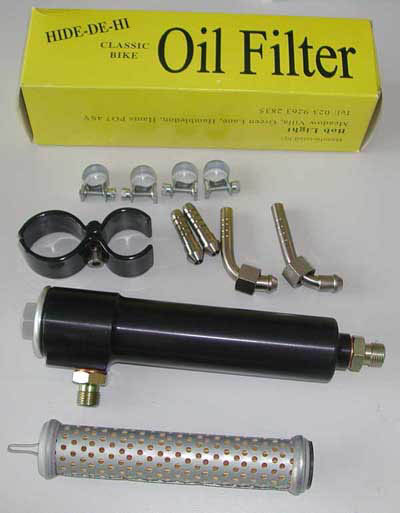
| Another kit of a tubular design
using a Trident element. It is claimed to remain operational even when
90% blocked and has a bypass valve. A little expensive but probably the best design.
Available from Bob Light Engineering at Meadow Villa, Green Lane,
Hambledon, Hants, P07 4SY
Cost me 65 UK pounds including 2 spare filters I fitted mine in the tool box and held it in place with a rubber strap. Velcro would work well. |
|
This a very good site built by Richard Trygg on his restore of his BSA Firebird
http://www.ingfatrygg.se/bsa.html