
INFINITE CAMPUS INSTRUCTIONS
First, to get to Infinite Campus, you need to open your web browser and type in the following URL ( OR JUST COPY THE LINK BELOW):
http://campus.burlington.k12.ia.us/campus/burlington.jsp
This will take you to the log-in page below. You will probably get at least one security warning, maybe more, depending on your browser’s and computer’s security settings. Ignore, click okay, continue, whatever it takes to keep going to this page:
Type in your user name and password into the dialog box in the middle of the screen, and click 'sign in'. This will open the Infinite Campus main screen for you. There will be a menu of choices ( the Index) along the left side of the window, and message boxes on the right, as you can see below...
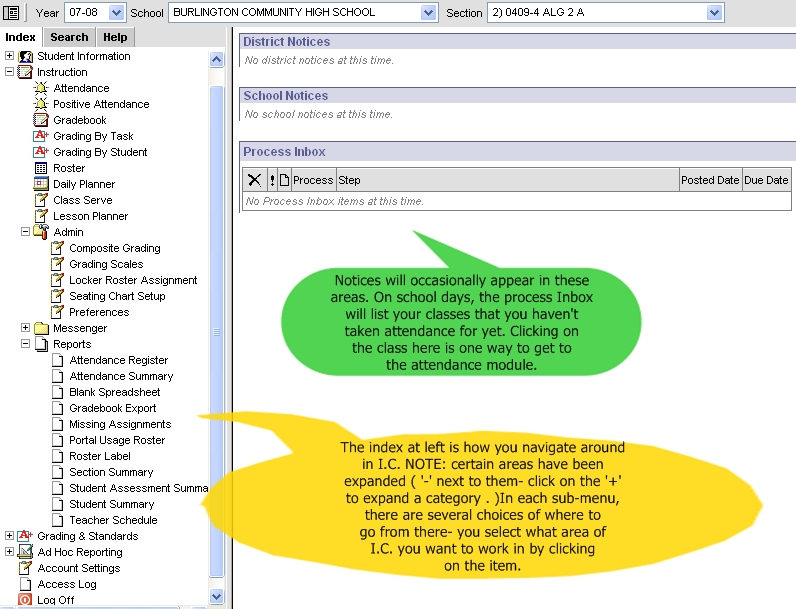
Attendance can be taken using the 'Process Inbox'. The rest of what you do will involve using the left side menu ( index) to navigate around inside Infinite Campus. You DO NOT use any of your browser’s functions to do things inside Campus. In particular, NEVER USE THE ‘BACK’ BUTTON IN YOUR BROWSER TO GET ANYWHERE. INSTEAD, ALWAYS USE THE INDEX TO NAVIGATE FROM ONE FUNCTION TO ANOTHER!!!
In general, something you should keep in mind, when in doubt....CLICK SAVE ( UPPER LEFT OF ALMOST EVERY WINDOW WITHIN THE PROGRAM) ANYTIME YOU’VE MADE CHANGES IN ANYTHING! IF YOU LEAVE TO GO TO ANOTHER AREA AND COME BACK, WHAT YOU DID WON’T BE SAVED!!
VIEWING AND PRINTING YOUR CLASS ROSTERS
Once you’re in the program, if you want to look at your rosters for your classes ( this seems to be most people’s first destination...)
1. ) Click on Rosters in the left-hand menu. By default, the roster for your first class appears in the main window.
2. ) You can print your roster by clicking on the Print icon directly above the roster. ( sorry, no screen shot here- I couldn't do it without displaying confidential student information....)
3. ) To get to your next class, use the drop-down menu at the top of the window to select the next class you want to view/ print.
SETTING YOUR PREFERENCES
1. ) Click on Preferences ( left-hand menu, under Admin- if you don’t see anything under Admin, click on the + next to it to open up the menu below that category). The Preferences dialog box opens:

2. ) Select the options you want here.( in particular, select invert seating chart auto placement- if you want to auto-fill your seating charts from the front of your room instead of the back). then CLICK SAVE.
CHANGING YOUR PASSWORD
1. ) Click on Account Settings in the left-hand menu ( third choice from the bottom), and follow the directions here:
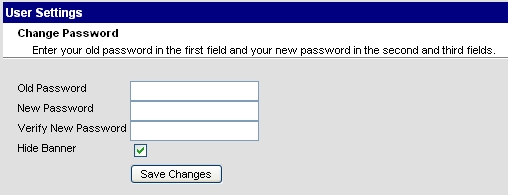
2. ) Notice the option to ‘Hide Banner’, which you can also select here, to save browser window space when you are working in IC.
3.) CLICK ‘SAVE CHANGES’. Be sure and write down your password...
SETTING UP AND PRINTING SEATING CHARTS
SETTING UP SEATING CHARTS
1. ) Under ‘Admin’ on left-side menu select ‘Seating chart setup’. You'll get this screen :
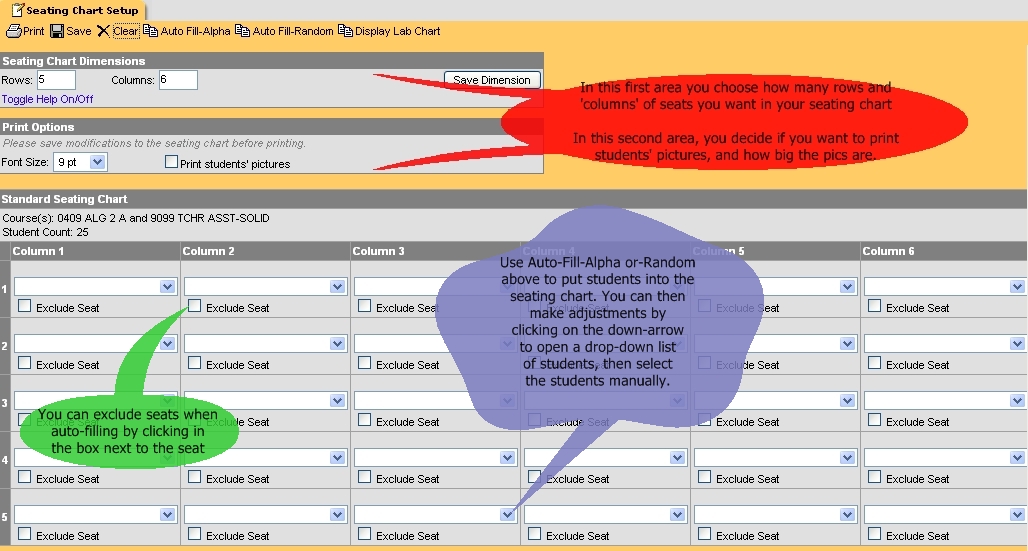
2. ) Seating Chart Dimensions- selecting the number of rows and columns to match your room setup, THEN CLICK ON SAVE DIMENSIONS.
3. ) FILLING IN YOUR SEATING CHART- . You have the options mentioned above ( auto Fill- Random or Alpha ), which you do simply by clicking on those words at the top. The names of your students will appear automatically in your seating chart. When satisfied with your seating chart, SAVE IT. If you don’t want to do it this way, you have the option of using the drop-down menu for every seat and filling in the students that way. Whatever method you choose, when you’re done, SAVE IT at the top of the window ( NOT IN YOUR BROWSER’S MENU!). Then select the next class using the drop-down menu.
4. ) TO PRINT YOUR SEATING CHART- If you want to print a seating chart with students' pictures on it, selct 'Print Students' Pictures, then choose a picture size ( I've found 6-7 pixels works pretty well ), SAVE , then press print at the top of the window, ( NOT in your browser's menu).
5. ) SEATING CHART CHANGES- Just go back to Seating chart setup and make the changes, SAVE THEM, and print as you did before.
SETTING UP YOUR GRADE CURVE(S)
1. ) Select ‘Curves’( left-hand menu, under Admin). Click on New ( right above the Curve/Curve List Editor). A new input box opens:
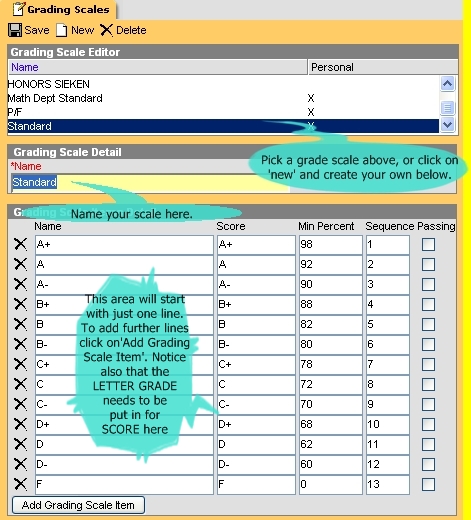
2.) Name the grading scale ( Standard, etc. ) in the Grading Scale Detail box.
3.) In the blank for ‘Name’ put A+ or A, ( also in the ‘Score’ box- IT MUST BE PUT IN THE SCORE BOX to display grades in your gradebook). In the Minimum Percent’ box, put the appropriate amount- this depends on how you grade, of course...in the ‘sequence’, put number 1 ( then for A put 2, for A- put 3 and so on as you go through each grade in your scale)
4.) Click on AddCurveListItem and do the same for the next grade in your grading scale.
5.)Once you’ve finished with all of the grade choices ( including F- minimum score 0 presumably), SAVE at the top. If you have different grading scales for different classes you would need to repeat steps 2-5 for each scale you want to create.
![]()
SETTING UP YOUR TERMS FOR YOUR GRADEBOOK
THREE OPTIONS HERE:
![]()
IF
YOU WANT TO WEIGHT YOUR QUARTERS ( 50-50, 40-40-20 WITH EXAM, ETC.)
1.) Select ‘Composite grading’ ( left-hand menu, under Admin). In the section window that appears, select Q2 Semester for 1st Semester or Q4 semester for 2nd, and the Composite Grading Detail window opens up:
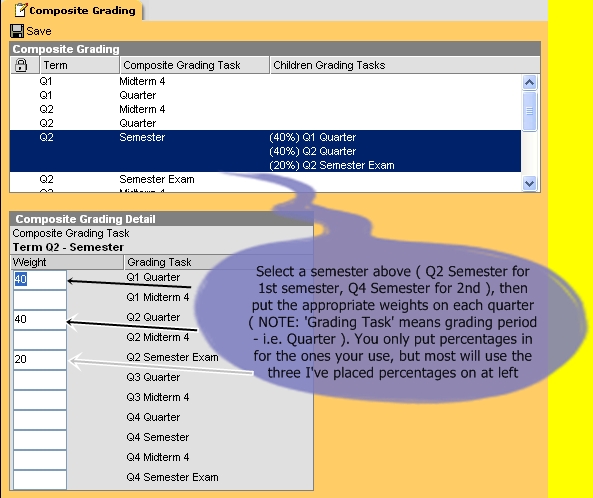
2.) Under ‘Weight’ put the percentage you want each quarter/final exam to receive- Do the same for 2nd semester after finishing with 1st, as it will save you time later on.
3.) Once you’re done setting it up for this class, CLICK SAVE. YOU HAVE TO DO THIS SEPARATELY FOR EACH CLASS.
BEFORE PUTTING ASSIGNMENTS IN YOUR GRADEBOOK, YOU NEED TO SET UP ‘FOLDERS’ ( WHICH I.C. CALLS 'TASK GROUPS' ) FOR EACH CATEGORY ( I.E. DAILY WORK, TESTS) USING ‘LESSON PLANNER’
1. ) Click on ‘Lesson Planner’in the Index, and the 'Lesson Planner' dialog box will open to the right:
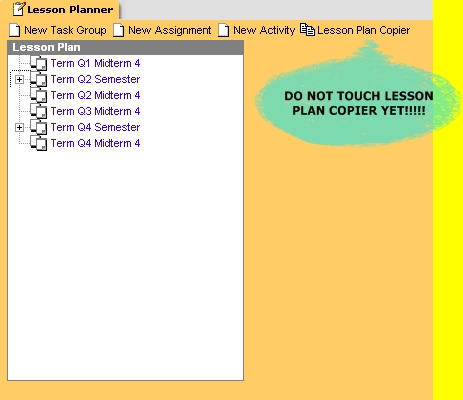
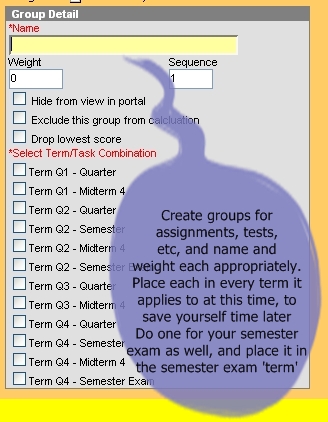

2. ) Create a ‘New Task Group’( folder ) for your assignments by clicking on 'New Task Group'.
3.) In the 'Group Detail' dialog box that opens, name it, assign a weight to it if you weight your different categories within the quarter, then place it in your Term Q1 Quarter, Term Q2 Quarter, Term Q3 Quarter, and Term Q4 Quarter terms by selecting those below- by selecting all of these at once, you take care of the whole year at once here for this ONE class .
4. ) Do the same for your tests and whatever other categories you include in your quarter grade the same way. You'll also have to create a 'New Task Group' for your final exam and put it into the Term Q2 and Q4 Semester Exam terms

![]()
YOU
DON’T WANT TO WEIGHT YOUR QUARTERS AT ALL, AND GO BY STRAIGHT
POINTS FOR THE ENTIRE SEMESTER ( and don’t want to weight
within the quarters, between tests and assignments ). YOU DON'T NEED
TO GO TO COMPOSITE GRADING- YOU GO DIRECTLY TO 'LESSON PLANNER'
BY CLICKING ON 'LESSON PLANNER' IN THE LEFT-HAND MENU
( INDEX)
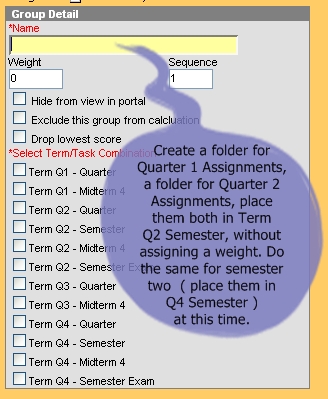
1.) In ‘Lesson Planner’ create a ‘New Task Group’( folder ) for your 1st quarter assignments by clicking on 'New Task Group', place it in your Q2 Semester ( or Q4 Semester for 2nd semester, of course ).
2.) Create a 'New Task Group' for your 2nd quarter assignments the same way. You can also create separate ‘Groups’ for Q1 and Q2 Tests, and any other categories you want to have ( as long as you don’t weight these, everything will still go by total points).
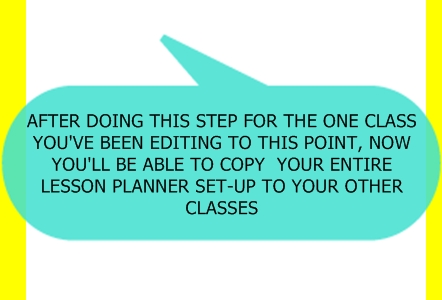
3.) If you want your final exam to only count as part of your Q2 Semester grade, then you’ll need to create a separate ‘Group’ for it as well. Go ahead and set up 2nd semester now the same way, so when you use Lesson Plan Copier it will take care of the whole year for each of your classes. DO THIS ONLY FOR ONE CLASS- YOU'LL BE ABLE TO GO BACK AND USE 'LESSON PLAN COPIER' LATER TO COPY EVERYTHING YOU DO HERE FOR YOUR OTHER CLASSES
4.) During 1st quarter ( or 3rd) all of your assignments, tests, etc, will need to go into the appropriate folder, then do the same for 2nd quarter ( or 4th ). Details of how to do this will be in the section on entering assignments.
![]()
YOU
DON’T WANT TO WEIGHT YOUR QUARTERS, BUT YOU DO WANT TO WEIGHT
YOUR ASSIGNMENTS AND TESTS WITHIN THE QUARTER:
GO DIRECTLY TO 'LESSON PLANNER' BY CLICKING ON 'LESSON PLANNER' IN THE LEFT-HAND MENU ( INDEX):
In ‘Lesson Planner’ create ‘New Task Groups’( folders ) for your categories by clicking on 'New Task Group', naming them and placing them into the appropriate 'terms'( Term Q1 Quarter , Term Q2 Quarter, Term Q3 Quarter, Term Q4 Quarter- do all at olnce for this ONE class ). Place one for your semester exam into the 'Term Q2 and Q4 Semester Exam' terms. DO THIS ONLY FOR ONE CLASS- YOU'LL BE ABLE TO GO BACK AND USE 'LESSON PLAN COPIER' LATER TO COPY EVERYTHING YOU DO HERE FOR YOUR OTHER CLASSES
YOU SHOULD KNOW THAT END-OF SEMESTER GRADING WILL BE MORE COMPLICATED FOR YOU, SO YOU MAY WANT TO TRY TO USE OPTION ONE OR TWO, IF YOU CAN MAKE IT WORK FOR YOU…
![]()
SETTING UP YOUR GRADE BOOK TERM
AND GROUP PREFERENCES
1. ) Select Lesson planner under Instruction in the left-hand menu:
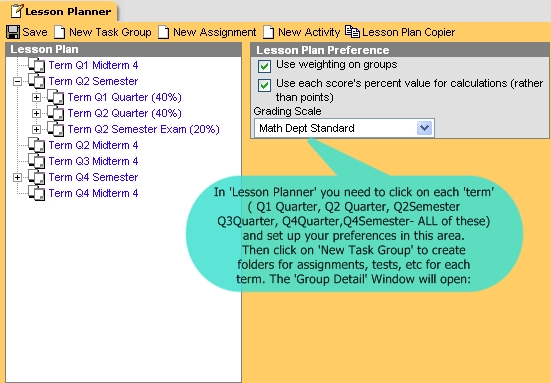
2. ) In the ‘lesson plan’ box, you’ll see the different terms/quarters listed, select Q2 Semester ( remember you previously set up Q1, Q2 Weights ). When you click on the + box in front of Term Q2 Semester, the categories you previously set up will be listed.
3.) Click on each term ( Term Q1 Quarter, Term Q2 Quarter, Term Q2 Semester, Term Q3 Quarter, Term Q4 Quarter, Term Q4 Semester, Term Q2 Semester Exam and Term Q4 Semester Exam- you have to do ALL of these, separately )and in the ‘Lesson plan preference’ box to the right select the options you want and use the ‘Curve’ Drop-down menu to select one of the grading scales you created earlier. SAVE
4.) Do the same thing for category folders within the terms .
USING LESSON PLAN COPIER
( 0NLY AFTER COMPLETELY FINISHING ONE CLASS FOR THE ENTIRE YEAR!! )
1. )Go to 'Lesson Planner' by selecting it in the index, as usual.
2. ) In the 'Lesson Planner'elect 'lesson plan copier’ and the 'Lesson Plan Copier' dialog box appears, as below:
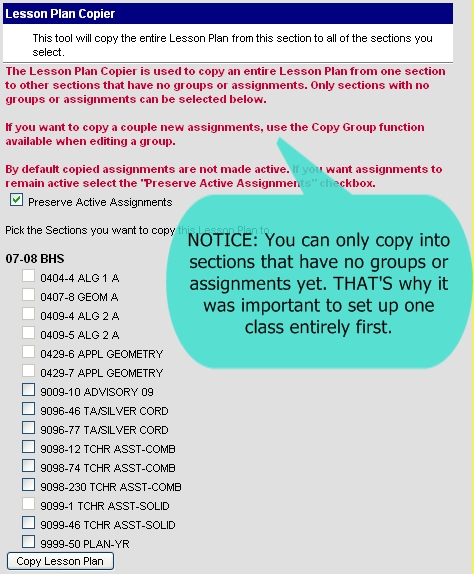
3.) Select ALL of the classes you want to use this same grade-book set-up for, then click on 'Copy Lesson Plan'
![]()
DAY-TO DAY ACTIVITIES WITHIN INFINITE CAMPUS
TAKING ATTENDANCE
USING PROCESS INBOX – In the main page, in the process inbox you will see ‘Attendance required’ for each of your classes ( on days we have students…). To take attendance for a class here, click on the link for that class ( the blue, underlined WORDS ). You’ll get your list of students ( or seating chart display, if you checked that in 'preferences' ) for that class, all are marked Present ( P) by default, you just need to change to A( absent) or T( tardy) for the students those apply to. You can also put a comment in to the right if using the list version of the module ( i.e. 15 minutes late, etc.). When done marking these, CLICK SAVE .
USING ATTENDANCE MODULE - Click on ‘attendance’ in the left-side menu ( located under ‘instruction’). Select the section you are taking attendance for in the SECTION drop-down menu ( right at the top-middle of the window, as before). Make the appropriate mark for each student in the attendance list, then click ‘save’ ( located at the top-left of this module). You MUST CLICK ‘SAVE’ to record the attendance.
If you need to change your attendance ( i.e. somebody shows up after you marked them absent), get there using the Attendance Module, make the changes, and click SAVE again.
PUTTING ASSIGNMENTS IN- USING LESSON PLANNER
( GRADE-BOOK IS USED ONLY FOR RECORDING AND POSTING GRADES)
1. ) Click on ‘Lesson Planner’ in left-hand menu. This opens up the same window you’ve seen before.
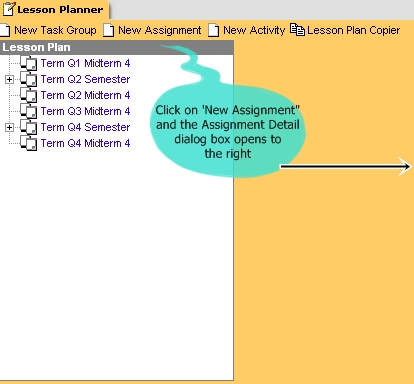
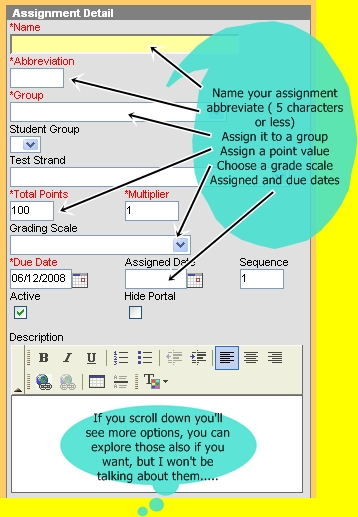
2. ) Click on ‘New Assignment’. The “Assignment Detail’ dialog box appears at the right, and you fill in the details for your assignment.
3. )To use the calendar to place an 'assigned date' on the assignment, or to adjust the due date:
a.)Click on the icon, a little drop-down calendar opens up,
b.)click on the date.
c.)If you need to change months you do that at the top of the calendar.
Once done with the input, SAVE.
When you open up the term you just put this assignment in, you should see a + beside the category you put it in, and when you open up by clicking the + you should see the assignment you just created.
4. ) Repeat steps 2 and 3f or each assignment you want to add.
IF YOU WANT TO COPY THESE ASSIGNMENTS TO ANOTHER CLASS- USE 'COPY GROUP'
1. ) Click on the NAME of the group/folder ( not the folder itself, the words) the assignments are found in. The ‘Group Detail’ Dialog box opens. More importantly, above it you’ll see an option to ‘copy group’. Click on this, and you’ll get to a screen with two columns of information in it.
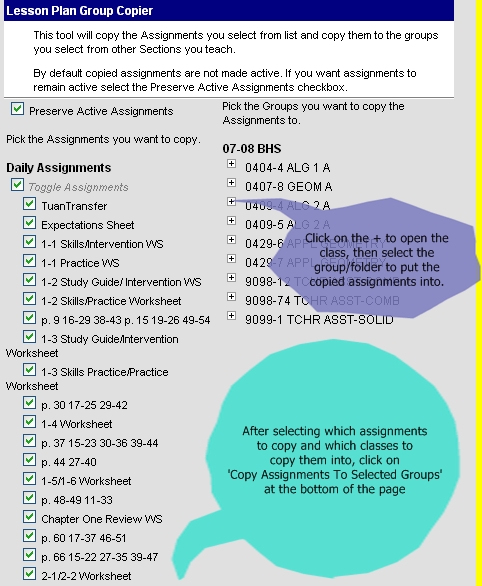
.
The left column shows the assignments in the group your working with. They are all pre-selected, so if you don’t want to copy all of them you’ll need to de-select the ones you don’t want.Then you go to the right-hand column.
2. ) Here you’ll see your list of classes, with the + beside each one. Open up the class, and you see the terms and groups/folders for that class. Select the group you want to copy the assignments to. Then click on ‘ Copy Assignments to Selected Groups’.
IF YOU GO TO GRADEBOOK FOR THE OTHER CLASSES NOW, THESE ASSIGNMENTS SHOULD BE THERE.
CHANGING ASSIGNMENTS ONCE YOU’VE ADDED THEM- JUST CLICK ON THE ASSIGNMENT IN THE LIST, THE DIALOG BOX OPENS. MAKE CHANGES AND SAVE.
PUTTING GRADES INTO YOUR GRADEBOOK
( CAN ONLY BE DONE ONCE YOU HAVE PUT SOME ASSIGNMENTS IN )
1.) Click on ‘Gradebook’ in the Index ( under ‘Instruction’). Your gradebook will open up. At left you’ll have your list of students. In the middle some columns which are empty now until you’ve put in some grades. At the right, if you’ve put some assignments in you’ll see them listed ( using their abbreviated names, which are displayed along the top of the grading area). The right side is what we're going to focus on now:

2.) To put in scores for an assignment ( if you are putting in the scores for just one assignment at a time), just click in the column below that assignment’s name ( you may have to click twice, to make sure the box has a black frame around it, making it active), and type in scores for each student ( if you start at the top, after putting in the first student’s score, press the ‘down’ arrow on your keyboard to go down to the next student’s score box for that assignment ).
2a.) If instead you are putting in several scores for each student ( i.e. waiting till the end of the week and updating your gradebook 5 assignments at a time), after putting in the first score, click on ‘tab’ and it moves you to the next space in that student’s assignment row. When done with that student, just click in the next student’s first box, and repeat the process. By right-clicking in a scorebox, you can indicate whether it is late, missing, exempt, incomplete, they cheated, or the score is dropped by selecting that menu item in the drop-down menu that appears. You can also score them that way right in the box using one-letter abbreviations for each of these categories( L- late, E- exempt, M- Missing, I- incomplete, C- cheated, D- dropped). These are not for the report card, just for your records ( and the parent portal….)
3. ) When done putting in scores, CLICK SAVE before leaving!!! You’ll notice the middle area in you Gradebook now has information in it ( Pts Poss. % Grd)
PRINTING PROGRESS REPORTS
Under ‘Reports’ select ‘Student Summary’:
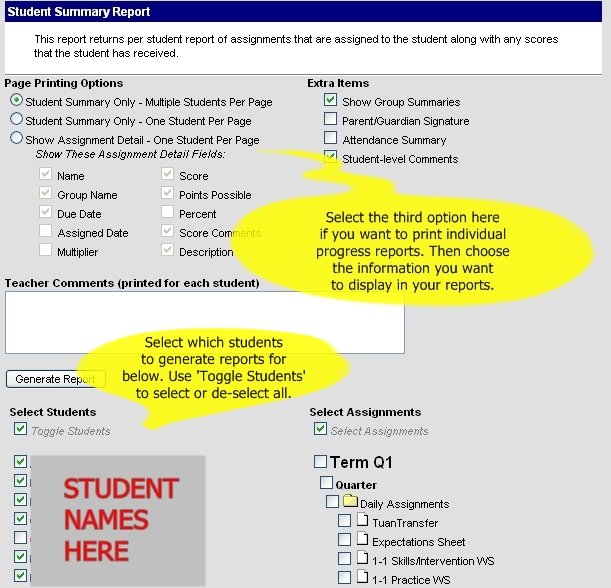
Under ‘Page Printing Options’ select which one you want ( I would select one of the ‘one student per page’ options myself ). If you choose the bottom option here ( show assignment detail- one student per page) then you can select which items to display below that choice. If you only want to print progress reports for certain students, you can click on ‘toggle students’, which de-selects all students, and then select the ones you want to print individually. Once you have made your selections here, click on ‘Generate Report’. A PDF document opens up, which you then print from within Acrobat as you would any other document. If you don’t see a grade, then you need to go back to ‘Lesson Planner’, select TermQ2 Semester and choose your preferences for the semester exactly as you did for your quarters when you were setting up your lesson planner ( choose to ‘use weighting on groups or not, use percents or not, and choose your Curve- at minimum, you need to select your curve). Then save and go back to reports, this time your report should show a grade for each student.
PRINTING CLASS SUMMARIES ( SCORE CHARTS)
Under ‘Reports’ select ‘Section Summary’:
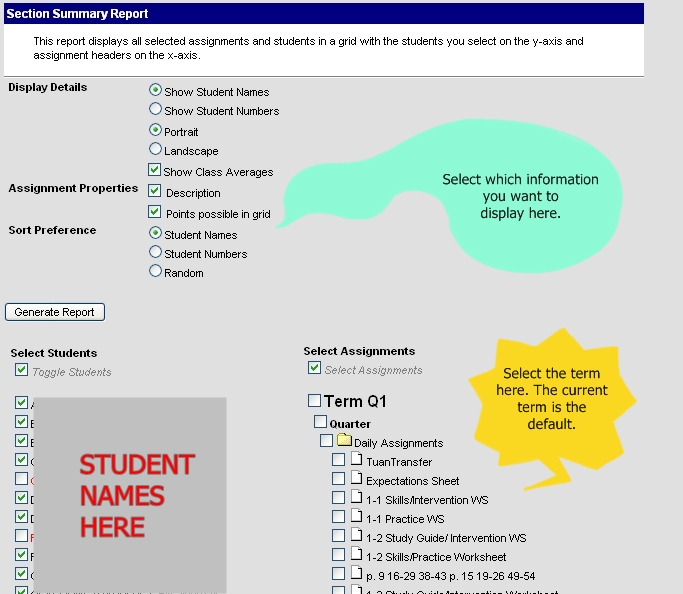
Here you can choose to show students’ names, or ID #. Sort by name or ID#, or randomly. Also, you can choose to eother show a description of each assignment, or just a list. When you select ‘Generate Report’ a PDF document opens, but the first page won’t look like what you want ( it will just be a list of the assignments, with or without a description ). Scroll down to the second page, and you’ll see your list of students, with a grid showing assignments, and a percentage, and a Grade. If you don’t see a grade, then you need to go back to ‘Lesson Planner’, select TermQ2 Semester and choose your preferences for the semester exactly as you did for your quarters when you were setting up your lesson planner ( choose to ‘use weighting on groups or not, use percents or not, and choose your Curve- at minimum, you need to select your curve). Then save and go back to reports, this time your report should show a grade for each student.
![]()
POSTING GRADES TO THE OFFICE
AT THE END OF THE QUARTER
1. Open up your grade book for the class you want to post grades for:
2. Right-click anywhere in the ‘grades’ area of the grade-book ( the middle area, between students’ names and the assignments ).
3. In the pop-up menu that appears, select ‘Post Grades’. The two green columns will fill in with the grades from the previous columns. CLICK SAVE.
ADDING COMMENTS AND ADJUSTING GRADES
ALSO FOR PUTTING T.A. GRADES IN...
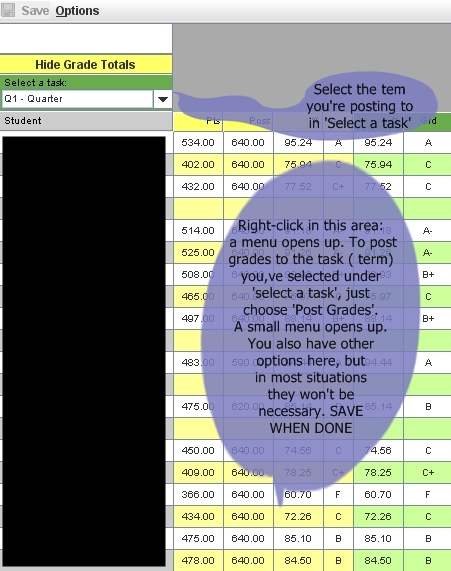
1. In the left-hand menu, select ’Grading By Task’ . You’ll get a blank yellow page with a tab at the top that says ‘Grading By Task’. Below that is a drop-down menu that will currently display ‘Select a Task’ .
2. Use that drop-down menu to select Q1 Quarter to display your students and grades for 1st quarter for that class. You’ll see a list of the students with their percentage score displayed to the right, followed by their ‘Score’ ( grade). Notice the grade is displayed in a drop-down menu.
3. If you want to adjust a grade, use the drop-down menu to do that.
4. If you want to add comments for a student, click on the little notebook icon at the right of the comments window for that student, and the enter codes/select comments window will open up. Select the comments from the list provided, and they will appear in your comments window for that student when you close out of the comment selecting dialog box. If you accidentally put the wrong comment in for a student, click on the X to the right of the comments window, and it will clear comments for that student. WHEN DONE, CLICK SAVE.
PUTTING IN GRADES IF YOU DID NOT USE THE IC GRADEBOOK
1. In the left-hand menu, select ’Grading By Task’ . You’ll get a blank yellow page with a tab at the top that says ‘Grading By Task’. Below that is a drop-down menu that will currently display ‘Select a Task’ .
2. Use that drop-down menu to select Q1 Quarter to display your students for that class. You’ll see a list of the students with A blank area where percentage would be if you had used the grade book, and a blank space for score ( this would also be filled in if you used the Grade-book) displayed to the right. Notice the ‘score’ box has a drop-down menu. Use this to put their grade in. Then when done, CLICK SAVE.
3. ) If you want to add comments for a student, click on the little notebook icon at the right of the comments window for that student, and the enter codes/select comments window will open up. Select the comments from the list provided by clicking in the box next to the comment, and they will appear in your comments window for that student when you close out of the comment selecting dialog box. If you accidentally put the wrong comment in for a student, click on the X to the right of the comments window, and it will clear comments for that student. WHEN DONE, CLICK SAVE.
![]()
SEMESTER GRADE POSTING
THIS WILL WORK DIFFERENTLY FOR DIFFERENT PEOPLE
( DEPENDING ON HOW THEY HANDLED COMPOSITE GRADING )
SITUATION ONE- YOU USED COMPOSITE GRADING AND WEIGHTED YOUR QUARTERS ( 50-50, OR 40-40-20 INCLUDING EXAM, OR ANY OTHER VARIATION )
1. Use the drop-down menu in your grade-book to select Q2 Semester. When you do this, if everything ( weighting, etc. ) is set up correctly, you should see the yellow/green area on the left just as before, and the two quarters ( and final exam if you have one) listed separately in the right side where assignments were when you were in the grade-book for the quarters. Post your grades exactly as you did for 1st and 2nd quarters- follow the directions on page four of this document.
2. If you gave any students incompletes 1st quarter, and turned in adjusted grades for them later, you may have to adjust their semester grade- right now, it will take the ORIGINAL ( most likely failing) percentage from 1st quarter and use it to calculate the semester grade. If you don’t remember who you gave incompletes to, you can look in your grades for each class to find the 1st quarter grades that don’t match the percentage that’s displayed. Then in your semester grading you’ll have to adjust those using “Grading By Task”.
3. ) Now you can post grades, by right-clicking in the grades area as you did for quarter grade posting.
SITUATION TWO- YOU USED COMPOSITE GRADING, BUT SINCE YOU GO BY TOTAL POINTS, WEIGHTED THE QUARTERS 0% EACH-OR YOU DIDN’T USE COMPOSITE GRADING AT ALL, BUT PUT 1ST QUARTER ASSIGNMENTS IN 1ST QUARTER, AND 2ND QUARTER ASSIGNMENTS IN 2ND QUARTER:
YOU HAVE TWO OPTIONS FOR CALCULATING YOUR SEMESTER GRADE NOW-
OPTION ONE- YOU CAN FIGURE OUT WHAT YOUR WEIGHTS SHOULD BE BASED ON YOUR TOTAL POINTS, AND GO BACK TO COMPOSITE GRADING AND FOLLOW THE INSTRUCTIONS FOR WEIGHTING YOUR QUARTERS NOW- THIS WILL WORK PARTICULARLY WELL IF IN EACH CLASS, EVERY STUDENT HAS THE SAME NUMBER OF POSSIBLE POINTS
1. ) Select ‘Composite grading’( left-hand menu, under Admin). In the section window that appears, select Q2 Semester, and another window opens up.
2. ) Under ‘Weight’ put the percentage you want each component to receive- NOTE that some of these may not apply. FOR EXAMPLE what I did: since my semester grade is broken down as 40% 1st quarter, 40% 2nd quarter, and 20% semester exam, I put 40% in for each quarter ( Q1 Quarter, Q2 Quarter) then put the 20% in for Q2 Semester Exam. 3.) Once you’re done setting it up for this class, CLICK SAVE. You have to do this separately for every class, so select the next class using the drop-down menu, and follow steps 1-3 ( including SAVE every step of the way).
3. ) Now you can post grades, by right-clicking in the grades area as you did for quarter grade posting.
OPTION TWO- CREATE QUARTER ONE AND QUARTER TWO ‘ASSIGNMENTS’ WITHIN YOUR Q2 SEMESTER FOLDER- THIS METHOD TAKES LONGER, BUT WILL WORK BETTER IF YOU HAPPEN TO HAVE DIFFERENT POINT TOTALS FOR DIFFERENT STUDENTS, DUE TO STUDENTS TRANSFERRING CLASSES, MOVING IN LATE, ETC.
1. ) Find the total available points in your grade-books for each quarter for the class ( you should find this in the yellow grading area at left ).
2. ) Go to “Lesson Planner” and create a new assignment which will be used to hold your totals for each quarter. ( Name them 1st quarter total, 2nd quarter total or something like that), and put them in the Q2 Semester folder by selecting that term when you create the assignment.
3. ) Print out your grades for the class ( Section Summary Report ).
4. ) Go to your grade-book for Q2 Semester, and input each student’s total points for the quarter into the assignment you just created.
3. ) Now you can post grades, by right-clicking in the grades area as you did for quarter grade posting.
SITUATION THREE- ALL OF YOUR ASSIGNMENTS ARE IN YOUR SEMESTER FOLDER, YOU GO BY TOTAL POINTS ( BUT YOU CREATED SEPARATE FOLDERS FOR 1ST AND 2ND QUARTERS ).
1. ) In ‘Lesson Planner’, go into your semester folder and click on each of your 1st quarter folder(s)- The ‘Group Detail’ window opens up. Select ‘Exclude this group from calculation’. If you also had a Q2 Semester exam included in your Q2 Semester, you would want to do the same thing with it that you did with all of your 1st Quarter folders, unless you want to include it in your Q2 Quarter grade
2. ) Now your semester grade will only include the assignments from you 2nd quarter folder(s).
3. ) Go into your gradebook now, and go to Q2 Semester.
4. ) Right-click in the grading area ( yellow/green) and choose ‘Post to another task and post those grades to Q2 Quarter.
5. ) Now go back to ‘Lesson Planner’ and change it back to include your 1st quarter folder(s).
3. ) Now you can post grades, by right-clicking in the grades area as you did for quarter grade posting.
SITUATION FOUR- ALL OF YOUR ASSIGNMENTS ARE IN YOUR SEMESTER FOLDER, YOU GO BY TOTAL POINTS ( AND YOU DIDN’T CREATE SEPARATE FOLDERS FOR 1ST AND 2ND QUARTERS ).
IN YOUR SITUATION, GETTING THE SEMESTER GRADE IS EASY, BUT YOU NEED TO GET A 2ND QUARTER GRADE. THE FOLLOWING PROCEDURE IS A WAY OF HANDLING THAT:
1. ) Create ONE folder in 2nd quarter ( using ‘New Task Group’ within Lesson Planner )
2. ) Figure out from your grade-book how many total points you had during 2nd quarter ( you SHOULD be able to do this by subtracting the posted total for 1st quarter from your semester total- this gets more complicated, of course, if different students have different point totals, but you can create a separate assignment for each different point total in the next step)
2. ) Put ONE assignment in the folder you created in step one , and make it worth whatever your total points possible were for 2nd quarter.
3. ) Now you’ll have to calculate the 2nd quarter point total for each student ( by subtracting their 1st quarter total from their semester total).
4. ) Input these totals into the assignment you’ve created.
3. ) Now you can post grades, by right-clicking in the grades area as you did for quarter grade posting.