home | what's new? | bad things | tips | calendar | askCat | resources | contact | guestbook
Makeover a Retro Garage Sale Trash Jewelry Box!
Before(see the end for after!) |
 |
I bought this jewelry box last weekend at the Goodwill. I'm not exactly sure how much I paid, but it was less than a dollar. This is not the first one I've had like this. If you look close, I'm sure many of you might recognize it from your own family's collections. My Grandmother gave me one a few months back. It was filled with my Great-aunt's jewelry (all crap, but good for parts) and she had kept it in the basement. My Mother took one look at the thing and said you're throwing it out. My Mom has this thing about used items. She believes they all come with this smell that you can't get rid of. In a way she's right. I'm sure that everyone with this type of jewelry box must have them kept in musty old places like attics or basements. I had it in my Mom's house too long because while I thought I was airing the thing out, she was throwing it out!
These boxes are all exactly the same except for the wallpaper type material they cover the outside with. They all have the drawer beneath, split into long sections, and the pull out tray in the top with smaller sections. These jewelry boxes have so much room and are organized in such a handy manner, it seems a shame to be tossing them. Not too mention, I have yet to find a jewelry box that will hold as well as display all of my chokers and rings in a way that protects them without hiding them. If I can't see something, it doesn't get used. But geez if these things aren't ugly!
So I picked this one up the other day thinking, "there's no reason I have to put up with the Astroturf equivalent of velvet lining the drawers and the ugly vinyl wallpaper covering. I'm going to take this home and gut it!
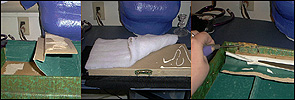
It was very simple to do really. Just start with the lid, pealing each piece apart as complete as possible. You then cut your fabrics using these pieces as patterns. Before reattaching anything, I took a screw driver and unfastened the hinges, removing lid from box. My only advice is to return each new piece in the exact opposite order you took each old piece off. Also, in the lid, there was an old rotting sponge used for the padding. I replaced this with two layers of batting to fit the top of the lid exactly.
As you can see below, the result was rather amazing! I used satin for the outer cover and velvet for the lining. Now there is no smell because all of the wallpaper/cardboard velvet has been thrown out and replaced by my own materials. And this is so pretty, it will never end up in the basement. I'm sure if Mom knew what was underneath, she would throw it out when she's sees it. But aha! I have cleverly disguised the jewelry box as a brand new just bought 22nd century item!
After |
 |

Click to subscribe to the Cat Smith DIYing Newsletter!!
home | what's
new? | bad
things | tips | calendar
| askCat
| resources
| contact | guestbook
Cat Smith DIYing and its contents are ©2002
Contact the Web Mistress regarding any questions, comments or problems:
DIYgothicCatGrrl