home | what's new? | bad things | tips | calendar | askCat | resources | contact | guestbook
|
Make Your Own Bridal Garter |
 |
Materials:
50" of 11/4" wide ribbon
25" ea. of 5/8" gathered ruffled lace, 1/4" to 2/3"
gathered ruffled lace
Enough 1/2" elastic to go around your leg twice
Scrap of lace to make appliqué
1 yd ea. of 1/4" ribbon, 1/4" fancy edged ribbon
3 small ribbon roses, any colors
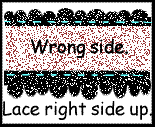 |
Cut the ribbon into two 25" pieces. Take the longer lace and stitch it face up along the bottom of the wrong side of the first ribbon. The smaller piece of lace is sewn face up along the top of the wrong side of the ribbon. |
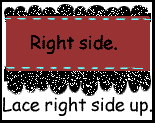 |
Place the second piece of ribbon on top of this and sew close to the edges of the top ribbon. The lace gets sandwiched between. |
 |
Directly down the center of the ribbons, stitch a seam to form two casings for the elastic. Cut the elastic into two pieces. Thread each elastic through the two casings. |
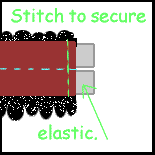 |
Pull the elastic a small bit outside each end of the casings. Stitch down and then up on each side to close the openings and hold the elastic in place. |
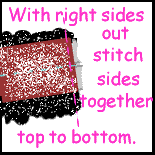 |
Then with right sides together, bend the garter so that both ends are touching and stitch this all the way from the top of the lace to the bottom of the other piece of lace. |
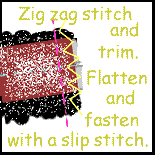 |
Zig zag stitch this up and down and then trim close to the stitching. Slip stitch the top and bottom, catching only the inner ribbon, so that this flap rests flat. Turn right side out. |
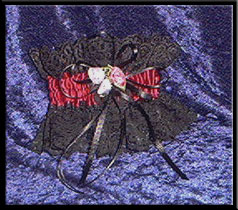
From a scrap piece of lace, cut an appliqué for the front. This could be a flower or any number of patterns you find on the lace. Stitch this piece through it's center to connect it to the front of the garter. Cut three pieces of each of the two ribbons, varying the lengths. Sew them to the center of the appliqué, catching only the outer ribbon so it doesn't show on the inside. Cut three more pieces of each of the ribbons, some 2" and some 3". Taking two at a time, loop them and sew them two pointing left, two pointing up, and two pointing right. Now, to hide the stitching, sew three small ribbon roses on top. Make small stitches through the leaves, near the flowers to camouflage the stitching.
Give to your favorite bride.

Click to subscribe to the Cat Smith DIYing Newsletter!!
home | what's new? | bad things | tips | calendar | askCat | resources | contact | guestbook
Cat Smith DIYing and its contents
are ©2002
Contact the Web Mistress regarding any questions, comments or problems:
DIYgothicCatGrrl