home | what's new? | bad things | tips | calendar | askCat | resources | contact | guestbook
Recycled Sewing |
Use a thrift store find to create exercise pants! |
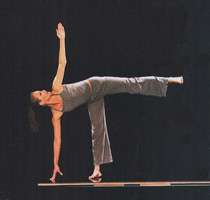 |
So, I saw this section on Yoga in the September 2000 issue of Shape Magazine. Yes, I am such a pack rat that I just ran across the picture and the idea spark hit. As it says on the Goth Workout Website, some of us are "Tubby Goths" and I'm one of them. And seriously, workout clothing is one of my greatest fears! But these pants looked just completely comfortable and I would be willing to be seen in them should I get caught mid-workout. |
 |
Well, I love a good thrift store deal as much as the next girl. But this dress I had picked up for a dollar was never going to get worn. I have a tendency to pick up anything that will fit and is black, hoping I'll think of some use for it later. As I would never be caught dead, let alone alive, in this cotton knit striped T-shirt topped dress (gathered at the waist), I didn't have an idea what to do with it until I ran across the workout pants shown above. Aha! I thought. Time for a little make over magic! |
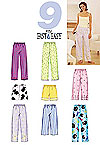 . . |
The first thing to do was find a pattern with legs similar to what I was trying to accomplish. We aren't using the pattern to make the pants, we just want the pieces to help with the cutting of the inner leg to insure a proper fit. I chose Butterick 3314, a pattern for pajama bottoms. I will probably also make some workout pants from this pattern, but remember here we are recycling not creating from scratch |
 |
First thing, pick out the two leg pieces from whatever pattern you chose. It should look similar to the sketch shown here. If you want to try to wing it, just make sure you stick to this shape. After cutting the pattern pieces from the rest in the package, iron out the wrinkles. |
 |
Next, cut the skirt from the shirt part of the dress right below the gathers. This releases the fabric to it's original size. On a flat surface, preferably a cutting board, spread the skirt out. First we are going to cut the front pieces so find your pattern piece that says "front" specifically. On the right side, line up the seam line of the pattern with the side seam of the skirt. Remember, don't pull any stitches! When placing the pattern on the skirt, the other area you want matched up is the hem line. Take advantage of the skirt already having a hem so you don't have to hem them later! We want the completed skirt to save us a ton of stitching time! Pin down the pattern to the skirt, but when you cut around the pattern, only cut the top layer of the skirt being careful to leave the back in tact. |
 |
Now, turn the pattern upside down (this may now be right side up depending on how it was placed for the first cutting). Like before, match the seam line of the pattern to the seam of the skirt and cut only the top layer. Once cut, you should be able to open the once upon a time skirt into one long piece of fabric containing two seams. Flip the fabric over so that you are still working with the right side of the fabric face up. Using the pattern piece marked "back", follow the same directions as the front, matching seam lines but now not having to be careful not to cut other fabric. You will now have two legs and most of the work done! |
 |
Right sides together, pin the inner leg seams together on each pant leg. (The legs are still separate at this point. If you are sewing the two legs together, you're doing it wrong!) Because we want to keep the hem in place, make sure you match the front to the back starting at the hem. Now stitch a 3/4" seam also making sure to sew from the hem to the crotch. After both legs are done, the crotch can be sewn. |
 |
Turn one leg right side out and place it inside the other. Pin the two pieces together and stitch. Stitch again in the curve of the crotch for reinforcement. Pull the leg out of the other leg and you will see our pants are nearly done. |
To form the casing for the elastic in the waste, iron in 1/4". Then fold over just larger than the elastic you will use. I used non-rolling 3/4" elastic so I folded over 1" and ironed it down. Stitch close to the fold, leaving an opening for the elastic.
To measure the elastic, put it around your waste and pull until comfortable. You want it to have been pulled a little to get to comfortable because if you cut it to fit relaxed, the pants will feel too big when worn. Work the elastic into the casing and then hand stitch shut. Your workout pants are now finished and you are now free from the ugly thrift store find!

Click to subscribe to the Cat Smith DIYing Newsletter!!
back to sewing
home | what's
new? | bad
things | tips | calendar
| askCat
| resources
| contact | guestbook
Cat Smith DIYing and its contents are ©2002
Contact the Web Mistress regarding any questions, comments or problems:
DIYgothicCatGrrl