home | what's new? | bad things | tips | calendar | askCat | resources | contact | guestbook
|
How to Make A Jagged Remnant Skirt |
 |
Materials:
A bunch of your coolest remnants
Black thread
Waxed tissue paper (to make a pattern)
Enough 1 1/2" non-roll elastic to go around your waist
 |
First thing to do is make three pattern pieces. Using the shape seen on the left, they should basically be rectangles with a pointed bottom. Take your waxed tissue paper and draw a five inch width with a 31" inch length. Do it again with a 34" length and then finally 37". |
Taking the remnants, cut 18 pieces randomly from the three patterns. You want 18 total, not of each. The combination is completely up to you, maybe you just want to do six of each. Doesn't matter, the fun part of the skirt is the randomness of the length and the variety of fabrics. So go crazy.
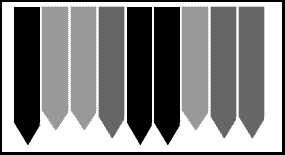 |
Next, on a flat surface (I used my bed) place the pieces randomly next to each other. Stand back and look at what you've done. Do any of the pieces look out of place? Do you have two pieces of the same fabric too close together? Rearrange until you are happy with your combination. |
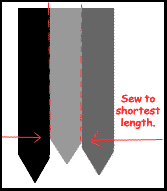 |
Pin the pieces together front to front. I find it easiest to do this by piecing the first two, sewing, adding the next piece. Otherwise you're holding a lot of pins in your lap and things shift around. Sew the first two pieces together, only as far as the shortest piece. Add the next piece and do the same. Continue until you have all pieces sewn together. |
Open this wrong side up and press the seams open. Trim close to the seams, especially at the top where elastic is going to have to pass through. If you have any shear panels, make sure you iron both pieces of the seam towards the opposite piece so that this doesn't show through. After everything is pressed, pin the final two pieces of skirt together and sew shut. You could do the ironing after that step, but I find the process easier to do with the skirt flat.
Press the waist of the skirt under 1/4" and then 1 1/2" to create the casing for the elastic. Measure the elastic around your waste. Sew this all the way around, but leave an opening large enough to put the elastic in. Pull it so it is comfortable but not tight and add 1/4" before cutting. Thread the elastic through and then slip stitch the opening shut.
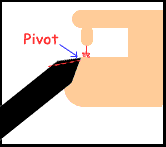 |
Finally, the tricky part... the hem. Press the edges of the skirt under 1/4" all the way around, and then repeat. Basically, you just want to sew the hem slowly because you have pointy edges. Each time you reach a point, raise the needle to the highest position and lift the presser foot. Shift the fabric so you are once again headed in the right direction. Continue all the way around the skirt until the hem is complete. |
A totally unique skirt that helped to use up old fabrics you just had lying around!!

Click to subscribe to the Cat Smith DIYing Newsletter!!
back to sewing
home | what's
new? | bad things
| tips | calendar
| askCat
| resources
| contact | guestbook
Cat Smith DIYing and its contents
are ©2002
Contact the Web Mistress regarding any questions, comments or problems:
DIYgothicCatGrrl