home | what's new? | bad things | tips | calendar | askCat | resources | contact | guestbook
 |
How to make Satin & Lace Bookcovers |
 |
I needed to make a wedding book for my sister's wedding. We are planning, taking notes, and clipping pictures, articles, & ideas. There needs to be a way to organize this stuff. I kept all of it in a binder for a while, but it seemed inappropriate. Also, I kept finding ideas for someday when I maybe get married. Little things here and there that are Victorian, gothic, or black. I decided the simplest idea was to cover the binder. It's inexpensive and I could decorate hers for her and mine, well, black.
Choose: Style on Left or Style on Right (easiest)
1/2 yd satin
1/2 yd lace
2.5 yds gathered lace (for view on left)
2 yds ribbon
Thread matching satin
Wrapping tissue to make pattern
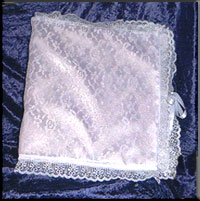
To make the style of the white cover:
First, make a pattern. Open your binder flat and measure across the top and down the side. Also, close the binder and measure from edge of cover to back edge of cover. (If that's confusing, what you're trying to find is the measurement of the closed binder.) For the back piece pattern, measure a rectangle on a piece of waxy wrapping tissue (you can use regular tissue, but the waxy kind will last longer to use again) the length of the binder closed plus 1" by the length of the side plus 1/2".
 |
Next, make a pattern for the side pieces, using the length plus 1/2" of the side (top to bottom). Measure the inside cover to where you would like it to cover. On one binder, I covered the entire piece and on the other, I covered about half. Add 1/2" to that and use the two measurements to create a rectangle. |
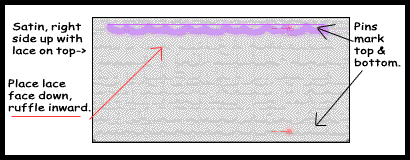
Now, with your pattern pieces, cut one each of satin and of lace using the back piecing pattern. Using the sides pattern, cut 2 each just of the satin. Place the lace flat, wrong side up, on a flat surface. Smooth the satin to fit above it, also right side down. Open the binder flat on top of the combination. Using 2 straight pins, place one just above the top of the binder and one just below. You want a small amount extra to keep the binder from showing.
Cut two pieces of the gathered lace the amount you measured from point a to point b. (That's the measurement before the 1" was added.) Pin each piece to the top and the bottom, lace facing inward, wrong side up on the fabric right side up. (see below)
 |
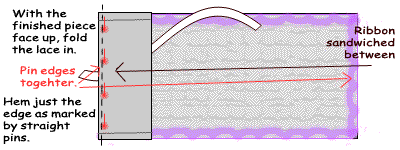
Hand sew the ruffled lace down to the satin/lace combo. After you have it sewn, turn inward and press at pin line. If you would like a bookmark, pin ribbon in center and stitch it in along with the hem. |
Fold the unfinished side under to meet the pin fold and hem. (If you prefer, you can press under 1/4" and then fold under again to the pin fold and press there also.) With the binder closed, wrap this freshly sewn piece around it, top and bottom matching proper area. Now you're going to place a straight pin just outside the cover on the front and back sides. Cut two more pieces of gathered lace to match the side lengths (make sure they are long enough to match the gap left by sewing the first two) and follow the same instructions as above for the top and bottom.
Are we in the same place now? You should have finished one large rectangle, big enough to fit the binder when closed. It should have a ruffle all the way around.
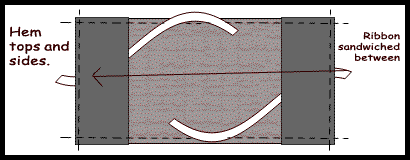
With the two side pieces, fold and hem to match the top and bottom of the finished piece. Press in 1/4" under and hem. Now, with right sides together, pin down each side. In the center, be sure to sandwich the ribbon for the tie. The long side should be on the inside. (See below)
 |
Trim the edges to the hem and fold right side out. You should no fold this around the binder once again to make sure it will fit properly when the binder is shut. This is very important. |
All there is to do now is hem across the top and the bottom, as close as possible to not alter the fit. Make sure before hemming, you have folded the lace back out correctly so that the stitching reinforces it instead of permanently folding it in!
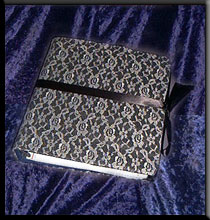
To make the style of the black cover:
Materials:
1/2 yd satin
1/2 yd lace
2 yds ribbon
Thread matching satin
Wrapping tissue to make pattern
First, make a pattern. Open your binder flat and measure across the top and down the side. Also, close the binder and measure from edge of cover to back edge of cover. (If that's confusing, what you're trying to find is the measurement of the closed binder.) For the back piece pattern, measure a rectangle on a piece of waxy wrapping tissue (you can use regular tissue, but the waxy kind will last longer to use again) the length of the binder closed plus 1" by the length of the side plus 1/2".
|
Next, make a pattern for the side pieces, using the length plus 1/2" of the side (top to bottom). Measure the inside cover to where you would like it to cover. On one binder, I covered the entire piece and on the other, I covered about half. Add 1/2" to that and use the two measurements to create a rectangle. |
Now, with your pattern pieces, cut one each of satin and of lace using the back piecing pattern. Using the sides pattern, cut 2 each just of the satin. Place the lace flat, wrong side up, on a flat surface. Smooth the satin to fit above it, also wrong side up. Open the binder flat on top of the combination. Using 2 straight pins, place one just above the top of the binder and one just below. You want a small amount extra to keep the binder from showing. With the binder closed, wrap this piece around it, top and bottom matching straight pins you just positioned. Pin just outside the cover on each side.
Take this piece and pin the sides to it matching up with the pins you place when you measured. This is where you will hem. In the centers of the sides, pin the ribbon pieces for the ties, long sides facing in.
Slice corners off and trim edges close to hem. Turn right side out and press. Fit over binder and you are finished!

Click to subscribe to the Cat Smith DIYing Newsletter!!
back to sewing
home | what's
new? | bad
things | tips | calendar
| askCat
| resources
| contact | guestbook
Cat Smith DIYing and its contents are ©2002
Contact the Web Mistress regarding any questions, comments or problems:
DIYgothicCatGrrl