home | what's new? | bad things | tips | calendar | askCat | resources | contact | guestbook
|
How to make A Stand for Your Sewing Double |
 |
Materials:
12" diameter circle of wood (precut from hardware
store)
4x4 piece of lumber
5 long nails
Hammer
A hand saw
Aleene's Tacky Glue
A straight hanger
A can of spray paint
A can of spray clear enamel
First, follow the instructions for the Sewing Body Double and complete it up to the point of creating the base from a poster tube. Measure from the top of your neck to the bottom of your foot. This is the length for your 4x4 piece of wood. At the hardware store, you can have them cut this for you at no charge. Save the left over piece. I'm sure I'll think of a project for you sooner or later.
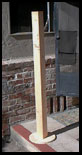 |
Anyhow, on a level ground surface, holding your wooden beam tall, place the circle of wood as centered as possible. Taking the first nail, hammer it through the center. Then, eyeballing each of the next four nails, hammer one into each corner of the four by four through the circular base. Once secure, turn this over so it is right side up. |
Next, just to the side of the middle, saw a niche large enough for the hanger to rest in. If you get sap on your hands, ordinary soap and water won't get it off. This posed quite a problem for me, being a novice at woodwork. I tried a number of things, finding finally that rubbing alcohol would wash my hands clean of the sap. Place glue throughout the niche and rest the hanger inside. If you like, you can also place a couple of nails to ensure the hanger won't budge from this spot. After the glue dries, you can spray paint any color you wish.
Finally, follow the steps from the Sewing Double as repeated here:
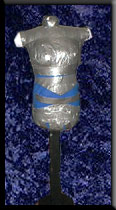
Drape the duct tape covered T-shirt on the hanger. Using more duct tape, seal the opening in the back. Stitch the top of the neck and the openings in the sleeves. From the bottom, stuff with the polyfill until it is firm, making sure to fill in places where you might have a bulge or two. The breast area is important because it is important in pattern measurement. When your second self is significantly stuffed, stand it up on the foam core and trace around the bottom. Using a box cutter, cut around the outline. Take this piece and stuff it in the bottom. Cover with the remaining T-shirt pieces and stitch shut. Add an extra layer of duct tape or paint, whatever you want to finish it off.

Click to subscribe to the Cat Smith DIYing Newsletter!!
back to sewing
home | what's
new? | bad
things | tips | calendar
| askCat
| resources
| contact | guestbook
Cat Smith DIYing and its contents
are ©2002
Contact the Web Mistress regarding any questions, comments or problems:
DIYgothicCatGrrl