home | what's new? | bad things | tips | calendar | askCat | resources | contact | guestbook
|
How to Make Salt Clay Ornaments |
 |
Salt clay is really simple to make, and inexpensive! Using salt clay, you can create unique and original ornaments for your holiday tree. This page is going to show you the simplest way: using cookie cutters and paint.
Materials:
4 cups flour
1 cup salt
1.5 cups hot tap water (no need to boil!)
A large bowl
Your choice of cookie cutters
Skewers (found at grocery or cooking stores- this can be improvised)
Paint in your choice of colors
A nonstick cookie sheet
Rolling pin
Non stick surface
Extra flour for your hands and rolling pin
Here we go kiddies! Time to get your hands dirty! Heat the water coming from your tap. When it's hot, measure one and a half cups and pour that into the large bowl. Dump in the salt and stir for one minute. The salt will thin but not dissolve. Add the flour until the water is absorbed. Remove all rings from your fingers because the next part is messy! Get your hands in there and knead the dough until it is smooth. Keep the dough in an air tight container taking out pieces just big enough to work with. I also like to keep a small amount of water nearby that I can work into the dough if it starts to crack.
Now you're ready to create shapes. If you feel artsy, go ahead and create things on your own then skip down to the baking instructions. Just make sure any place you wish two pieces of dough to make contact you apply water as you would glue on anything else. Later, I will add pages with more advanced ideas.
Prepare your nonstick surface. I like to use a Tupperware product. It's a plastic sheet especially made for rolling out dough for cookies and other things. Sprinkle flour all over it. Get a handful of dough and roll it out. If the dough sticks to the pin or your hands, just rub with flour. Using the cookie cutters, cut out shapes as you would cookies. Each time placing the cutout on the nonstick cookie sheet.
 |
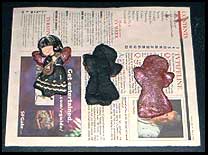
With the fancier cookie cutters, the kind that are just a metal shape, empty in the middle, you just push the dough out gently with your fingers. With the kind shown here, the shallow solid plastic, it's a little more difficult. First pat the cutter in the flour. Don't coat the cutter because doing so might fill in a detail you wish to appear on the finished product. You just don't want it to stick to the dough. The easiest way to get the dough in the cutter away from the batch is using a wooden or other skewer, trace around the outside of the cookie cutter before lifting. This gets rid of any raw edges. To get the dough out, just tap gently. If you mess up, you can always roll it back into the dough and try again! |
The last step before baking, is to use the skewer to make a hole in the top of the ornament. Gently hold the piece in your hand and push the skewer through like a needle through fabric.
When you have a full cookie sheet, you will want to start baking. You don't want to leave the tray sitting out because the dough cracks as it dries. If you have a batch waiting to go in while another is cooking, make sure you cover it with plastic. Preheat the oven to 300 degrees. Salt clay creativity cooks for one to four hours depending on the size. Cookie sized clay only needs about an hour. If you are experiencing puffiness, lower the temperature a bit. When the dough is hard, it is done cooking. Test this at the thickest part of your shape. The dough can burn, so keep an eye on it and don't assume one hour is a given. Do not attempt to cook the clay in a microwave, and under no circumstances can it be air dried.
 |
Once your clay ornaments are completely cool, you can paint them. Craft stores sell small bottles of craft paints in a variety of colors. They have specialty paints that are pearlescent, glittery, or metallic. Go crazy! This is your tree. Use the shapes and colors you want to use for the decorating. |
|
|
After the fronts of the ornaments are painted and dried, paint the backs a solid color for finishing. I use the color that was most used on the front. When the backs and fronts are all dry, use a spray enamel to seal the paint. This will also make the dough last longer, keep it from disintegrating. Coat the front and back at least 3 times, letting them dry between coats. |
The final step is to thread a ribbon through the hole in the top of the ornament and attach a hook. Voila! You now have customized ornaments for your tree or to give as presents!
Store these ornaments in a environment steady place, for example, an indoor closet. Leaving them in the garage or attic can cause them to deteriorate before their time.

Click to subscribe to the Cat Smith DIYing Newsletter!!
back to holidays
home | what's
new? | bad things
| tips | calendar
| askCat
| resources
| contact | guestbook
Cat Smith DIYing and its contents
are ©2002
Contact the Web Mistress regarding any questions, comments or problems:
DIYgothicCatGrrl