home | what's new? | bad things | tips | calendar | askCat | resources | contact | guestbook
|
How to make A Simple Velvet Curtain |
 |
Materials:
1 yd velvet
2 yds 2 1/4" satin ribbon
1 piece of same ribbon the length of the width of the fabric after ribbon
is sewn to sides (I'll explain)
Trim the same length as the last measurement
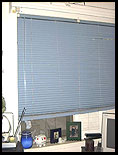 |
To see how I came up with this idea, it's important to see the before. I moved into my sister's old bedroom and she had these powder blue blinds left behind. I kind of wanted to leave them up, though, because the summer sun beats right down on my window. Needless to say, I'm not very fond of that. First I applied window tinting materials to the outside of the windows. Then I chose to keep the blinds up, but they don't move up and down really well, so I have them set where I can still let a breeze in. |
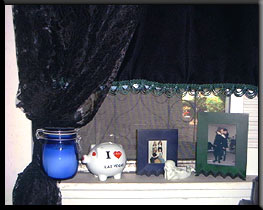
I found a yard of black velvet in the remnants of a fabric store, very inexpensive. Holding it up, it appeared the perfect size. When I got home, it was just slightly smaller than the area I wanted to cover. So this is how I made the curtain to fit the window.
The yard length is the sides. The first thing to do is cut 2 one yard pieces of 2 1/4" black satin ribbon. On the first side, pin the ribbon to the edge, right sides together. Stitch 1/4" seam.
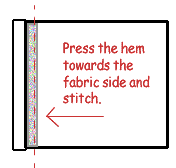 |
Fold the ribbon and fabric face forward and press the seam towards the fabric side. Stitch this down (see picture). Repeat this process of sewing the ribbon to the other side. |
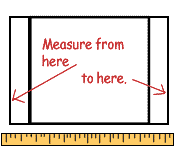 |
Now measure the width of your almost completed curtain. Cut this length of ribbon. To the top of the fabric, pin this, right sides together. Press the seam towards the ribbon. Trim this seam down close to the stitching. |
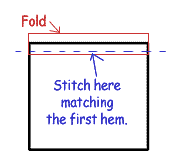 |
Fold the ribbon in half, wrong sides together, matching the edge to the stitching on the reverse of the fabric. Stitch close to the where the ribbon meets the fabric to create the casing for the curtain rod. |
|
|
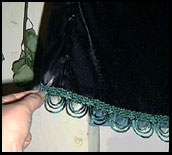
To finish the curtain, cut a piece of trim to match
the length of the width of the curtain again, but this time just
a little longer. You want to be able to fold the trim over the edges
first so it doesn't unravel and second so the edges look finished.
Pin the trim to the curtain wrong side of trim to front side of curtain. Stitch it down. Afterwards, trim the fabric anywhere it shows longer than the trim. That's it. It's finished. Pretty simple. Pretty dark. It's a bad thing! |

Click to subscribe to the Cat Smith DIYing Newsletter!!
home | what's new? | bad things | tips | calendar | askCat | resources | contact | guestbook
Cat Smith DIYing and its contents
are ©2002
Contact the Web Mistress regarding any questions, comments or problems:
DIYgothicCatGrrl