| TM |
|
Paint Mask How To |
|
There is certainly no shortage of modern technology adding a new twist to established methods of doing things....and airbrushing is no exception!! In this article, I will be showing how a precision cut vinyl paint mask can save you a TON of time and exacto blades!! Many of you may have heard the term "plotter" thrown around in various airhead circles from time to time. This refers to a machine that will precisely follow a computer generated path and cut stock vinyl film material. With the right equipment and software, it is fairly easy to generate a high quality and sometimes very complex pre-cut mask that you can use in place of the traditional frisket or layers of overlapped masking tape and hand cutting with an exacto knife, which can be very tedious and sometimes damaging to the previous paintwork. The plotters are a little expensive and may not be the solution for everyone to have their own setup, and I wont be going into the planning, designing, or cutting of these masks, but, you may be able to talk with a local sign company to get something done for you, or, you can get in touch with me through my website, www.FlameMasks.com and I will be happy to discuss making a mask for you. Ok, are you ready? Then, lets get to it!!!! |
 |
|
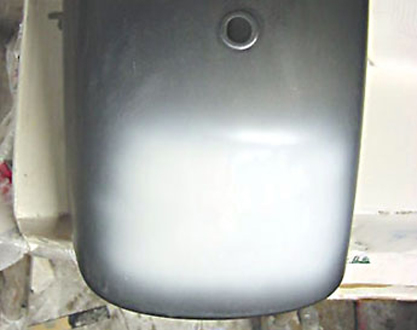
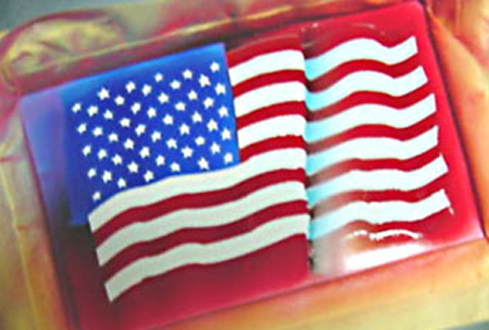
STEP ONE : This is the rear fender of a Honda Magna. Its been prepped, primed, and basecoated with a Jet Black urethane, then cleared with HOK SG100 intercoat clear and was lightly sanded with 600 grit paper. Then the general area for the US Flag I plan to apply is sprayed with White and allowed to dry for an hour or so. This will serve as an undercoat for the colors I plan to use for the flag. I used HOK Pinstripe Urethane White for this, reduced 100% with RU-310 Fast Dry Reducer. I like this paint for basecoats under artwork because it drys a little smoother and glossier than regular basecoat urethanes. Shoot a few wet coats, giving it about 3-5 minutes between coats until you have a nice even coverage and its a good idea to shoot about 1 1/2 inches bigger than you will actually need for the mask and don't be too concerned about the overspray at this point, just make sure there is ample area for the design that's smooth and free of overspray roughness. |
 |
|
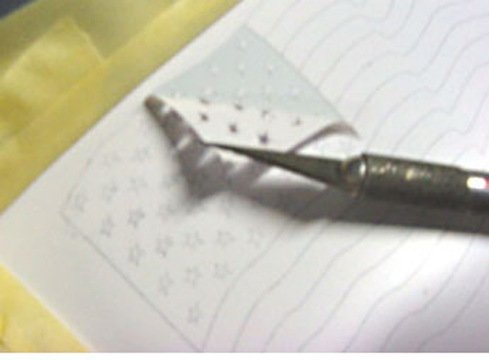
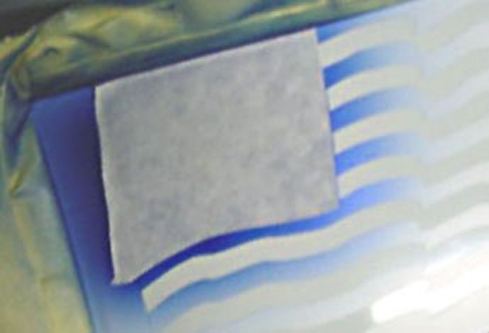
STEP TWO : I have a precut mask prepared for this application and have applied it to the fender, over the white undercoat area. The lines you see in the pic here were drawn on with the plotter prior to actually making the cuts so that it would be easier to tell where the cuts are during the process of painting. The mask should be applied carefully, while watching for any creases that may develop. Flat or slightly curved areas rarely will have much (if any) creasing, but, if they do occur, they can easily be worked out with your fingers, an edge of a credit card or semi ridged squeegee tool. Once smooth and free of creases or air bubbles, I "frame in" the outer edges of the mask with 1" masking tape. I use a reverse masking technique with the tape which means I aligned the top edge of the tape with the extreme outer edges of the mask, but, only pressed down the top half of the tape, then pulled the bottom edge of the tape (not in contact with the mask surface) away with the sticky side up. I added two widths of tape all around the frame and angled them up slightly. This works great because it "deflects" the paint overspray upwards and away from the rest of the surface of the fender and the overspray does not stick because its dry before it can contact any surface after deflection. |
 |
|
STEP THREE : Now I start pulling up parts of the design and painting a section at a time. I want to paint the blue "star field" first because it will need to be remasked before doing the stripes or shading I have planned. Plus, by unmasking ONLY the star field and LEAVING the "stars" themselves covered, after the blue is applied, the stars will still be white, as they should be. Care should be taken that these stars do not come up with the star field section...if they do, then, reseat the mask, gently hold the star in place and resume pulling the field up. |
 |
|
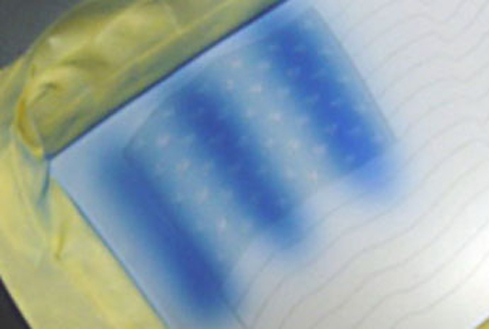
STEP FOUR : With the star field exposed, check all the stars to ensure they are completely in contact with the surface by just giving them a little press with your finger....clean finger of course!! The mask material is "pressure sensitive" so it sticks pretty well with just a little pressure applied. Now I start using light coats of HOK Majik Blue Pearl (PBC37) focusing my strokes more heavily in the areas of the flag that will have slight "waves"...judging this from the way the stripes below the star field are curved. Painting these areas heavier adds a little more depth to the blue and though its not very evident, this is the beginning of a very natural looking shadowing process. |
 |
|
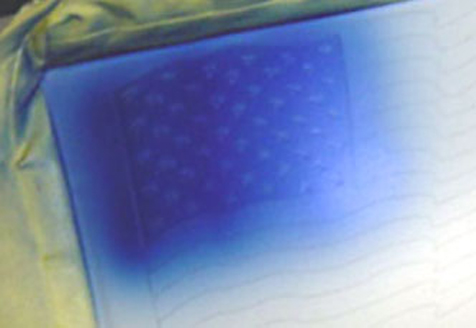
STEP FIVE : After the shadowed areas are established, two medium coats of the Majik Blue Pearl are applied evenly over the entire field area. This allows some of the shadowed areas to show , but, only slightly. |
 |
|
STEP SIX : You might want to use a reference pic of the flag at this point to make sure you remove the correct "stripes"...I plan to paint the RED stripes, leaving the "white" stripes masked, so all those that will be red are now unmasked. The star field area is then remasked using "transfer tape" or "application film" which is used to transfer the cut vinyl mask to the fender in step two, which keeps the cuts locked in place until after the mask is applied, then the film is removed. The transfer tape is used frequently as an alternative to frisket or overlapping masking tape. It cuts much much easier than either of the two and is not as tacky, so, its not likely to pull the paint up when removed. Notice that the only edge of this masking that MUST be cut precisely is the right edge of the star field area because this is the only spot where the "RED" flag stripes will actually meet the blue of the field. Thus there is a lot of freedom for overlapping the cuts on the other three sides. |
 |
|
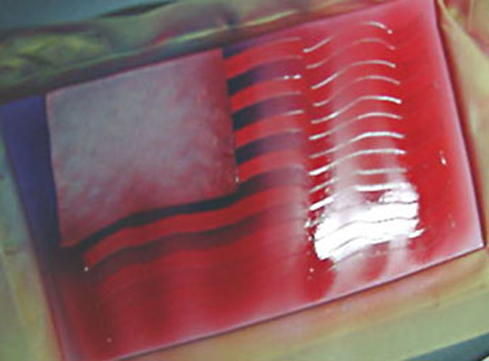
STEP SEVEN : HOK Wild Cherry Kandy (I used UK-03, which requires KU-100 catylist, but KBC03 basecoat can be used instead depending on preference and product availability in your area.) is then applied in three EVEN medium wet coats over the entire stripe area. Then, after the last coat has dried for about 3-5 minutes, but is still semi wet, I begin to apply more concentrated strokes in the "fold" or "wave" areas of the flag...as in Step Four with the star field, again, using the curves in the design as reference for the darker shadowed areas. I like to use Kandy Colors for this because they will get darker with each layer of color. So, keeping the remainder of the strokes concentrated in the fold or shadowed areas, effectively makes the illusion of a wave because its darker. I stop with the shadowing a little short of the actual shadow tone I really want, because I will also be shadowing the white stripes in a moment and I don't want the red stripes to be "too" dark before proceeding. |
 |
|
STEP EIGHT : After the Kandy Red has started to get "tacky", I begin removing the remaining masked areas starting with the stripes. Its important not to let the red setup too long because it can make rough edges or peel up some of the other paint...if you wait too long, you might want to use a SHARP exacto blade to lightly cut through the red on the edges of its masked areas before pulling it up. A good way to test how tacky the paint is to touch an area ON THE MASKING, and when you pull away from the surface, you feel its soft, almost still wet, BUT, there are NO Strings of paint following your finger...that's about right!! You MUST BE CAREFUL not to let the mask or your fingers touch any area that's been painted as smudges at this point can be disastrous!! |
 |
|
STEP NINE : I want to use Oriental Blue Kandy (KBC-04 or UK-04) for the shadows that would be on the WHITE stripes...it just looks more natural than a darker shade or black would. Also the transparent properties of the kandy again help make the shadows less prominent and thus more realistic. The center of the flag has a large fold or wave that would not be seen if looking at this flag in real life, and this area would be much darker than the smaller waves. So, to simulate this difference, a "hard" edge is established by masking with the transfer film and cutting away the part that runs over the right portion from the fold. Then a few coats of the kandy blue are applied allowing a little drift to the right of the masked edge. |
 |
|
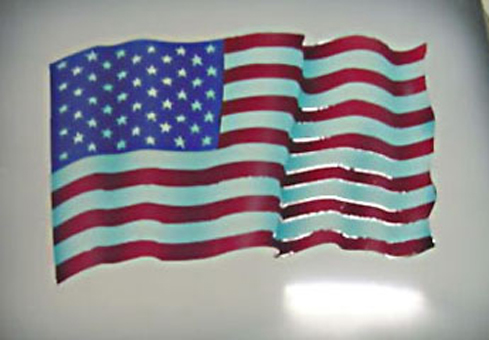
STEP TEN : Here you can see the effect that the "hard" edge masking has for the fold area...effectively, giving the illusion of the natural shadow from a heavy wave in the flags material. |
 |
|
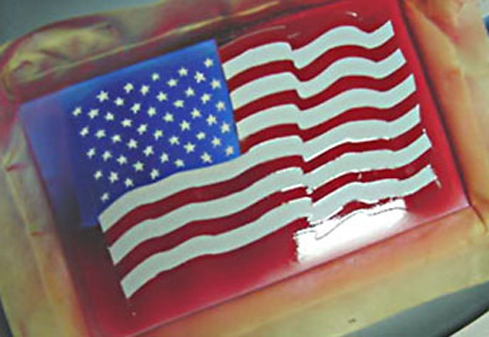
STEP ELEVEN : The Kandy Blue is now used in ALL the other areas of which there is a wave indicated by the design. Notice the heavy wave area just done in step ten, has also been sprayed lightly again, letting the stroke drift to the left a little this time. Also the Kandy Blue shading is continued into the star field which will complete the shadowing done in the early steps of this area. |
 |
|
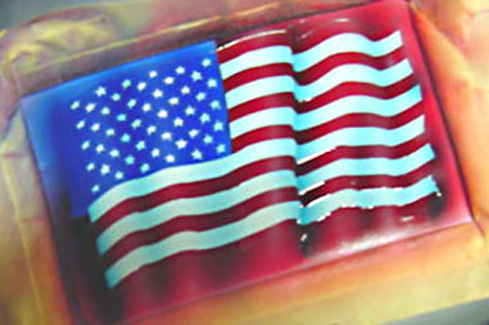
STEP TWELVE : When happy with the shadowing, Two wet coats of SG-100 are applied to protect the work so far and then all the rest of the masking is removed. This is allowed to dry overnight and then lightly block sanded with 1000 grit wet paper to start knocking down the "high spots" in the paint so that eventually, the surfaces will be even. I also at this point sand the edges of the white undercoat area making sure there is no rough overspray remaining. |
 |
|
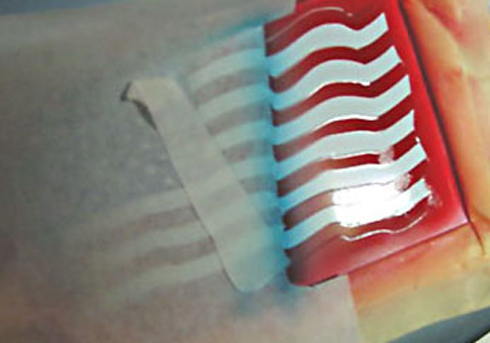
STEP THIRTEEN : Now the entire flag area is covered with a solid mask portion that was cut with the plotter to match almost exactly, but just about 1/32" larger which will give the effect of an highlighted edge or "hem line" to the flag later. Once the mask is in place, I use HOK Orion Silver (PBC-02) and a straight edge of heavy paper to make a "burst" effect that will appear to be behind the flag once the mask is removed. Now I proceed to paint the rest of the fender and other parts for this Magna. I have to leave the flag masked until all the rest of the fender has been painted. Then it will be unmasked and the clearcoat/colorsand process will begin until the surface is even. |
 |
|
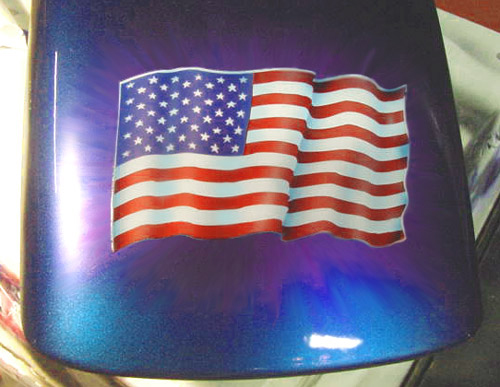
STEP FOURTEEN : After I applied the custom mixed Candy Blue Pearl over the rest of the fender, the burst behind the flag was not exactly the way I wanted, so, before I unmasked the flag, I used the same method as in step thirteen and made a lot of "Tighter" Rays by moving the straight edge in smaller distances at a time, again in the circular pattern, then lightly spraying first a layer of Majik Blue Pearl and then repeating the process with Passion Pearl (PBC-65). This gave the burst a very nice "ghosty" look which also has some solor shift properties...all blending into the candy/pearl main color beautifully!! Now the clearcoat process is done. I used Duponts 7600 ChromaClear over this one. Block sanding lightly with 1000 grit wet and recoating with clear until the surfaces of the fender and the flag were even, then applied one final coat of clear. Thats it for now...hope this has been helpful to you!! Kevan.....KB Kustoms |
| Copyrights :Airhead Airbrush.Com , Inc. Reserved No part of this tutorial may be reproduced, stored in a retrieval system or transmitted in any form or by any means, electronic, electrostatic, magnetic tape, mechanical or otherwise, without prior permission in writing from Airhead Airbrush. Com , Inc. |