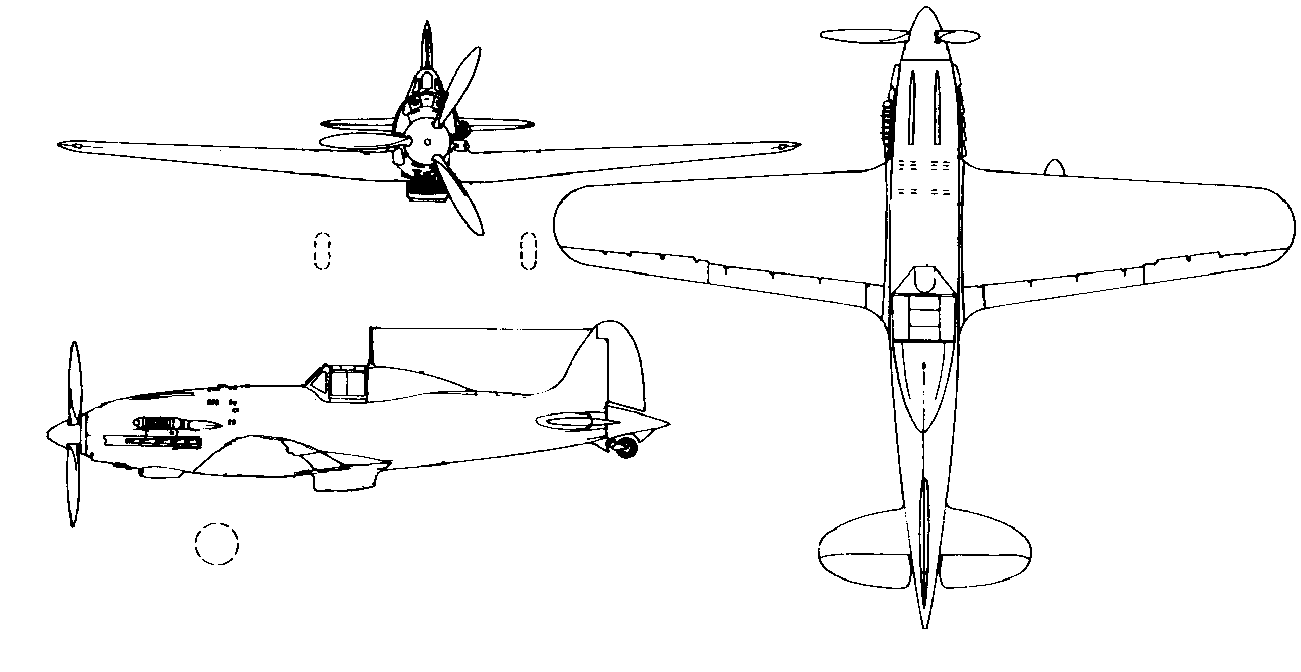
Macchi MC202 Folgore |
Design and project by Louis Dionne [[email protected]]
October 2006.
[Last edit: March 2009]

Summary:
Full Size
Wing Span: 10.58m [34.71']
Length: 8.85m [29']
Height: 3,02m [9.9']
Wing Area: 16,80m2 [180'2]
Weight: 2,357kg
Speed: 600km/h @ 5,500 m
Range: 765km
Max. Elevation: 11,350m
Engine: DB.601/A-1 o RC.41
Total HP: 1,175
Armament: 2 x 12,7mm
Total Built: 1100
Prototype
Scale: 1/15 eme
Wing Span: 70.5 cm [27.7"]
Weight: 170-260gr [6-9oz], (7.1oz on prototype)
Profile: Clark Y, 2° washout at tip
Wing Area: 738 sq.cm [114.4 sq.in.]
Wing Loading: 9oz/sq.ft (on prototype)
CG: 36 - 49mm from LE
Motor: CD-ROM
Propellor: APC 4.75x4.75
Power source: 2S 800mAh Li-Po
Current: 5A
Prototype has 3 servo driving elevator, ailerons,
rudder, has removable landing gear.
For indoor flight best keep the weight under 6oz

Snap shot from the excellent IL2-Sturmovik game. You can get excellent scale details from viewing the MC202 under any angle using this air-war simulator.

Equipment:
| Motor |
50-80W motor |
| Prop | Prototype: Gunther 125 x110 (5 x4,7) or APC 4.75x4.75 prop |
| Battery |
700 to 1000mAh Li-Po packs |
| ESC |
10A ESC Prototype: Castle Creation Phoenix 10 BL controller |
| Servos |
2-3 µservos, 3g to 9g Prototype: 2x 3.3g servos (rudder/elevator), 1x 9gr (aileron) Recommended: 2x 3-4gr servos (aileron, elevator) |
| Receiver |
µ receiver, 3 or 4 ch, 5g to 15g. Prototype: Sombra Labs Lepton 5 (full range processor based sub-micro 5ch receiver) |
Materials:
Extruded polystyrene for the wings and tail feathers then
expanded polystyrene for the fuselage.
Glue:
- Water based contact glue (Latex)
- Foam friendly CA
- Epoxy
- Polyurethane glue
- Goop
Paint:
- Water based paint like acrylics applied with brush or small foam roller or sprayed with air-brush system.
- Foam friendly spray cans (Acrylics, Krylon H2O)
Hardware:
- Main wheels, like the Du-Bro 1.25" Lite Wheels (Du-Bro part at Zebra Hobbies; #125MW )
- Tail Wheel (Du-Bro part at Zebra Hobbies; #12MTW)
- Thin music wire (1/32")
- Carbon rods for the pushrods (0.040"), for the landing gear (0.070")
- Strong magnets to hold the wings (1/4") and canopy assembly to the fuselage (1/8")
- 1/32" PCB material to manufacture the control horns and tail wheel bearing plate.
- You could use micro hinges or wick type flat hinges, but the foam is quite fragile. I prefer to use tape for this. I used 3M Blenderm, good adhesion, waterproof, thin and very flexible.
Decals:
- Make you won on your ink-jet printer on regular paper and glue them on
- Printed on an ink-jet printer on Avery Clear Full Sheet Labels (Avery #08665)
- Here is something to work with:
MC202
decals
| Construction |
| 1) Wings |
|
Wings are cut from regular blue extruded foam with these dimensions:
Once you have cut a right and left panel...
You can use whatever method you want to make and control ailerons. I propose you to use 2 ailerons and to minimize weight, go for a single servo to drive them.
There is an alternate method to drive a single aileron
from a single aileron servo. I prefer a central servo driving torque rods; it drives two ailerons with the single servo imbedded in the wing center joint and everything is completely enclosed in the fuselage with no control horn sticking out in the breeze. If you are using a NiCd or NiMH power source, you may not have enough space inside the fuselage to have all the equipment along with the batteries. But let's assume you will be using Li-po or similar technology along with sub micro servos in the 3 to 6gr range. In the picture below, you will note the single central servo, dug in the wing thickness, the driving pushrods with a V shaped kink to allow adjustments, the transparent hinge material and the green masking tape to reinforce crucial areas. These tapes pieces will stay in place and be painted over. The torque rods are capped with aluminium (or brass in the case) tubes crimped and drilled to receive the pushrods. A bit of CA will maintain the tubes on the ends of the torques rods. Additional tubes are used as bearing for the torque rods and are recessed in the wing between the tube-caps and the ailerons. The fuselage sides will prevent the pushrods from coming out of the tube-caps. The center piece of green masking tape is providing a strong retainer for the glue holding the magnet keeping the back of the wing in place on the fuselage. Another piece of tape is tape to the bottom of the wing to improve on the wing joint and hide the hole for the central servo. I used 3M Blenderm to fix the ailerons to the wings, then painted over. Others have used light iron on covering like the Nelson Lite.
There is an alternate method to drive a single aileron
from a single aileron servo.
|


| 3) Fuselage |
|
The fuselage comes in 5 sections; the nose, the battery area, the main section and the 2 tail sections. The cockpit opening is cut after from the top of the fuselage and acts as the trap to access the servos and replace or charge the battery pack. The nose section has a round hole through it to fit a large CD-ROM motor. A brushed 280 motor would fit, but is a very much heavier proposition. All sections have a bottom slot where the hot wire enters and exits to empty the inside. The last tail section has the wire going in from the top. All the cuts are made with the parts sitting on their side. The foam used for the fuselage is a heavier grade of Expanded Polystyrene. The Expanded foam has no residual internal stresses and gives excellent results for thin walled parts coming out straight.
Only the back part of the section #1 is kept and then sanded to curve into the spinner into the characteristic shape of that nose section.
The last section of the fuselage has slots for the fin and stabilizator. The next section describes them. Once interlocked and into the slots, you will glue in a few extra pieces of foam and shaping to complete the tail.
After assembly and the sanding of the nose section to a sharper angle. We see, below, the hatch in the center section. It is retained with 2 magnets, embedded in the front and back of the hatch cover, while matching screws are embedded in the fuselage at the right location.
|


| 4) Stabilizer |
The stabilizer and elevators come in three separate pieces and are cut out of the same material as the wing panels.
-
Round the LE of the stabilizer using a sanding block.
-
For the looks, you may want to taper the TE, but this will weaken the foam in case of a sudden contact with Terra Firma.
-
Bevel the front of the elevators.
-
Join the elevators halves using a 1/8" hardwood dowel.

| 5) Fin & Rudder |
There is a small long thin piece of foam to be glued on top of the fuselage to form the headrest. Note the slight mistake in the picture below; the headrest should be extended to the fuselage opening.
Note also that the original had an open gap between the canopy and the headrest sides. This can be clearly seen in the next picture from the IL2 Simulator.
|


| Final Assembly |

You can attach the wings to the fuselage in different fashions:
- glue the wing to the fuselage permanently; this is the most sturdy option and also the lightest.
- use a 1/8" dowel glued to the TE (and sliding into an aluminum tube glued in the fuselage at the TE point) and a pair of strong neodymium magnets to retain the front of the wing.
- I used 2 pairs of magnets. One pair in the front and one the back. The magnets in the back fixed to the fuselage is glued to a balsa stick reinforcement. A tongue in the front of the wing is still required if you aim for the upper range of motor power.
- You should laminate two 1/64th plywood to the inside fuselage sides along section #3, if you do not glue the wings to the fuselage. This is a high stress area.
The Tail Feathers
- Make yourself a few control horns (using credit cards, thin 1/32" PCB or thin plywood) and glue them to the elevator - and rudder if installed.
- Glue the stab to the fin and inside the fuselage slots at the rear, making sure everything is square.
- The last section of the fuselage ending past the tail feathers is built up using scrap blue foam.
- Use light sparkle to fill any hole left and smooth out everything.
Hardware
- Make yourself a few control horns (using credit cards, thin 1/32" PCB or thin plywood) and glue them to the elevator and rudder if installed.
- You can use .040" carbon rods for pushrods ending with a thin music wire glued to the pushrod using a wrap of Kevlar thread and CA.
- Use masking tape to protect your servos and then use foam friendly glue to fix them to the fuselage sides and in the wing slot. I used Goop glue direct on the servo when foam is not involved. When dried the thin layer of dried Goop is firm, but a strong pry will release the servo and the Goop can then be rolled off with the fingers.
- Install your servos in the fuselage. Set their neutral points and route the carbon rods through the fuselage and the rear bulkhead where appropriate to reach the servo and minimize the binding in the pushrods.
- A stiff music wire is used to drill holes through the fuselage where the pushrods will pass.
- Install a small balsa support inside the mid rear section of the fuselage to support the carbon pushrods for the elevator and rudder actuation. Drill 2 holes for the 2 pushrods roughly in line with where the stiff music wire was passing through.
To fly indoor or from ground, I prefer to have rudder for ground control and of course, landing gears. If you install rudder, add a small tail wheel to a tail bracket glued to a slot cut half way through the rudder. End the top of the tail bracket in the rudder in an inverted L shape to transfer torque from the rudder to the tail wheel.

A small piece of 1/32" PCB material is used as a bearing for the tail wheel. Use Vaseline to prevent the strut from sticking to the bearing plate.


I located the landing gear legs 90mm from the centerline, 11.5mm from the LE. The landing gear is made of thin music wire, attached to a 0.070 carbon rod using Kevlar thread and CA. The carbon rod is then glued to a hardwood dowel section imbedded in the wings glued to the bottom of the wing. Use light weight wheels. I prefer to use the Du-bro 1-1/4" Mini Lite Wheels (#125MW). They weigh 1.1gr each.


| 1) Light Sparkling |
Use light sparkle to fill all the tiny foam holes and sand smooth. Cover the whole airplane, let dry, then sand lightly. I use a Lepage brand from the local hardware store.

| 2) Wing Fillets |
- Sand the wing seat to match the wings. Once they fit well, do the wing fillets. Easily done.
- Put protective wax paper on the wing center section.
- Cut heavy stock paper and glue to the wing seat; this will serve as the bottom of the fillets and will mate with the the wings. Make sure there is enough paper to support those fillets.
- Once the glue is set, with the wings still on, apply large quantity of the light sparkle filler to form those fillets.
- Once sparkle compound is dry, sand carefully with sand paper rolled on your finger.
- Apply more sparkle to complete a nice fillet. Sand again.
- Then trim the excess paper.
This will produce very nice fillets, but they are somewhat fragile. You will need to put a few layers of protective polyurethane on top.

| 3) Paint |
- Paint a few layers of polyurethane varnish (PUV), like Varathane, to provide a harder shell to the foam.
- Sand smooth between every layers.
-
Use cheap acrylic from the dollar store and either spray paint (thin with water) or brush a couple of layers starting with the light colors first.


Once the base paint job is done, complete with your favorite camouflage scheme. The MC202 was extensively used in the desert theatres and offers interesting mottled patterns. An airbrush system can speed up the process, but a good old brush a steady hand and patience can deliver fine results.


| 4) Decals |
Add your decals.
You can use the
plate I did or make your own:
decals/planche de
décoration.
The white bands were made using iron
on white covering. Apply minimum heat to reduce chances
of melting the foam under. Note the fasces on the wings
should be facing outboard on both wings. The plate
provided has been corrected to improve the quality of
the images and correct the orientation of the wing
marking.


The completed the tail sections with the pushrods hooked up.


A Dubro-Bro micro tail wheel will complete nicely the tail section. (Du-Bro part at Zebra Hobbies; #12MTW)

| 5) Spinner |
For the test flights, I have been using a Graupner Speed Spinner with the shaft hole enlarged to the 3mm, the diameter of my CD-ROM motor shaft. A bit heavy for our use, and too small for scale rendition, but runs true.
You can also make you own spinner by turning a foam chunk on the mandrel of a drill press.
-
Cut a plywood disk to serve as back-plate and attach to the prop adaptor.
-
Temporarily glue the foam block.
-
Turn said block to shape.
-
Remove block from back-plate
-
Cut a slot for the prop in the block
-
Reglue the block.
-
You can finish the foam cone using the same method as for the fuselage.


| 6) Motor |
The motor used comes out of a defective CD-ROM/DVD drive from a PC. The stator was rewound, magnets replaced by strong neodymium magnets. Machined a simple bearing tube holding 2 bearings (6x3x2.5mm bearing).
The motor draws 5-6A depending on the propeller and Li-Po pack used.
As indicated previously, I make my own motors using brushless motors off defective PC CD-ROM/DVD drives. Opening up and dismantling such devices gives you micro-switches, 3mm bars, sometimes matching bearing and various sizes of stators and rotors. I replaced the magnets in the bell/rotor for 12 stronger Neodymium magnets. 5x5x1 is a popular choice. I also replaced the winding to match my needs. Going for multiple strands of thin wire gives better results than a single strand of thicker wire; the thin wires are more flexible and you will fill the space between the stator teeth with more copper. You just have to be careful to keep the strands to stay side-by side and not twist themselves as it will waster more space.
As you can see in the picture below, I also replaced the bearing assembly with a machined tube with inside shoulders for the bearing and a single outside shoulder to seat the stator. Bearings used are typically 6x3x2.5mm. This stator is wound with 3 strands of gauge #28, 13 turns, tied in Y format. Making a fairly hot motor.
A bit of black heat shrink isolate the junction and soldering point of the 3 winds on the second picture. The other end of the winds go to a small PCB where a 3 pin connectors is also soldered; the PCB and pins are mechanically isolating the fragile copper wires from heavy manipulation or encounter with Terra Firma.


The next picture shows the machined motor mount. A second hole was done in the firewall and motor mount. This was required to allow access to the sets-screw visible inside the motor mount. A small hole in the bottom of the fuselage at the glue seam allow an Hex wrench to reach the sets-screw. The black motor connector (3 wire connector) was then passed in the new hole at 60deg from the original one.


Front view of the Folgore without the end bell and exposing the stator and it's copper windings.
| 7) Canopy |
I made a balsa wood plug for the canopy and vacuu-formed the canopy. Then raised the bottom to allow for the curve at the base. I applied several layers of floor varnish (Polyurethane) sanding in-between each until I got a nice shiny surface. Once satisfied, rub baby powder to ease the release of a completed canopy from the mold.

My vacuu-forming machine is a simple wooden box with a top drilled with many small holes and another hole on a side panel to insert the tube of a shop vac. I make a plastic holder made out of plywood. I staple a rectangle of plastic material to the plywood frame and heat up the plastic over the heat of a stove burner. Once everything is soggy, turn the shop vac on and apply over the plug.
For the small number of kits I made, the canopy is provided and you will need to cut along the pencil marked line on the canopy and adjust for the sanded shape of your foam fuselage and cockpit section. I masked off the window areas of the canopy using left-over material from the decal print job (Avery #08665). The canopy was pressed against the foam once located and then the foam was sliced at the imprint left to slide in the canopy; so the canopy is actually lightly inserted into the foam. Use the picture below to paint the cockpit structure once glued to the fuselage section. Use the water based contact glue to hold the canopy to the foam. Paint is done outside the canopy to fill voids and such. A few touch-ups on the camouflage was done after the paint has dried and the masking removed.


Next picture shows the spacious interior with the elevator and rudder servos glued to the plywood side doublers. In front of the opening, the micro receiver can be seen. You can barely make out the airleron servo arm under the receiver. The canopy section is held in place using 2 metals screws - the sand colored nipples that can be seen here in the thickness of the fuselage opening. The canopy section has matching 1/8" strong magnets to hold it sufficiently for all flight operations.

You may want to paint the foam inside of the cockpit black and make sure you add a pilot to your cockpit. I typically print a picture of a pilot on my ink-jet printer a normal and flipped image and then glue back to back to get a double sided flat pilot. Very light. End results below with the MIA pilot.

The next pictures show details of the exhaust stack made out of scrap pieces of balsa and the air filter. The air filter forward section is a piece of wood dowel put on a drill chuck and turned against a file to cut the grooves.


For added realism, the grooves for the fuselage mounted machine guns could be added as well as the oil and engine radiator underside the fuselage. These two can be easily built usig scrap piece of balsa.
| Trimming and Flying |
- CG : 36mm to 49mm from LE at root. Start with 40mm.
- Wedge the Li-po pack in the front of the fuselage with a piece of foam. Adjusting it's position to
get the correct CG.
Deflection of the elevator set to 6 à 10 mm. - Deflection of the ailerons to 30° or even more to get quick rotation on the rolls.
Propellor:
Graunper produces a 6x3 folding prop for 2.3mm shaft that is very light, but may require to enlarge the shaft hole to 3mm to match your motor shaft. Two setscrews on the prop assembly are then securing the prop adaptor to the shaft.
The popular APC 4.7x4.7 Electric prop is possibly the easiest to find. Provides a less trust than the folding 6x3.
The Gunther prop is a good and low cost prop, but the black retaining cap is made to hold to a 2.3mm shaft and will not hold firmly if removed once from the shaft. You may prefer to make a prop adaptor to fit the Gunther prop to your 3mm CD-ROM shaft. Papy KW makes his own prop adaptor using a 4mm bolt with a hole machined in the head. Here is how Papy Kilowatt makes Gunther prop adaptors...
|
Astuces :
pour l'hélice Gunther, comme
celle-ci est prévue pour des
axes de 2,3 mm et que le speed
280 a un axe de 2mm, il faut soit
augmenter le diamètre de l'axe
en l'étamant avec un peu de
soudure à l'étain soit utiliser
un porte hélice adapté. Le
collage ne fonctionne pas car
après quelques minutes de vol,
l'axe chauffe et l'hélice fiche
le camp en plein vol. Je fabrique moi-même mes adaptateurs d'hélice : j'utilise une vis M4 que je fore dans l'axe d'abord avec une mèche de 1,5 mm coté tête de la vis sur une profondeur de 10 mm (Si on a pas de tour, on place la vis dans le mandrin de la foreuse sur pied et la mèche dans l'étau, c'est plus facile pour bien centrer), puis je fends la tête de la vis sur 8 mm avec une scie à métaux ou un disque Dremel. Ensuite, je fore dans le premier trou mais avec une mèche de 2 mm. Le trou devient plus ou moins conique car la matière s'écarte. Il ne reste plus qu'à visser un premier écrou M4 sur la vis placée sur l'axe de 2 mm, lorsqu'on le serre vers la tête de la vis, celle-ci tient fermement sur l'axe. On peut alors placer l'hélice et la serrer avec un second écrou. |
| More Pictures |


