"The Wood shop"
in Oak Springs, AZ
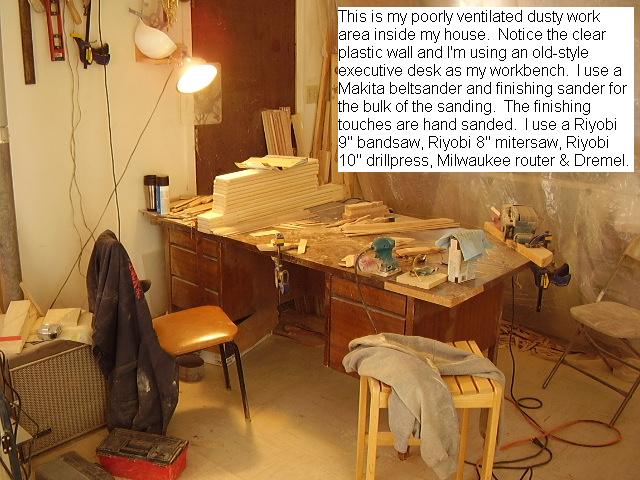
I originally started my loom business with a handsaw, an electric hand drill and sandpaper. The looms were not that good due to poorly cut wood and poorly angled drill holes. So, I borrowed a Skilsaw from my uncle and I purchased a new Riyobi 9" drillpress. I used to sand everything by hand and it took a long time and ALOT of energy. I was extremely worn and the looms were not as smooth as they are now. Soo, I purchased a Black & Decker belt sander. With nearly everyday use, the sander lasted 2 months when it clunked out and died. Then, I purchased my first Makita: a Makita 18" belt sander. I could have bought a larger more powerful sander, but they were too heavy for a full day of sanding bent over. Also, the design of this little Makita made for it to flip over to be used as a bench sander, if properly clamped down. As such, I used a rope to tie it to a 2x4 and clamped the contraption down with my Irwin clamp. You can see the sander on the right side in this photo below.
Taking advise from a carving friend, I purchased a Dremel to etch my initials and my trademark smiling man with Navajo hair bun. I used a 90 degree square and the SKILsaw to make my cuts, but my cuts were still off. I then purchased a Riyobi 8" mitersaw with a Ridgid portable miter table to improve cuts and eliminate measuring time. This was about all I used till I started to wear out from rounding the wood with a raster. As such, I invested in a Milwaukee router to round those edges. Slowly with a big order here and there and re-investment in more tools, the looms became what they are now.
As a curiosity, I started to make battens. I looked at my mother's battens and asked questions about their different designs for different uses. Eventually, it was a bilagaana who gave me the best advice, "...make it with a bend...so you can easily put it into the warp and keep it from slipping..." when beating the weft down. OHHH! I used water, my Irwin clamps and my Makita 18" sander for most of the work. I finished them extremely smooth with fine sandpaper and an oil stain. I later replaced the oil stain with Danish oil. Then, I started to make combs using a hand saw. I let my mom inspect the combs. She currently uses one of my first ones. They were pretty good, BUT, I took hours to make 1 comb. So, I purchased a Riyobi 9" bandsaw. Now with the bandsaw and some production techniques, I significantly decreased the production time, but it's still almost not worth the cost to make one comb. But, I still make them. :) Most of the time is spent sanding. As such, I purchased a Makita finishing sander to help decrease my time of sanding the combs and battens. All the sanding of the teeth are hand-sanded and the finishing sanding prior to oiling is done with hand. The rough sanding or "shaping" is done using my belt sander and finishing sander. With the finishing sander, I now use on my looms. It's added sanding time but it has significantly improved the finish.
Overall, I started with my hand tools and alot of work. I hope to invest in a table router, table saw, planar and of course REAL shop equipment. My equipment works for me, but I see the future using real shop equipment due to wear and tear and safety. One of these days I'll have that and DESCHINNY will be an international weaving equipment maker. Until then, this is what I use and this is how my "wood shop" looks.
Looking at the photo, I think I need a Shop-Vac. LOL!!!