|
|
03 Advanced Skills & Designer Games
(Based on Club Playing Style)
TEST - Player's Test:
Each player has been asked to prepare a skill set for the practice to show the other players a set of skills which they can use to utilize during a match.
Select 4 players to present their skill sets on Day Ten.
Player 1: _________________________ Subject: ___________________
Player 2: _________________________ Subject: ___________________
Player 3: _________________________ Subject: ___________________
Player 4: _________________________ Subject: ___________________
-----oooooOOOOOooooo-----
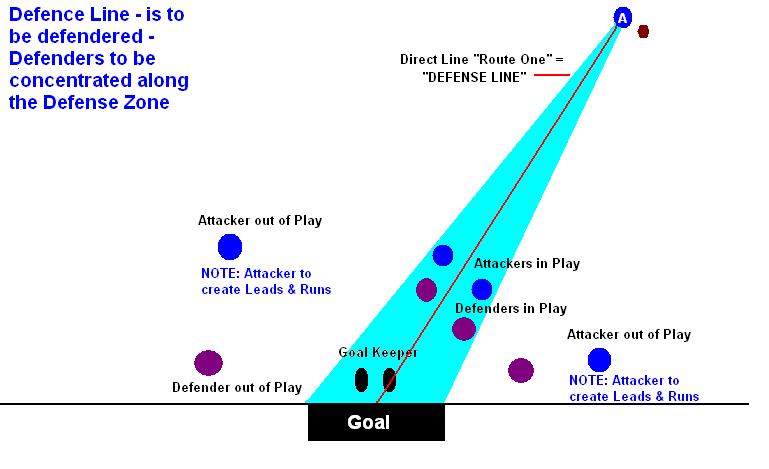
03.01.07 Attack Line / Defence Line
- To develop an understanding of the "Attack Line / Defence Line" concepts in play - the "Attack Line" refers to the Attacking Formation Playing Style - GK-2-3-3-2, where as the "Defence Line" refers to the Defensive Formation Playing Style - GK-1-3-4-2.
Execution of Skill:
Attack Line:
- The "Attack Line" is also commonly known as "Route One" and it is the direct between the ball and the center of the goal;
- The "Attack Zone" is the triangle formed by the ball - left post of the goals - right post of the goals;
- Attackers in the "Attack Zone" are in the area of play, whereas Attackers outside the "Attack Zone" are outside the area of play, the Attacker outside the "Attack Zone" responsibilities are:
- "Attackers" draw defenders away from the "Attack Zone", the aim is to try and minimize the number of "Defenders" in the "Attack Zone";
- "Attackers" set themselves up for leads and runs into the "Attack Zone" for deflections.
- Attackers must ensure that if they are outside the "Attack Zone" have created sufficient impact to draw the Defenders;
- The "Attackers" must concentrate on the "Attack Zone" and build attacks along that line - if the "Attack Line" is closed, then the ball must be distributed to another Attacker and in doing this, they change the ANGEL of the "Attack Line" - the change of the angles must be done at speed to prevent the Defenders from closing down the "Attack Zone";
- The Attackers must ALWAYS try and ensure that there are THREE POSSIBLE ANGELS for THREE ATTACK LINES;
- Normal goal scoring shots:
- Close Range Attackers:
- Deflections;
- Tip-ins;
- Slide-ins;
- Rebounds;
- Set-up Play - For Example - 2-on-1 Play;
- Improvisation.
- Top-of-Circle Attackers:
- Hitting while running;
- The "Dig";
- Slapshot;
- Flat stick hitting;
- Backhand (reverse) flat stick hitting;
- Chop;
- Bunt;
- Lifting (Flicking) the ball;
- Drag from the right leg;
- Improvisation.
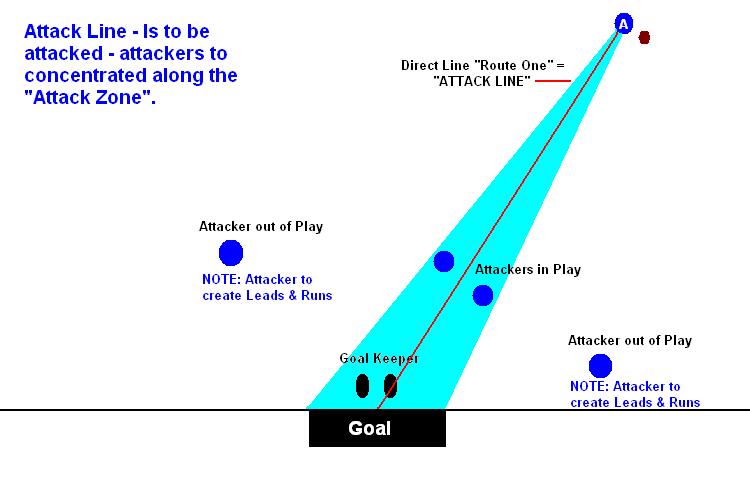
NOTE: A well disciplined defense would attempt to leave these players that are outside the "Attack Zone" as they are not in a "goal scoring" position, if this happens, then the Attackers must move closer to the "Attack Zone" to create the impression that they are moving into a "goal scoring" position.
Defense Line:
- The "Defense Line" is also commonly known as "Route One" and is the direct line between the ball and the center of the goal;
- The "Defence Zone" is the triangle between the ball - left goal post - right goal post;
- The Attackers would generally try and force the Defenders out of the "Defense Zone", however, the Defenders must:
- Be aware of the actions of Attacker outside the "Defense Zone", and MUST NOT BE DRAWN INTO FOLLOWING THE DEFENDER AWAY FROM THE DEFENCE ZONE
- Attackers outside the "Defense Zone" must be zonal marked
- NOTE: the concept of "BALL SIDE / HELP SIDE DEFENSE will be discussed in a further training day, basically concept is as follows:
- "Attack Line / Defense Line" marking is man-to-man;
- "Attack Zone" marking is man-to-man;
- "Other Zones" marking is zonal.
- Attackers in the "Defense Zone" must be man-marked to prevent any attacks;
The "Defenders" must always ensure that an "Attacker" moving into the "Defense Zone" is marked in-front of the Defender.
 -----oooooOOOOOooooo-----
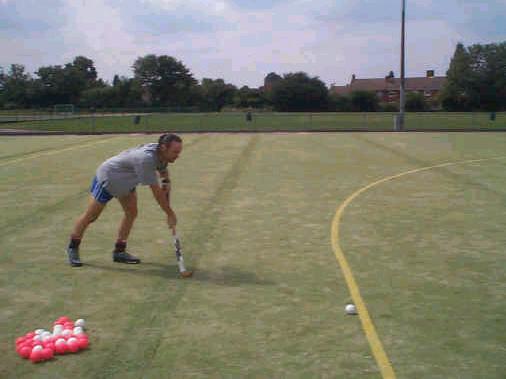
03.01.08 - Drag Flick (Calum Giles)
Question:
What is the advantage of the drag-flick?
Answer:
People discovered that by keeping the ball longer in contact with the stick, more power could be generated.
NOTES:
When Calum does the drag flick, he releases the ball two and a half 1/2 meters inside the circle.
It also takes the ball into the circle so that a goal shot can be taken. It is a quick and effective weapon to be used at corners.
There is no real way to defend against it, other than to just hope that your goalkeeper is better than the flicker.
Objective:
To develop the skill of the Drag Flick.
Execution of Skill:
Step 1
- Your starting position before the ball is injected depends on your size;
- There is no advantage to having a long run-up;
- All that happens when you do this is that you lose some control, and are therefore more likely to make a mistake;
- Technique and consistency are the keys to a good drag-flick.
 Step 2
- The approach to the ball is similar to when hitting a ball;
- But it is very important to note that you must place your back foot (right foot) just inside the circle ahead of the ball.
 Step 3
- After you have planted the back foot in front of the ball, you must now take as big a step as you can, whilst transferring the ball;
- This part of the transfer with the ball is done at a medium pace and with control (This large step allows you to get a longer drag on the ball, thus giving you more power on your flick. It also gets your body lower to the ground giving you more power and balance.);
- You should be picking the ball up from just behind your right foot.
Step 4
- The next stage is to start the final flick;
- As I said earlier, the first part of the transfer is done at a medium pace;
- The second phase which is the final flick at goal is done fast;
- When you have got the ball just behind your front foot, you must accelerate the arms and wrists through the ball, following through with your stick towards the area of the goal that you are aiming for;
- The actual release of the ball should be just past your left foot.
Step 5
- The follow through is the key to accuracy as with any skill;
- A low follow through for the bottom corners and a high follow through for the top corners.
The most common mistakes people make when drag flicking are:-
- Trying to flick the ball too hard. Technique generates the power, not muscle;
- Not dragging the ball far enough;
- Rushing the first part of the transfer;
- Not getting low enough;
- Falling away from the ball during the flick;
- Not following through to the goal;
- Looking up too early. Looking up to see if you have scored also lifts the shoulders and hands up off the ball, leaving you with the flick's equivalent of a topped shot;
- People expecting too much, too soon;
- It takes a lot of practice, keep practicing because after a while you will just get it right, and it will all become worthwhile.
-----oooooOOOOOooooo-----
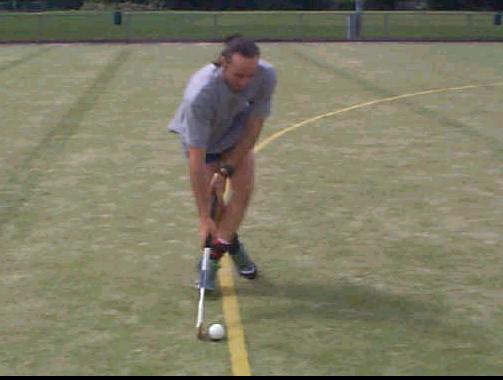
03.01.09 Aerial Pass (Calum Giles)
Question:
- Why do people use the aerial pass?
Answer:
The aerial pass can be used for two different reasons:
- One is defensive and the other is offensive. If your team is being pressed very tight by the opposition, then sometimes you might want to throw an aerial to relieve some of the pressure.
- The other times that it can be used is when a defender has cut off a pass, you can then lift the ball over him and find your team-mate, nine times out of ten this creates very good attacking opportunities.
Objective:
-
To develop the skill of the Aerial Pass (Overhead Pass).
Execution of Skill:
Step 1
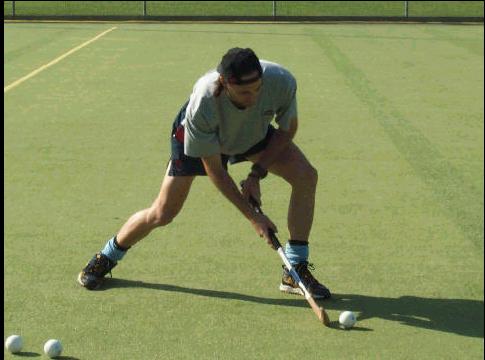
- In order to get the ball in the air, the stick face must get underneath the ball;
- In order to do this, you must get your body low by bending your knees;
- This allows you to get your hands low, thus enabling the stick head to get under the ball;
- Note the feet position;
- I am leading with the left leg and the stick is out to the side of my body;
- My hands are in no way restricted by my body or by each other;
- The left arm is bent and the right arm is almost straight;
- Notice the lowness of the body and also the stick;
- Start with the stick a few inches behind the ball as you will be sliding the stick into the back of the ball;
- The ball should be a few inches out in front of the left foot;
- The head must stay down at all times throughout the skill;
- Look at my head position all the way through the pictures;
- It is always looking straight at the ball.
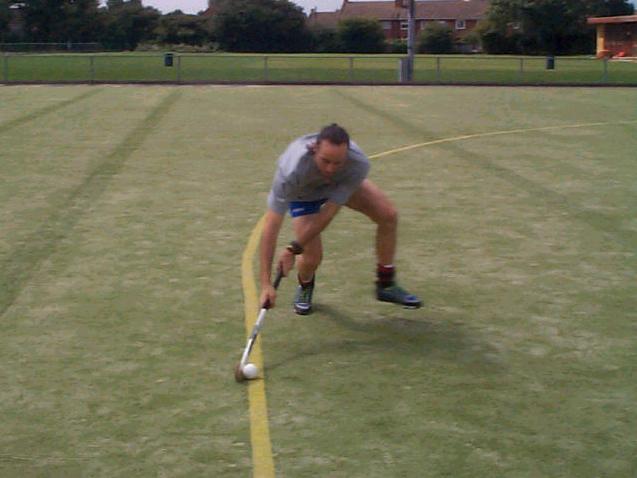
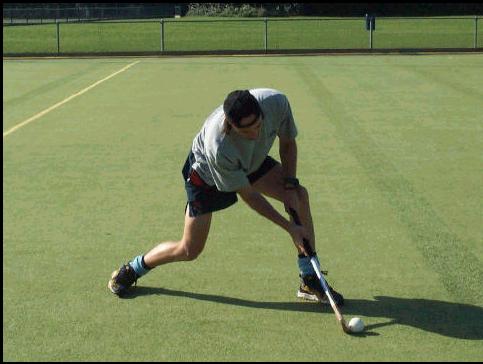
Step 2
- The first movement you make is to slide the stick at a controlled speed to the back of the ball;
- The right leg starts to drive through to help you gain pace and length;
- The right hand is more dominant in this movement;
- You start to get even lower with your body at this point.
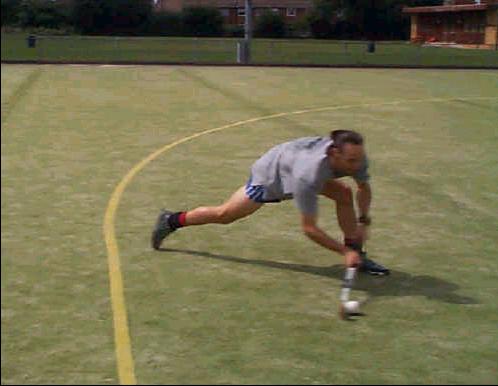
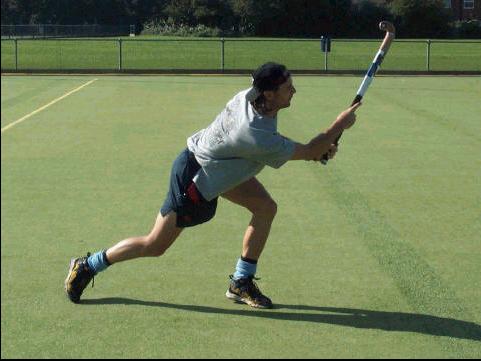
Step 3
- The next step is to start moving the right hand up in the air;
- The ball will go where the stick goes;
- The stick will go where the hands go;
- So in order to get the ball in the air the hands must now make their move upwards;
- The hands control everything;
- I know this is obvious, but most people fail on this skill because they are thinking too much about trying too hard, and the ball, than they are thinking about their hands;
- If you have problems with the ball going left or right, then generally it means that, that is where your hands are going.

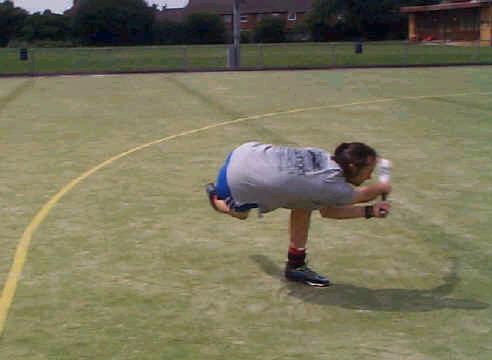
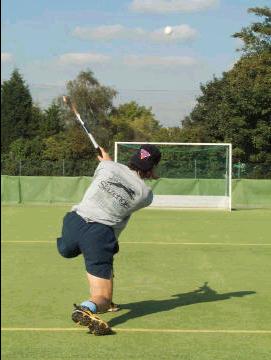
Step 4
- The follow through is the real key to this skill;
- It is not just about what you do when the ball is on the stick that helps you to flick well;
- Your follow through is what will determine the height and direction of the aerial;
- To get a high and long aerial then you should follow through up high;
- If you want a lower quicker aerial then you follow through lower;
- A simple way to do this, is to imagine that you have the ball in your hand, and that you are not using the stick to throw the aerial;
- Imagine the different follow trough's and compare for example, a cricketer throwing a ball in from the boundary, to a cricketer throwing a ball at the stumps from close range for a run out;
- They will both use the same action but they will both have different follow trough's, which in turn will bring two completely different results.
Step 5
- Finally what it looks like from behind;
- Notice the lowness of the body;
- Look how close the right leg gets to the ground, the follow through again is up high;
- The key thing to notice from this picture is that although the ball has gone (You can see it top of the picture);
- I have still got enough control of my body to maintain my balance and hold my position;
- This comes as a result of using a good technique to aerial the ball and not raw power or muscle.
The most common mistakes people make are:-
- Not getting low enough;
- Not getting the stick UNDER the ball;
- Trying too hard. It is technique that aerials the ball a long way, not muscle;
- Head comes up too early;
- Balls going too low, because the hands/follow through is too low;
- Balls going left or right, because the hands/follow through are going left or right;
- Arms are not to the side of the body and the arm movements are being restricted.
|
|
)