 |
|
|
|
|
|
|
|
|
|
|
|
|
|
|
|
|
|
|
|
|
|
|
|
|
|
|
|
|
|
|
|
|
|
|
|
|
|
|
|
|
|
|
|
|
|
|
Shoulder Belt Installation Tips for 65'-67' Mustangs |
|
|
|
 |
|
|
|
Roof Attachment |
|
|
|
After being somewhat dismayed by the various solutions used to attach the upper shoulder harness of an early Mustang, I devised a somewhat different approach. As you may know, shoulder belts were not an option for the 65's and 66's and so no roof support was provided. Supposedly they could be ordered in 67', but the option is quite rare. The 68' models included a shoulder strap so this article is geared primaily to the 65'-67' Mustangs. Attached are 11 drawings showing how I installed a roof attaching point on the Driver's side of a 66' Mustang. As a disclaimer I want to say that as a hobbyist I cannot vouch for the safety of this installation--I am only showing how I tackled the job. |
|
|
|
I believe that this solution lessens the chance of having an inferior weld give out at an unfortunate time. The factory support frame sheet metal (boxed, 2 layers thick) will have to physically tear for the support to fail. The installation is straight forward and fairly easy to do by anyone who possesses some welding experience. A cautious welder, taking several breaks and using a wet towel, should be able to do it and not damage the roof's paint job. This solution should work on all 65'-67's coupes and probably fastbacks as well. (Stephanie Roberts, a fellow mustang enthusiast and self proclaimed "tool-girl", has pictures of her "factory built" 68' Coupe's rear sail panel area and the construction appears basically the same. The only functional differences are that the 68' Mustang locates the attaching point behind the coat hanger attaching hole and that attaching area is "raised" to meet the headliner. The attaching area on the 68' is a "press nut" that is supported by a small sheet metal support. This area on the 68' is only 1 sheet metal layer thick. Some individuals may find that this location places the belt too far to the rear of the interior to be easily used. If you can't easily reach it, it probably won't get used!! |
|
|
|
I choose instead to use the oblong tooling hole in front of the coat hanger attaching point, as it is where the roofline sheetmetal for the "C" pillar and across the door meet - the area with the greatest number of sheetmetal pieces and hence the greatest strength. It was estimated that the loading (ratio of the surface areas) is about 1/6 using this installation. This tooling hole is also reasonably accurately located on both sides of the car. This location, although somewhat awkward for rear passengers, should work great with retrofitted high back seats. |
|
|
|
 |
|
|
|
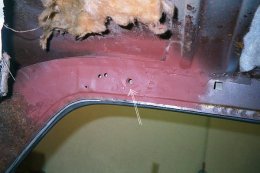
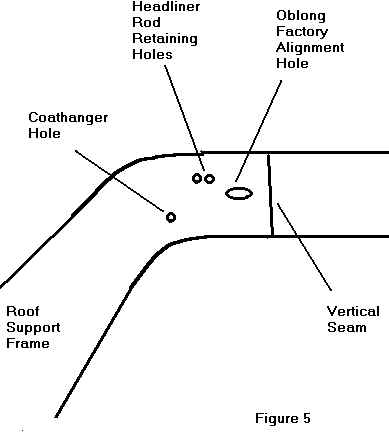
The white ghost arrow points to the newly installed shoulder belt attaching point on the roof. This used to be the oblong tooling hole as found on the driver's side. Other reference points seen are the headliner rod holes and the coathanger hole. |
|
|
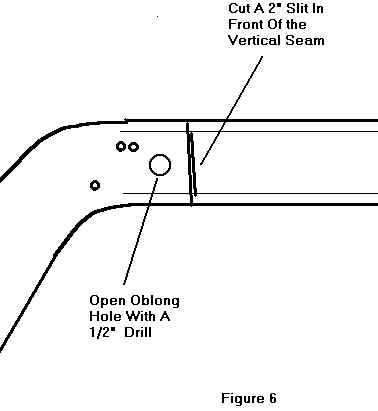
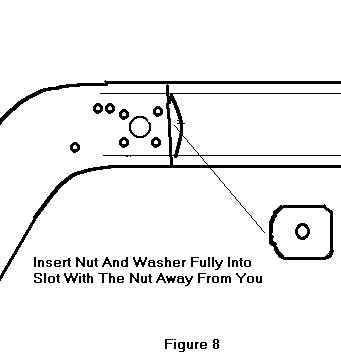
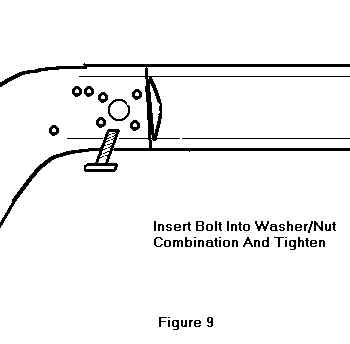
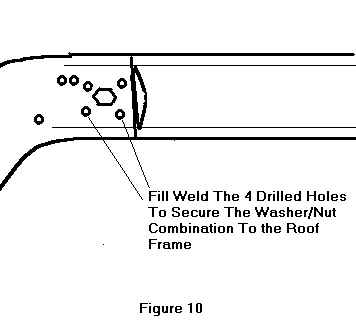
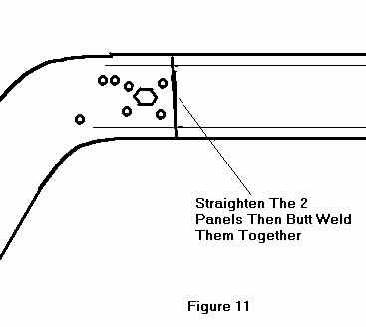
| Some basics: First I pulled the headliner and the VERY FLAMMABLE insulation away from the general area. Next I split the metal about 1 inch in front of the oblong hole, separated it, and then placed a 1 7/8" support plate (complete with a locking type nut) inside the channel so that it aligned with the afore mentioned hole. I inserted the seat belt bolt to snug the plate firmly against the channel and then welded it solid through holes drilled around the oblong hole (which I previously drilled out to 1/2"). Finally I pulled and welded the 2 split areas back together. It took about 2 hours to devise and complete the first one and just about half that time to do the similar passenger's side. UPDATE: It has been brought to my attention that it is not necessary to split the sail panel as I have done. Apparently it is possible to "fish" the nut and washer assembly shown below through the rear of the sail panel using a long wire. All other aspects of my installation would remain the same. An example of how to do this can be found HERE. |
|
|
|
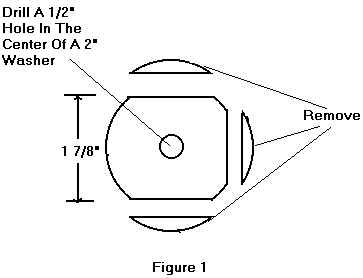
The support plate is a standard 2" washer (slightly modified for fit) that normally comes with aftermarket seatbelt installation kits. Although you could use almost any heavy piece of steel for a support plate (since the channel is over an inch deep), I liked the fact that the thick and yet soft washer conforms to the sheet metal when the bolt is initially tightened. The reason for the removal of the right side of the washer (Fig 1) was to allow for a place to tack on a second washer at a 90-degree angle. This second washer serves as a handle in order to place the support plate into the roof channel. It was easily broken off after the support plate is welded into place. The bolts are the same as used at the standard floor attaching points (7/16" x 20 thread) and the fine thread locking nut is found on the rear end spring plate U-bolts (6 cylinder?). |
|
|
|
The most difficult part of the process was trying to pull the 2 split panels back together--I found that using my $5.00 K-Mart slide hammer worked well since the metal is quite pliable. A person could attach additional layers of sheetmetal to feel more secure and it wouldn't hurt to add additional strengthening welds to the existing factory panels. Once completed, you will still need to fill in the small gap located between the headliner and the roof frame---this is one area I haven't tackled yet (due to a lengthy restoration) but seems simple enough. |
|
|
| Stephanie Roberts shows how to accomplish the remainder of the shoulder belt installation on her web site HERE |
|
|
| Try http://www.geocities.com/MotorCity/Track/1943/sped2/shharnes.html for an alternate type of installation, similar to the June Mustang Monthly article. It should work great on any Mustang (especially convertibles). Don't be dismayed because it was done on a Falcon--the idea is similar. |
|
|
| I personally want to thank those who responded to my E-mail inquiries and specifically Mike McKelvey for his engineering support and assistance. |
|
|
| Good Luck with your installation! |
|
|
|
|
|
|
|
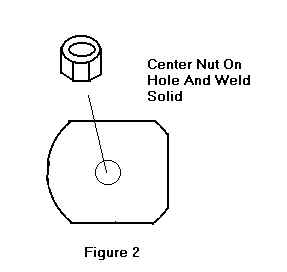
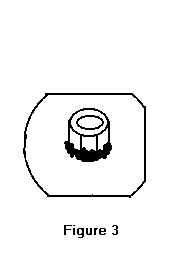
Figures 1-3 illustrate how to prepare the support brace. |
|
|
|
 |
|
|
|
 |
|
|
|
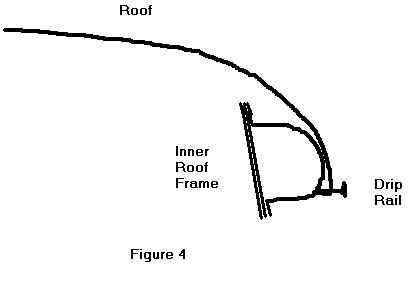
Figure 4 shows a cross section of the roof frame. |
|
|
|
 |
|
 |
|
|
|
|
|
Figures 5-11 show the driver's side roof frame. |
|
|
|
 |
|
|
|
 |
|
 |
|
|
|
|
 |
|
|
 |
|
|
|
|
 |
|
|
|
 |
|
|
|
|
|
|
|
|
|
Feel free to save this page to your computer for your personal use and future reference--it may not be copied for commercial purposes without prior written permission from me. Disclaimer: This page is not intended to instruct or teach anyone in the proper or safe methods of working on or maintaining a car and the author takes no responsibility for the use of the information contained herein. |
|
|
|
Return to Home Page |
|
|
|
� January 17, 2000 |
|
|
|

|
|