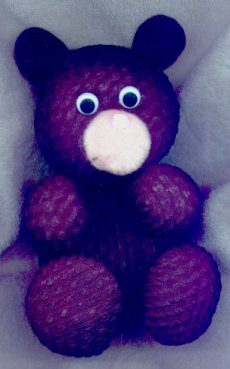
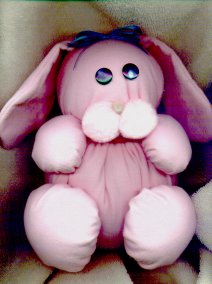
Materials:
Fabric of choice...cotton works well
Polyfil
Needle & thread
Ribbon, wiggly eyes, pom poms
Circle templates...I used a large round platter for the body,
a dinner plate for the head
& saucers for the paws
Sizes are approximate. You can make them much larger or smaller.
Directions:
Cut circles from fabric using pinking shear (less raveling)
Sew a running stitch 1/2 " from the edge of each circle.
Pull to gather but don't close completely.
Stuff with polyfil.
Pull tightly & tie off.
Glue head to body.
Refer to pic for placement of paws & glue to body.
Glue pom poms & eyes to face.
For a bunny glue a big pom pom on the backend.**
Sew/glue tail to cat.*
Add a ribbon bow between the ears or to one ear if desired.
Tie a bow & glue just under head.
*For cat tail cut a long strip of fabric approx. 3" x 18".
Sew/glue the long edge & one end with right sides together.
Turn right side out & stuff with polyfil.
Sew/glue end closed & attach to cat.
For ears cut 4 triangles from fabric.
All side approx. 2".
Sew the 2 sides right sides together leaving the bottom open.
Turn & push out point with the end of your scissors.
Whip stitch the bottom of each ear closed.
Make a pleat in the center of the ear at the bottom & glue.
Sew/glue each ear to head.
** For bunny ears cut 4 pieces from fabric.
I don't have a pattern for the ears so I will try to explain how I made them.
Draw a long U shape on paper.
Make the end of the U narrow & the closed part of
the U wider.
Sew right sides together, clip curves & turn.
Whipstitch ends closed & sew/glue to head.
*NOTE* If the animals will be used for decorative
purposes only it is fine to glue them together.
If they will be toys for children I would sew the paws,
head & tail on with a heavy thread.
![]()