 |
|
|
|
|
|
|
|
|
|
|
|
|
|
|
|
|
|
|
|
|
|
|
|
|
|
|
|
|
|
|
|
|
|
|
|
|
|
|
|
|
|
|
|
|
|
|
|
|
|
|
|
|
|
|
|
 |
|
|
|
 |
|
|
|
Home |
|
|
|
|
|
Tech |
|
|
|
|
|
|
|
|
|
|
|
|
|
4.0L P.S. Pump Repacement |
|
|
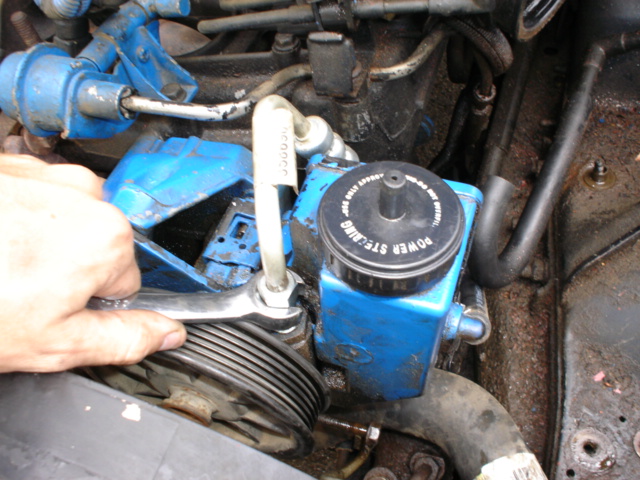
If your PSP is getting whiney first check to see if you are low on fluid, but you may have a bad bering and it will need to be replaced. This article shows how to replace a pump.
You will need: 14mm flared-nut wrench, P.S. pump wheel puller (from local auto parts store), power steering fluid - First we took out our air box for more elbow room. Next we loosened and removed the high-pressure hose with a flared-nut wrench (you can see in the pic at the right) |
|
|
 |
|
|
|
|
Next we removed the return line hose and let the resivour drain of fluid. Its good to put a small cup under the tap so fluid does not drip all over the engine. It also makes it easier later to check for leaks. Once both hoses are removed you can start to remove the mounting bolts that hold the pump on. The tensioner bolt must also be loosened to allow the removal of the serp belt. |
|
|
 |
|
|
|
|
|
|
 |
|
|
|
|
Now that the bolts are out and the belt has been removed the pump and be pulled out. Be careful when lifting the pump out not to damage it, it will be needed for core return. Also excess PS fluid may drain. Put your finger over the return spout to keep it from leaking.
The pic to the right is with the pump completly removed from the engine bay |
|
|
|
|
|
 |
|
|
|
|
|
|
Here are the two pumps out of the vehicle. On the left is the new pump and on the right is the old one we just removed. The wheel needed to be removed with a PS wheel puller tool we borrowed from Autozone. Once the wheel is removed it can then be lightly tapped with a hammer onto the new pump. |
|
|
|
|
|
 |
|
|
Now that the wheel is removed from the old pump we can romove the bolts that hold the mounting bracket to the pump. There are 3 bolts. Once they are removed you can re-bolt the bracket to the new pump, then put the wheel on the new pump. |
|
|
|
|
|
 |
|
|
|
|
|
|
Once the braket and wheel are attached to the new pump it can be bolted into the engine. In this pic you can clearly see two mounting bolts that hold the pump to the mounting bracket that is attached to the intake manifold. Do not completely tighten down any of the bolts because the serp belt needs to be re-fed onto the PS wheel and tightened with the tensioner bolt. |
|
|
|
|
|
Now that the pump has been securely mounted the high-pressure hose can be re-attached with the flared-nut wrench. The return line hose can also be re-attached the resivour spout and the serp belt can be re-fed through the engine and looped aroung the PS wheel. In this picture you can see us tightening the tensioner bolt. Be sure to do this to the required specs of the vehicle manual. |
|
|
|
 |
|
|
|
|
|
 |
|
|
|
Here is the new pump completely installed back into the engine bay. We removed the cap on the pump and made sure everything was tight and ready for running. |
|
|
|
|
|
 |
|
|
|
|
The key is to not forget to add more PS fluid. Make sure to fill to required amount. Most caps have a measuring line to show how much fluid to add. Dont forget to screw the cap back on tightly once the resivour is filled. |
|
|
|
|
|
 |
|
|
|
|
|
|
Once we filled her up we put the cap on and re-installed our air box that you can see on the left. Next we turned the engine on and looked for leaks. There were no leaks to be found and we took the Jeep out for a spin. The pump was looking and sounding great. |
|
|
|
|
|
OVERHALL PROJECT RATING
- 5 -
Rating 5: Ease of install, very satisfied with performance, we can steer again! |
|
|
|
|
|
|
|
|
|
|
|
Home |
|
|
|
|
|
Tech |
|
|
|
|
|
|
|
|
|
|
|