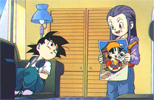
 First, get out your picture. If its too big, you might want to resize it to about 800px or less. Now copy and paste your image onto a new document (contents: transparent). First, get out your picture. If its too big, you might want to resize it to about 800px or less. Now copy and paste your image onto a new document (contents: transparent).
|
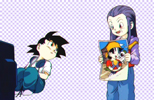
 Click on layer mask to make a mask on the image. This allows you to get back what you fix any mistakes at the end. Now press L on your keyboard to select the polygon lasso tool. Now start deleting unwanted areas on your image piece by piece. Its easier if you zoom in. You might have to use the cloning/rubber stamp tool if you want to get rid of things infront of your image. (press alt to define the area of your choice) Click on layer mask to make a mask on the image. This allows you to get back what you fix any mistakes at the end. Now press L on your keyboard to select the polygon lasso tool. Now start deleting unwanted areas on your image piece by piece. Its easier if you zoom in. You might have to use the cloning/rubber stamp tool if you want to get rid of things infront of your image. (press alt to define the area of your choice)
|
 Once you're finished getting rid of the background and stuff, you can get rid of the mask by right clicking on the mask click "apply layer mask". (Photoshop 4: right click, remove layer mask, apply) Once you're finished getting rid of the background and stuff, you can get rid of the mask by right clicking on the mask click "apply layer mask". (Photoshop 4: right click, remove layer mask, apply)
|
 Your picture might be a little grainy and unclear from the effects of jpeg format, but we can fix that. Smart blur [Filter->Blur->Smart Blur] to get rid of it. You can then duplicate the layer and set the copy to overlay or softlight to get rid of the low saturation. You can median [filter>noise>median) the copied layer if you want a somewhat dreamy effect. If you do that, hold the control key and select the original layer. Inverse the selection, select the copied layer and delete. You can then merge the two layers together. Your picture might be a little grainy and unclear from the effects of jpeg format, but we can fix that. Smart blur [Filter->Blur->Smart Blur] to get rid of it. You can then duplicate the layer and set the copy to overlay or softlight to get rid of the low saturation. You can median [filter>noise>median) the copied layer if you want a somewhat dreamy effect. If you do that, hold the control key and select the original layer. Inverse the selection, select the copied layer and delete. You can then merge the two layers together.
|
Then go to File>Save for Web. [Settings: PNG-24, Transparency:  , Interlaced: ] And that's pretty much it! I hope this tutorial helps you out. , Interlaced: ] And that's pretty much it! I hope this tutorial helps you out.  |