If you are serious about used ones. Talk to Adirondack
Auto Brokers . I bought my used "kit" from these guys. They were extremely helpful
and prompt. I was able to get quick replacement for my broken parts when the drivers side rear caliper sheared off the carrier bolts. This was my fault and they still got me parts quickly drop shipped from their supplier.
I bought the 6pc DOT approved Braided lines along with the rear disk
brake Kit
Used Rotors, Stub Axles with Dust Shields, Calipers & Carriers, Hard Lines and Bolts with More of the small clips & stuff than I expected to get.I would recommend getting the Following cheap small parts from VW before going any further as you'll not likely find the used 10+ year old ones in trustworthy shape;
New Bearings, Pads, Seals & Dust Shields, and E-Brake Cables for A2 Golf/Jetta with rear disks.
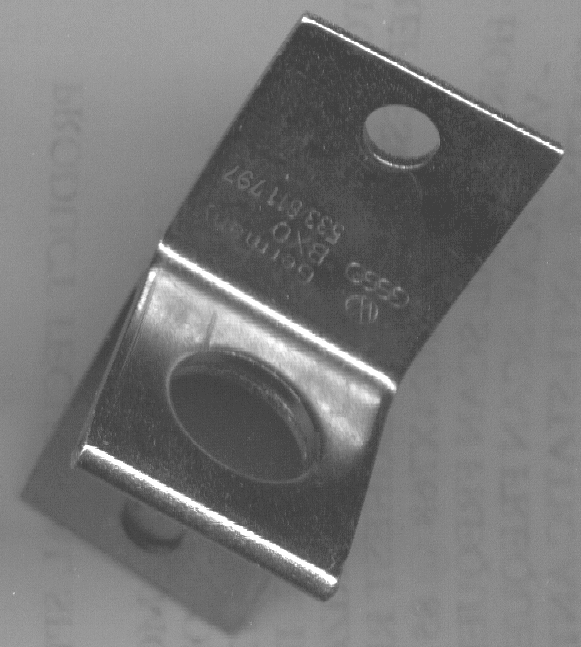
- 2 of the T bracket under the Shock VW Part # 533 611 797. These are in the VW microfiches or ETKA
- 2 of the small spring clips to lock the E-Brake cables to the calipers.
- 2 sets of new guide pin boots from VW (these include new caliper bolts with loctite already applied). Unless your used parts pass muster on inspection. These are expensive (I paid $50 for both sides) but worth the money if your boots are already cracked or getting close. If your boots are rough keep one to use as a sand blasting mask on the guide pin shoulder and hole.
- 4 of the small sheet metal clips that attach between the flexible line and the hard line at the body
- 2 of the Seal Dust Shields ( you will very likely screw up at least one of these removing it)
Note you'll only see the A2 GTI stuff in the blowups and that clip won't work on the A1 rear axle. The right one is there but is not shown in the blowups.
- Note these are the same part as the front line clips
at the body mounting points hence getting 4 not just 2
UPDATE 10/14/2001
Adirondack Auto Brokers no longer sells any used parts. They still have the DOT approved synthetic brake lines with stainless braided jackets and new rotors etc.... I don't have a good source for these parts as a "Used Kit"The Parts Place in Michigan may be a source but I hesitate to refer anyone there because of the mixed reviews I have heard on their customer service...
If you intend to just get caliper cores and the rest of the hard parts in servicable condition maybe just don't expect stellar service if there are problems with the parts.
Tools......back to vwpage
I carefully masked and then Sand-blasted the heavy cast and machined parts except the calipers themselves and repainted them using Epoxy primer and Chassis Black to resist brake fluid and dust...
If you do this..... it should be obvious but I'll say it anyway DON'T Sandblast the machined surfaces of the stubs or the guide pin holes.. I used walnut shell media to clean the corrosion off the guide pins and a steel rifle cleaning brush for the bores. Make sure to keep the bearing surfaces of the stubs paint free as well as the caliper guide pin holes and shoulders....I have used these rear disks with no other system mods.. ie.... I didn't need to replace the master cylinder or the proportioning valve or add anything to the hydraulics.
I would highly recommend thoroughly checking over the hard lines and making sure the master cylinder is in good condition. This would be a good time to change them if any are suspect.
If the master cylinder is going out then the full 16V Scirocco setup (master cyl and prop valves) may be the way to go... Mine works adequately stock.
I needed a few special tools for the job;Let's Do it;.....
- Small containers with lids for small parts, Like those springs, detent balls, and small nuts-n-bolts that roll away behind the workbench and thru the holes in the floor into never never land. Clean yogurt containers, baby food jars, or 35mm film cans from the local 1hr film place. I use a sharpie and post-it notes to id the contents.
- I use a cheap metal driveway drip pan from the parts houses like Auto-Zone to keep the brake fluid off the floor and keep the escaping nuts and bolts captive.
- Flare wrenches... Don't get the cheap ones they aren't worth it. Get the good ones with heavy full thickness jaws otherwise you'll round off the flats on the fittings. BTW Craftsman doesn't even make good ones. Mine are OTC and Snap-On . 3 wrenches 10,11 12,13 14,15 mm should cover all of the fittings on the car.
- A thin 15 mm end wrench to fit the guide pins... I used my Park Tools bicycle cone wrench.... Again no peanut butter tools... nuff said..
- 12 mm allen wrench or socket to turn the caliper piston back into the bore.
- Bearing and Seal Drivers while not a necessity make a nasty job go quickly with no accidents. JC Whitney and Harbor Freight sell sets for cheap... You can use large sockets and dead blow hammer... If this is the only time you are ever going to use these tools just carefully use big sockets..
- 1 box of nitrile painters gloves in your size and hand lotion (professional mechanincs use this trick to keep the skin from sucking up grease and dirt), 2 rolls of paper shop towels and 1 gallon of WD-40 with a $2 goodwill aluminum soup pan for final de-greasing of parts.
DO NOT use gasoline, diesel, or kerosene to wash parts. When you are 80 and you don't have cancer you will be glad you didn't.
- Take out the front seats There are pins screwed into the center track.Unscrew the acorn nut and keep these safe in a baby food jar or the like.. The seats should now just slide right straight back off their tracks....
- Pull the double-nuts off the e-brake cables and put them and the plate in a safe place I use baby food jars with the lids yogurt containers are just as good
- Remove the pin clip from the E-brake lever and drive out the pin now remove the lever without dropping the pawl out of it
- Chock the front wheels Jack up the rear of the car set the axle on jack stands and pull the wheels and drums
- Get out your breaker bar and cheater (short pipe) and remove the bolts holding on the drum brake backer plate & stubs. Remove the hard line from the wheel cylinder... I just cut it off and crimped the end over... pull the e-brake cables from their tubes. You may have to turn these with a pair of channel locks to break em free... box this stuff up along with the drums and sell em later or just give em away like I did ;-)
You now have no rear brakes......... Lets fix that
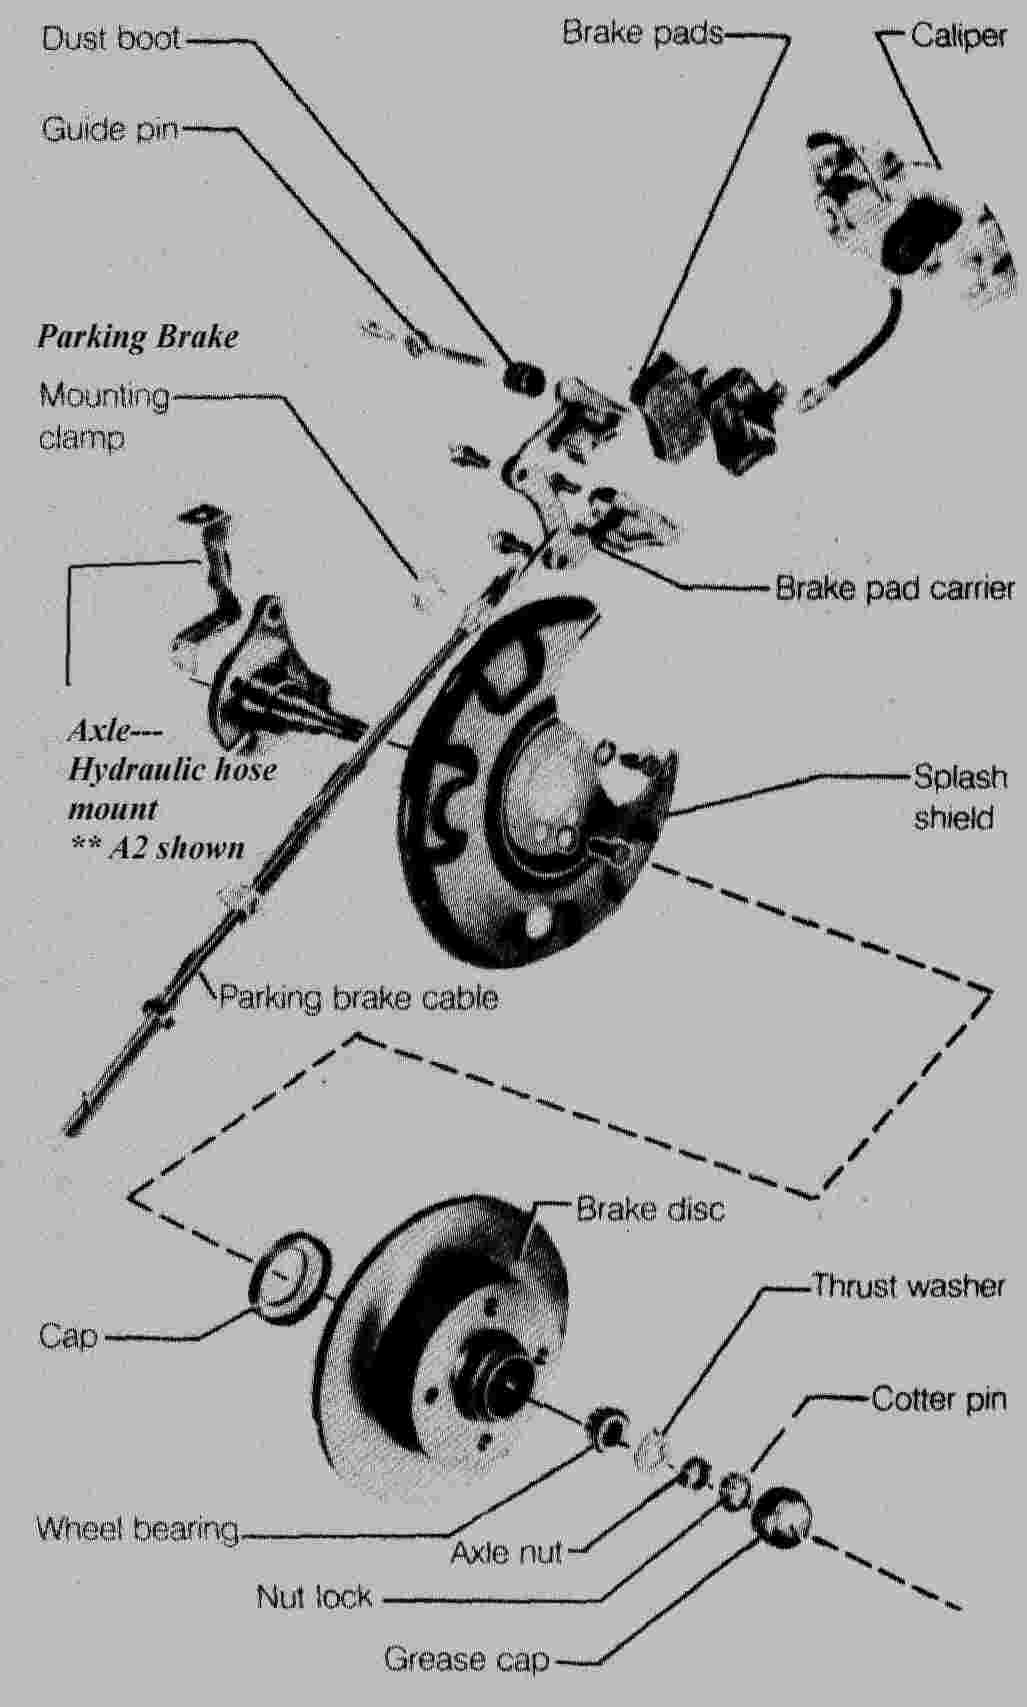
Click on image for a blowup of A2 Rear disc brakes....
Loctite 242 (BLUE) is an assembly necessity on all the Bolts
Never Seize is a real good idea on the brake line unions, bleeders and lug bolts just don't get it insde the lines.If you did everything correctly you now have good 4 wheel disc brakes and your e-brake really does something
- Install the new flexible brake line between the axle and the body ( if you are putting in a new one) install the hard-line on the axle making sure to put all of the clips in the right places...... You will see 2 holes drilled up thru the axle on the outboard side of the lower shock absorber mount this is where the T bracket you bought bolts in place and the last piece of flexible line attaches between it and the caliper...... Attach this line here last bolt it to the caliper first.... Note I have found easier to drop the rear axle to put in the body to axle brake line If you do this.. DO NOT horse the fasteners. If you break off the studs on the body. You are up the creek... without a paddle.. Lots of $ to fix so be careful.. I have resorted to heat to avoid killing these studs but be aware of your proximity to the fuel tank and take proper precautions.
- Bolt the splash shield and stub in place with Loctite and torque the bolts to spec. I chased the threads with a tap and die so that they would give the proper Torque. Make sure the convex surface of the splash shield faces you...
- Drive on the dust shield with the cup toward you... I used a chunk of PVC pipe that just fit over the stub and a rubber mallet...
- Now put on the hub/rotor assembly with the new inner bearings and seal that you have packed and installed pack the outer bearing and install it. put on the D washer with the tab in the groove and tighten the nut to 12-15 ft/lb while turning the rotor. Now back off the nut 2 flats and install the sheet metal castle and NEW cotter key. if the cotter will not fit take the castle off and turn it till the hole is in line with one of the slots.. wipe some grease on the nut and drive the cover on using a chunk of PVC that fits up to the small shoulder on the cover don't just whack the cover You'll deform it and it will then leak grease and might catch the cotter :-( .The rotor will feel very slightly loose with the wheel in place if the bearings are adjusted correctly between .001 to .010 in of play. BTW put the rotor on before the caliper carrier it won't fit with the carrier in place.
- Thoroughly clean the guide pins and carrier holes if you haven't done it yet... Grease the guide pins and add some grease to the carrier holes I use Sil-Glyde Silicone Grease put the boots in place and install the pins making sure the boot snaps into place over the pin and the carrier Loctite & torque the allen head bolts in place on the caliper carrier. Make sure these bolts are stamped grade 10.9 or better. I got 2 soft ones in my set and they sheared off while I was driving at low speed.
- Put the brake pads in place and install the caliper loctite the bolts and screw them into the guide pins... Here's where You'll need the cone wrench or an extremely thin end wrench to keep the guide pins from turning while you put in the bolts.... Make sure the rattle springs in the pads are in contact with the caliper with the wings up...
- Slide the c shaped clip over the T bracket and push the flexible line from the caliper through them both screw the hard line into the flexible line and torque it down. you should have the T bracket bolted thru the 2 holes on the outboard side of the shock under the axle. BTW make sure the shock nut is on the outboard side of the shock mount facing the T bracket or changing the rear shock could be a nasty job :-o .
- Push the E-brake cables thru the clip on the axle pivot and clip them to the caliper and put the ball in place on the caliper lever. Push the other end thru the tubes in the floor... You may need to jockey the end of the cable back out from under the brace in the bottom of the Handle bracket and then pull them up. Now put the handle back in place make sure the notch in the bottom of the pawl hooks over the brace in the bottom and that both cables run in the guides and not beside them.. If you have assembled the pawl and lever properly in the floor the pivot pin should slide right thru and then you can attach the cables just like the originals thru the bracket with the cone shaped nuts then the flat nuts in place on the cables. Don't adjust them up any more than is necessary to make them stay in their guides and keep the plate in place on the handle.
- Now bleed the brakes starting at the Right Rear then the Left Rear the Right Front and the Left Front... Apply Never-Seize to the bleeders and put rubber caps on them if they don't have them.
- Once the brakes are air free pump them hard 30 -50 times to seat the rear brake piston assembly and then adjust the brake cables evenly till you can only get @ 5 clicks before the rear wheels will not turn
- Apply Never-Seize to the lug bolts and put the wheels back on torque them to @55 ft/lb
- Test drive it and make sure it all works right... BTW back up real slow and check the brakes for operation in the driveway before taking it on the road..