|

Ok, here is my first tutorial, so I'm hoping that you all enjoy it
and can follow it relatively easily. Please let me know of any problems! Onward!! To make this graphic, you will need the following: Paint Shop Pro - You can download a free trial version here.
My zip file containing the selection, snowflakes and presets.
Unzip your selection into your selections folder, and your presets, crumples.bmp and diamonds.bmp into you Blade Pro Environments/Textures folder,
and open the snowflakes in PSP. 
1.Open a new image, 300x 300, transparent/16 million colors. 2. Make your Foreground color White, Background Null.
Click on your Preset Shapes tool, select Rounded Rectangle
line width of 10, anitalias checked.
And draw a rectangle large enough for your
text and adding your snowflakes. ~*~OR~*~
Click on Selections, Load From Disk,
and select the box.sel that you unzipped.
Click on your fill bucket and fill with white.
~*~
Now, go to Effects/Blade Pro and add the Silver 4 preset.
Or, another preset of your choice...
perhaps somethign silvery....
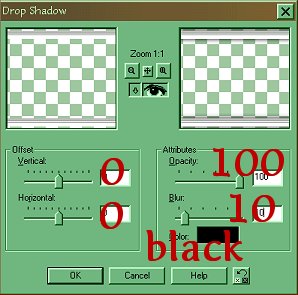
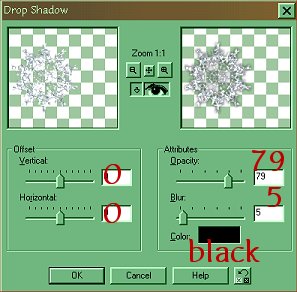
Add a drop shadow with below settings:
Deselect
3. With your magic wand, click outside of the box.
Then go to Selections/Invert
Selections/Modify/Contract by 8
Selections/Invert then hit the delete button.
Deselect
4. Click inside the box with the Magic Wand
The go to Selections/Modify and Expand by 10.
5. Go to Layers/New raster layer/Ok
Go to Layers/Arrange/Send to bottom
Click on your fill bucket and fill with a shade of blue, I used: #223982
Keep selected
6. Add a New Raster Layer/Ok
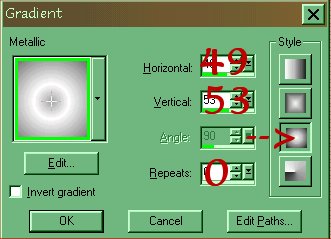
Switch your foreground color from your
blue to the metallic gradient, set at the sunburst settings:
With your airbrush tool set at these settings:
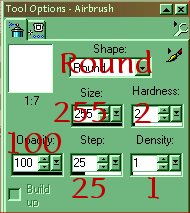
Click around a few times to get your desired effect.
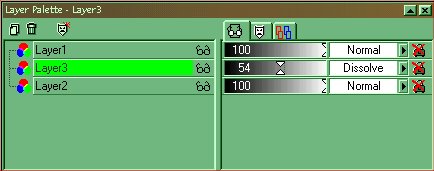
7. On your Layer Pallet, select Dissolve in the blend mode for Layer 3.
Move your opacity down until you get the look you want.
Deselect
Layers/Merge Visible and rename the merged layer to "box".
8. Open up snowflakes.psp
Use your selection tool to draw a rectangle around the
snowflake you want and when selected, Edit/Copy�
Then, go to your working image, and Edit/Paste as New Image.
Move it to wherever you want it�
Keep selected, and go to Effects/Blade Pro and apply the Diamond preset.
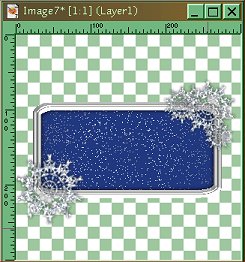
Here is where I placed my snowflakes:
You can apply a drop shadow on each one after you apply Blade Proif you want�I used:
Repeat step 8 with the rest of the snowflakes until you get the look you want.
9. Click on the box layer.
Layers/New Raster Layer/OK
Click on your text tool, and use these settings:

(Use the SAME gradient as you did in step #5)
I used the SnowDrift font, but you can use whatever font you wish.
Move your text where you want it and deselect it.
Almost there! You've been saving all along, haven't you?
10. Go to your box layer.
Selections/All/Float
Selections/modify/contract/10
Keep Selected
11. Layers/New Raster Layer/Ok
Effects/3D Effects/Cut Out with these settings:

Repeat all of step 11, however, when you do the cutout,
set the Vertical and Horizontal to -5
Deselect
Layers/Merge All Visible
12. Selections/All/Float/Defloat
Image/Crop to Selection
Resize your selection however you wish by going to image, Resize/Percentage of Original/Ok
(I did mine by 50%)
Then, Effects/Sharpen/Sharpen
Save in whatever format you'd like, and.......
And�we're done!
.:~:._.:~:._.:~:._.:~:._.:~:._.:~:._.:~:._.:~:._.:~:._.:~:._.:~:.
All graphics © 2001Danrei Designz
All content © 2001 Danrei Designz.
Problems with the webpage? Email the WebMistress
In order to view page as meant to be, please have the Lucida Casual Font installed.
.:~:._.:~:._.:~:._.:~:._.:~:._.:~:._.:~:._.:~:._.:~:._.:~:._.:~:.
|