PVC
Quena In G4
Design Improvements By Dan Bruner
([email protected])
Before I get into the details of this project I would
like to thank Loren Stafford. I built my first quena by using Loren's Plans and I
encourage you to visit his page first. My quena is based on Loren's with a few design
improvements including a protective cap, chamfered tone holes and enlarged thumb hole.
Also, these plans are more "PVC specific".
Loren Stafford's- How To Make A Quena
The quena (pronounced kena, and sometimes spelled that
way) is an Andean end-blown flute. This quena covers a range of G4 to G6. The second
octave is achieved by over-blowing. It's a little tricky to play till you get used to it,
but has a great sound.
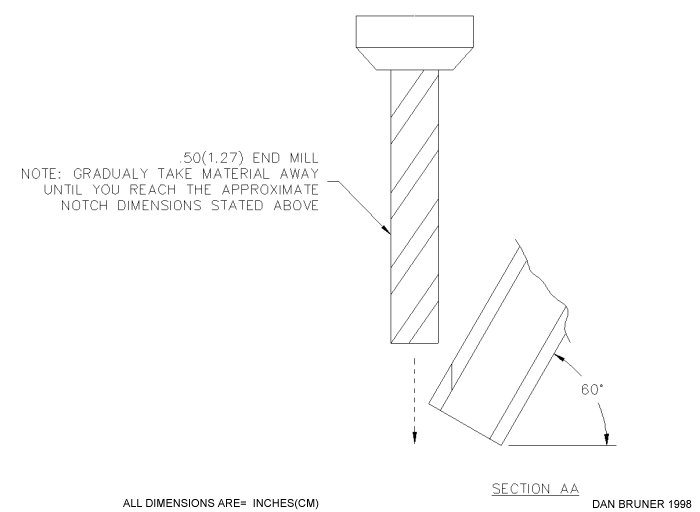
The most important feature on this instrument is the notch. It's also the trickiest part
to work on without the proper tools. I was lucky to have the option to machine the notch
on a machining table, but there are other ways. Using a half-round file is no good with
PVC, I tried it, but it only seems to melt the material and leave an ugly surface behind.
You could, however, use a file to get the general shape and then smooth it out with the
side of an ordinary drill bit. Other methods include sandpaper wrapped around a dowel rod
or carving with a sharp knife. Many shakuhachi's (Japanese end-blown flute) that I have
looked at don't have a rounded notch but a flat one. In other words you could probably get
away with using a utility knife to cut off the notch area in one single slice. No matter
which method you try, make sure the notch is the first thing you do. There's no point in
drilling all the finger holes until the notch is done and working properly.
To work the quena is a little tricky to explain. Place the notch end of the quena against
your bottom lip and chin. Use your lip and chin to seal off all but the upper 1/3 or 1/4
of the diameter (the notch should be on top at this point). Purse your lips and lightly
blow a small air stream towards the sharp part of the notch. It took me a long time to get
used to this but it will work. Move the flute at different angles in relationship to your
mouth and re-adjust your lips. Don't give up, keep trying! Once you've
mastered this you are ready to do some tuning.
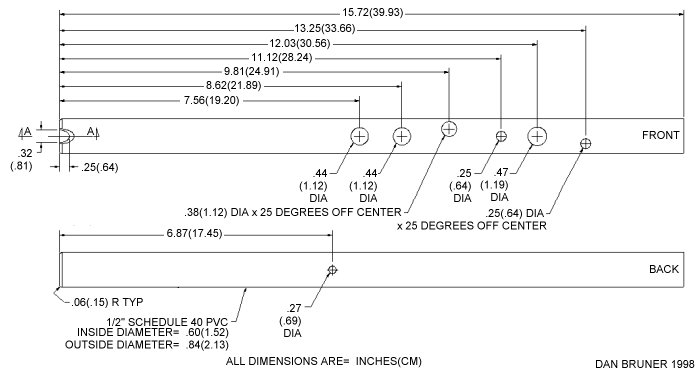
I provided an overall finished length for those of you who don't have the means to tell
whether it is tuned to G4. If you use this dimension (15.717) it will be close to G4 but
not precisely. If you have the means to tune it then add about .25 to the length and
shorten as needed to bring it into tune.
Again, I provided the finger hole diameters for those of you without the means to tune,
but almost anyone can tune the finger holes close enough once the notch is done and the
pipe is cut to length. If you can sing this familiar line: Do, Re, Me, Fa, So, La, Te, Do,
then you know the diatonic scale and can tune this flute. Start by drilling 1/8 inch
diameter pilot holes in the locations of the finger holes. Cover them all up and blow
through the flute, this gives you the first and lowest note "Do". Now lift off
the first finger and blow, it is out of tune, it should sound like "Re" but you
haven't tuned it yet. Enlarge the hole in small steps and keep testing it until you get to
what sounds like "Re". Now you can move on to the next hole up. At this point
all finger holes are covered up except the last two. Start to enlarge the 2nd finger hole
until your reach "Me". Repeat this process on the rest of the finger holes
(working from the bottom to the top, of course). Blowing at a low level should give you
the lower octave "Do though Te". The last "Do" is the first note of
the second octave and is achieved by covering all the finger holes and blowing twice as
hard (over-blowing). You should be able to get the rest of the notes in the second just by
over-blowing.
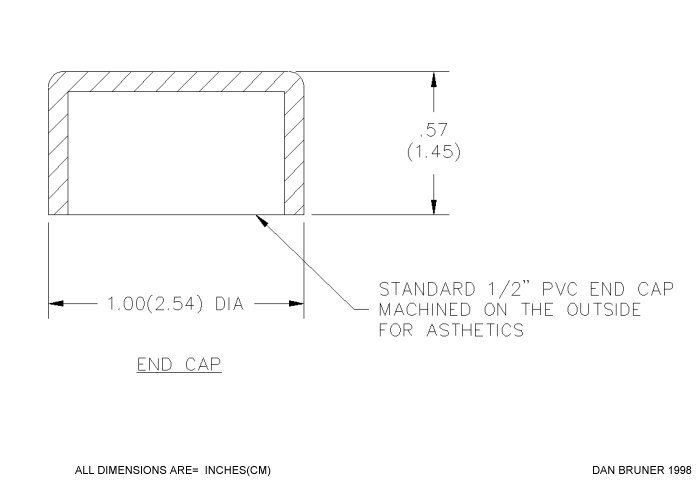
An end cap is a nice thing to have once you've built your quena. If you throw all your
flutes in a bag like I do, it won't be long till you damage the notch. I used a standard
end cap for 1/2 PVC. Bring your quena to the hardware store and test fit various caps
until you find one that is snug (they are not all made the same, some will be too loose or
tight). I shortened it a bit and machined the outside so it looked nice, but that's not
necessary. The cap costs less than 1 dollar, so why take any chances.
One last thing I did was use a 45 degree chamfering bit on each tone hole. It provides a
nice "seat" for each finger.


|