PVC
Flute In D4
Designed By Dan Bruner
([email protected])
I should first explain that this flute is entirely
experimental. Most flutes are capable of achieving more than one octave by over blowing.
My flutes tend to cover about 1 and � octaves. The reason for this is that I am breaking
the rules of length to bore ratios which are usually 30:1. There could be other reasons
for this problem, but regardless, I have been very satisfied with my flutes even though
they are not technically perfect. If one were to follow the "rules" it would
imply that you could only use � diameter PVC for one flute in a particular key, or �
diameter PVC for one flute in a particular key. After that you get into diameters that are
unreasonably large for flutes.
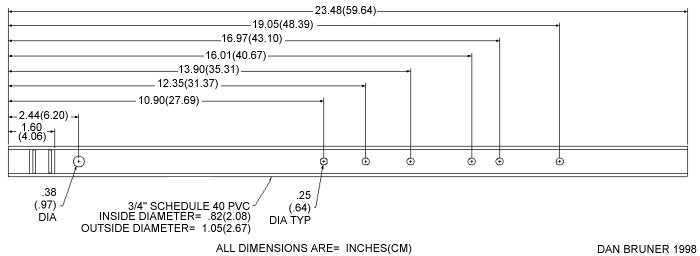
Start by cutting the pipe to length. Over cut by about � inch if you plan on fine tuning.
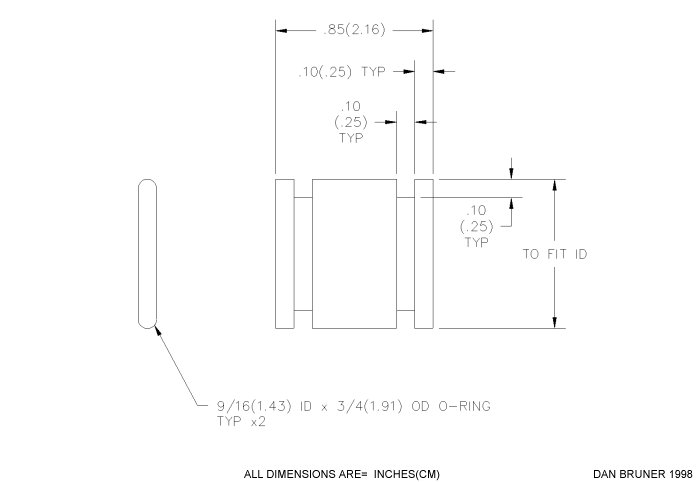
Make your tuning cork. I would suggest plastic or rubber over wood or metal. Metal is
heavier and steel will rust unless protected. Wood will expand or contract with moisture
and possible damage the flute. Don’t use wood unless you plan on protecting it and
maintaining it for years to come. I have seen actual cork stoppers at the local hardware
store that would work nicely too. After you have the pipe cut to length and a stopper
ready drill out the embouchure (windway).
I provided the finger hole diameters and length for those of you without the means to
tune, but almost anyone can tune the finger holes close enough once the embouchure and
tuning cork is done. If you can sing this familiar line: Do, Re, Me, Fa, So, La, Te, Do,
then you know the diatonic scale and can tune this flute. Start by drilling 1/8 inch
diameter pilot holes in the locations of the finger holes. Cover them all up and blow
through the flute, this gives you the first and lowest note "Do". Now lift off
the first finger and blow, it is out of tune, it should sound like "Re" but you
haven't tuned it yet. Enlarge the hole in small steps and keep testing it until you get to
what sounds like "Re". Now you can move on to the next hole up. At this point
all finger holes are covered up except the last two. Start to enlarge the 2nd finger hole
until your reach "Me". Repeat this process on the rest of the finger holes
(working from the bottom to the top, of course). Blowing at a low level should give you
the lower octave "Do though Te". The last "Do" is the first note of
the second octave and is achieved by covering all the finger holes and blowing twice as
hard (over-blowing)
If you have a tuning device then start with covering all the finger holes and sounding a
note. This should be D4, the lowest note achievable. If you have over-cut the length of
your pipe you can shorten the length to bring it into tune. Once the length is tuned just
start working your way up from the bottom to the top, enlarging each hole until it is in
tune.
Some final notes. I like to chamfer the finger holes for comfort and looks. This becomes
difficult for large finger holes unless you have a 45 degree chamfering bit. Don’t
chamfer too deep and keep in mind that your fingers must perfectly seal off each hole.
Don’t chamfer the embouchure, it must remain sharp edged in order to work properly.
If you’ve gone to this much trouble, you may as well remove the manufacturer’s
ink markings. Acetone works well for this, it may take some time, but it works. Sanding
the instrument is not a good idea. I sanded an earlier flute an it lost it’s clean
exterior look. Not to mention that the dust produced when sanding PVC is absolutely not
good for you! A fellow instrument builder out here on the net suggest sanding PVC under
water to keep particles out of the air (a great idea, if you must sand).

|