PVC
Clarinet In A3
Designed By Dan Bruner
([email protected])
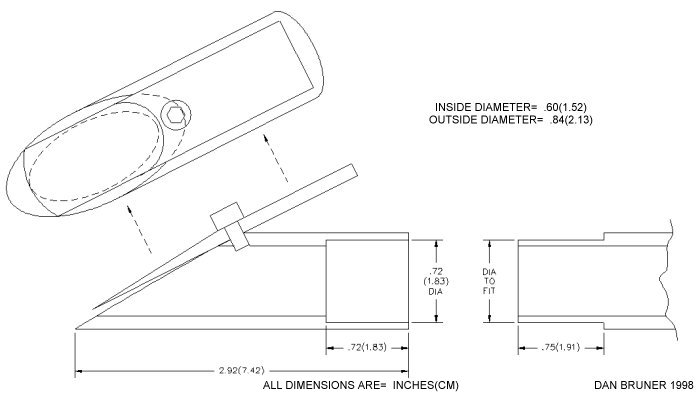
Starting with the head joint, I made it a separate piece
because it is difficult to build. I don’t want to have to make a new mouth piece
every time I build a clarinet in a different key. I want the option to build different
"note pipes" that can be interchanged with the single mouth piece. First you
will take piece of � schedule 40 PVC and cut it about 1 inch longer than the overall
length of the head joint. The best tool for creating the sloped edge is a belt sander. I
tried machining it to the appropriate angle and it wasn’t working well. The PVC would
crack or break away on the sharpest edge. This angle is determined by the reed your using.
I chose to use an Alto Sax reed because it is wider than the inside diameter of the PVC. A
Clarinet reed was not wide enough. Using a belt sander (or a saw and sandpaper, if you
have to) start shaping the slope. Keep the reed near by to check for size. The reed edge
must line up with the inside diameter enough to cover the hole. The slope of the PVC must
be great enough that the thickest part of the reed is located above the location for the
screw. In other words, you don’t want the screw to end up located on the sloped part
of the reed. The hole for the screw in the PVC must be drilled at a right angle to the
surface of the slope as close to the top as you can get it. That is where the material is
the thickest. Keep the head joint in the vice after drilling the hole for the screw, now
place the reed in its proper position and bring the drill down again. Set the reed aside
and tap the screw hole. Now take the reed and enlarge the hole in it for the screw to pass
through (the reed is not to be threaded). You should now be able to attach the reed to the
head joint. You will see that there needs to be a slight gap between the thin part of the
reed and the reed surface (about 1/32) try blowing through it before you go any further.
If it works, that’s good, if it doesn’t and only tends to seal off without
letting any air through, then you will need to do some more sanding. This can be done on
the belt sander too, but you must go slowly and not over do it. The idea is to leave the
surface flat where the screw is and slightly arc the surface away from that area until the
desired gap is achieved between the reed and the sloped surface of the PVC. Periodically
test the reed to see if it works, when it does, you're done. That was the hardest part of
this whole project.
Now take the read and screw off of the head joint and put the head joint in a lathe
(preferably). You need to machine it or cut it to the proper length and drill out the
material where the note pipe slips in. There are several ways to attach the head joint to
the note pipe and depending on the equipment you have you might want to try something
different. Perhaps you could leave the ends of the head joint and note pipe alone and make
some sort of exterior sleeve to hold them together. Tape would be a last resort, but if
you have to, go ahead. The important thing is that, in the end, your overall length is
close to what is called out in the drawing.
Before we get into the tuning of the instrument I want to point out what happened to me.
On my first PVC Clarinet, I came up with a certain dimension for the length and certain
dimensions for the finger holes. However, that was the prototype. When I went to make the
final version, my reed placement was a little different and it dramatically changed the
diameters of the finger holes to get the proper tuning. The length was still the same, but
the holes ended up much larger. What I am trying to point out here is that you should
definitely try to tune this by ear if not by use of a tuning device. If you go and drill
you finger holes to exactly what I have stated in the drawing, then chances are that it
will be terribly out of tune and you will have to start over. The chances that any two
people will end up with exactly the same head joint are slim. Also, PVC pipe is not made
to the strictest of tolerances.
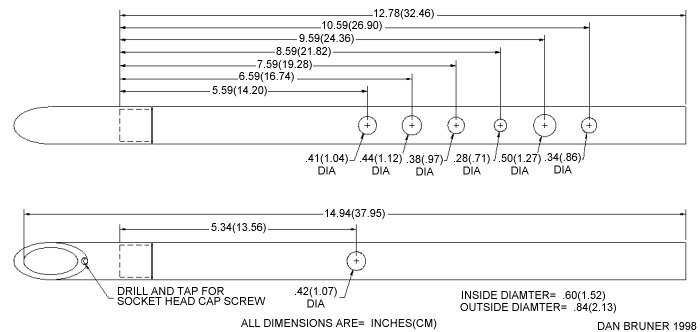
I provided the finger hole diameters and length only as a reference and for those of you
without the means to tune, but almost anyone can tune the length and finger holes close
enough by ear. If you can sing this familiar line: Do, Re, Me, Fa, So, La, Te, Do, then
you know the diatonic scale and can tune this clarinet. Start by drilling 1/8 inch
diameter pilot holes in the locations of the finger holes. Cover them all up and blow
through the head joint, this gives you the first and lowest note "Do". Now lift
off the first finger and blow, it is out of tune, it should sound like "Re" but
you haven't tuned it yet. Enlarge the hole in small steps and keep testing it until you
get to what sounds like "Re". Now you can move on to the next hole up. At this
point all finger holes are covered up except the last two. Start to enlarge the 2nd finger
hole until your reach "Me". Repeat this process on the rest of the finger holes
(working from the bottom to the top, thumb hole being the last).
If you have a tuning device then start with covering all the finger holes and sounding a
note. This should be A3, the lowest note achievable. If you have over-cut the length of
your pipe you can shorten the length to bring it into tune. Once the length is tuned just
start working your way up from the bottom to the top, enlarging each hole until it is in
tune.
Some final notes. I like to chamfer the finger holes for comfort and looks. This becomes
difficult for large finger holes unless you have a 45 degree chamfering bit. Don’t
chamfer too deep and keep in mind that your fingers must perfectly seal off each hole. If
you’ve gone to this much trouble, you may as well remove the PVC manufacturer’s
ink markings. Acetone works well for this, it may take some time, but it does work.
Sanding the instrument is not a good idea. I sanded one of my earlier flutes and it lost
it’s clean exterior look. Not to mention that the dust produced when sanding PVC is
absolutely not good for you! A fellow instrument builder out here on the net suggests
sanding PVC under water to keep particles out of the air (a great idea, if you must sand),
otherwise, put something over your mouth and nose.


|