
Anad's Glass Block Tutorial
Please read my Terms of use before doing any of my tuts.

This is an original idea based on a picture frame that my mother has.
Supplies needed:
PSP 7 or 8
Ulead Art Textures or any Gradient or Pattern fill of your choosing
Eye Candy 3.1 or Eye Candy 4000
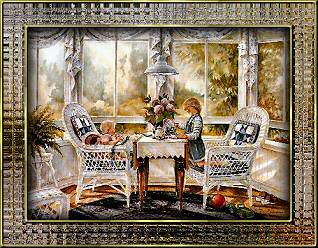
Any graphic of your choosing. One of my result Graphics in this tutorial is by Trisha Romance.
**For Ulead Art Textures I made my own Gradient so when you see it, it isn�t available in the program. You can make your own gradient textures for the program. I discovered how by accident.**
1. Open your graphic and shift + D to duplicate the original graphic. Don�t get rid of the original graphic minimize it cause we will use it later!
2. Now on your image you have left open, go to image, to add border and add a white border of 5 pixels.
3. Get your magic wand and click on the white border and go Effects to Plugins to Ulead art Textures and add a gradient. Below is what I did.
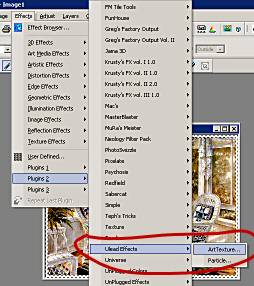
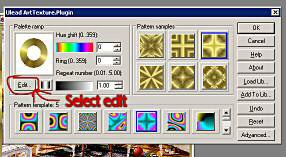
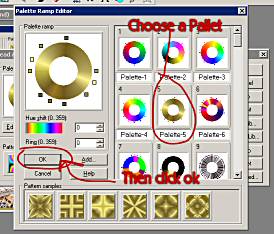
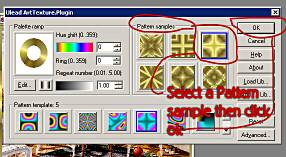
When Art Textures Opens up look for the word Edit and select it. Then it opens up and you can select any gradient you wish. Select a Pallet of your choosing and hit okay. Now select the box and choose the way you want the gradient to look on your frame and hit ok. Don�t deselect yet!
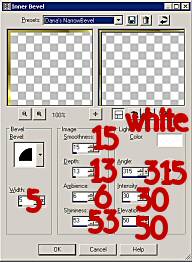
4. Add Innerbevel to your border with these settings:
5. Now we are going to Selections to Invert. Now go to Effects to 3d Effects to Cutout so that we can add depth to this frame. Cut out settings are as follows:
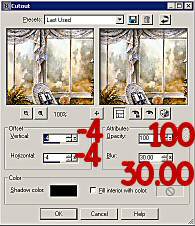
Then do the Cutout Effects again only change the Vertical and Horizontal to 4 the rest of the settings are the same. Deselect.
6. Now we are going to go to Image to Add Border and add another white border of 30 this time. Take your magic wand and select the border. Now open your original image you minimized earlier and control + C (Copy) then click on the image your working on and paste INTO SELECTION. It is important that you right click on the blue that says Image 1 or whatever and select Paste into selection. This is going to give the glass blocks a look of the picture behind the frame. Don�t Deselect.
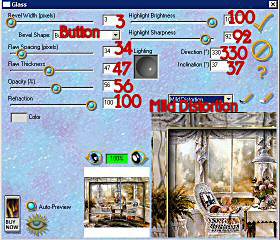
7. Now go to Effects to Plugins and Eye Candy 3.1. Open Glass and use the following settings:
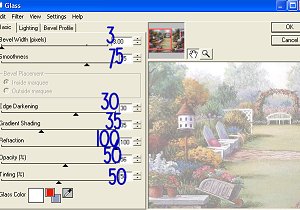
If you are using Eye Candy 4000, use the following settings:
Keep border selected,we aren�t done yet!!
8. Go to Effects to Texture to Mosaic Glass and put in the following settings:
Number of Columns 25
Glass Curvature 50
Number of Rows 25
Edge Curvature 0
Symmetric Checked
Grout Width 2
Grout Diffusion 50
Go to Selections and Select none!
9. Go to Image to Add Border again of 5 pixels in White. Add your Ulead Art textures again or the gradient you used at the beginning of the tutorial. Add the same Inner Bevel and your done.
Here is another example of a Glass Block frame.
Thanks for doing this tutorial!
Special thanks to Helen Williams, a tutorial tester from PSP Imagination Station, for providing me with the Eye Candy 4000 settings for this tutorial. I appreciate it Helen!


|