|

Anad's 3D Twist Frame

Tools needed:
PSP 7.04 or 8. I made this graphic in 8 so a few settings may look slightly different, but it will work in version 7.
Flaming Pear Boss Emboss available in the Designer Sextet. Twist is what you are looking for.
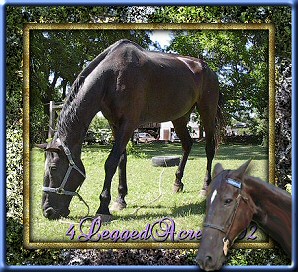
A photo of your choice. The photo I used is my own photo of my own horse, a Tennessee Walker, 25 years of age.
A tube of your choice. Mine is from another picture of my horse that I tubed myself. For the second example at the bottom of the page, I used a tube from Patao's Tubes.
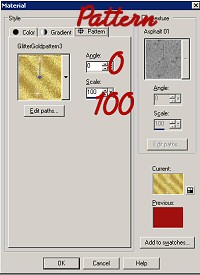
This gold glitter pattern or a gold glitter pattern of your choosing.
1. Open the photo of your choice and shift + D twice to duplicate the graphic twice. Close the original and save one copy for later. Also at this time, open the gold pattern of your choice if it is not already installed into your patterns.
2. At this time, in your foreground area, select pattern and go find your gold pattern.
3. Go to Image - Add Borders and add a border of 10 using any color that is not in your graphic. Using your magic wand, select the border. Flood fill the selected border with your gold pattern. Keep selected.
4. Go to Selections - Invert. Now Go to Effects - 3D Effects - Cutout. Use these settings:
V & H 2
Opacity 100
Blur: 15.00
Color Black
Do cut out again same settings except change V & H to -2. Select none.
5. Go to your Foreground and while still in Patterns, this time find the extra copy of the image your using and select it.
6. Go to Image - Add Borders and add a border of 25, same color as before is fine. Using your magic wand, select your border and flood fill it with the copy of your image.
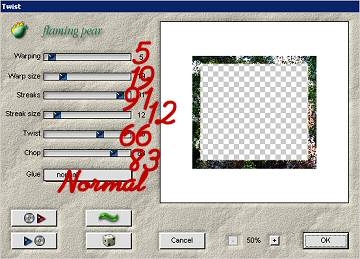
7. Go to Effects - Plugins - Flaming Pear - Twist and use these settings:
Keep selected. Go to Selections - Invert. Repeat the cutout steps as in step 4. Select None.
8. Go to Image - Add Borders and add a 10 pixel border.
9. Using your magic wand, select the border. Flood fill the border using a color you pick from the graphic that looks nice. Keep the border selected.
10. Go to Effects - 3D Effects - Inner Bevel and use your Round preset that comes with PSP. Select None.
11. Add a tube of your choice onto the frame you just made in 1 corner of your choosing so that it looks like it is 3D. Don�t put the tube on the image itself or it will look to be a part of the image. You need it to be on the frame itself. Add a drop shadow to your liking and you're done. For my drop shadow I used:
V 10
H 0
Opacity 100
Blur 15
Here are a couple examples that I have done for you to see.
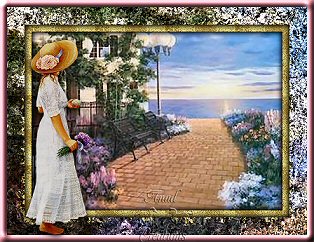
Tube of lady courtesy of Patao's tubes. Her link can be found at the beginning of this tutorial.
Thanks for doing this tutorial!


|