It should be noted that these rules are often under revision and may change unexpectantly. Keep yourself updated.
It is advised that you read over the details on the character sheet before continuing with the details of the battle system.
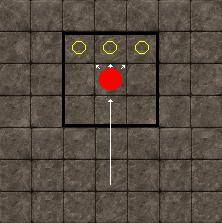
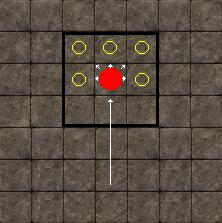
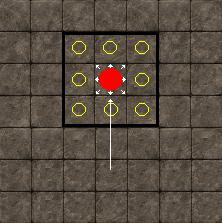
Battlefield Team Positioning
The turns are played in order from characters with highest agility to those with lowest agility.
Once all the players in the battle have taken their first turn, the first round has been completed.
The battle continues until the objective has been reached, which is either specified by the BM or set as the default: surviving team claims victory. At any time when an action is not being taken, players are free to role-play to their heart's content. Bear in mind, however, the "time-line" of the battle. In reality, characters are not standing "waiting" for their turn. Feel free to speak and ask questions during battle.
- Moving diagonally requires 2 movement points
- "F" shows the turning ability of the character. Turning ability is how far the character can turn on the square they MOVED TO in order to perform their next action, like attacking.
--- If the character does not move, they may turn to any direction, regardless of their turning ability.
--- A character may turn to any direction and then move if they don't want to move backwards, but they cannot turn again after moving. This leaves the character's flank and rear exposed.
- There are three ranges of turning and one modifying rule shown at the end of this part.
- "Ground" refers to the type of movement the character performs, of which there are three types: Ground, Climbing, and Flying. These three movement types are detailed in the class abilities section right at the bottom of that page.
2) S - Side - The character may turn themselves a max of 90 degrees to either side, meaning they cannot turn to their flank or rear.
3) A - All - The character may turn themselves in any direction at the end of their turn, including flank and rear.
- Attacking ends your turn.
- You must directly face the target you are attacking.
- You can attack diagonally.
- You may move and then attack, but not the other way around.
- Ranged attackers count spaces non-diagonally for range (this goes for all ranged attacks, including spells and effects) - i.e.- diagonals count as 2 spaces in this respect
- Stage 2 - Partial Block (Roll: 11 to 20)
- Stage 3 - Standard Hit (Roll: 21 to 69)
- Stage 4 - Accurate Hit (Roll: 70 to 89)
- Stage 5 - Critical Hit (Roll: 90 to 99)
- Stage 6 - Mortal Wound (Roll: 100 to 119)
- Stage 7 - Kill Shot (Roll: 120+)
-50% (halved)
No Change
No Change
+100% (doubled)
+200% (tripled)
+400% (x5)
We now move on to the modifiers for this roll. There are so many modifiers that players need only remember which ones will help them and which ones will hurt them. These two modifiers are added BEFORE the natural hit roll is made:
- Att Speed < Def Speed (0.51 to 0.60)
- Att Speed < Def Speed (0.61 to 0.75)
- Att Speed < Def Speed (0.76 to 0.85)
- Att Speed < Def Speed (0.86 to 0.99)
- Att Speed = Def Speed
- Att Speed > Def Speed (1.01 to 1.19)
- Att Speed > Def Speed (1.20 to 1.39)
- Att Speed > Def Speed (1.40 to 1.69)
- Att Speed > Def Speed (1.70 to 1.99)
- Att Speed > Def Speed (2.0)
-20 (Bad Hindrance)
-15 (Bad Hindrance)
-10 (Slight Hindrance)
-5 (Slight Hindrance)
No Change
+5 (Slight Edge)
+10 (Slight Edge)
+15 (Good Edge)
+20 (Good Edge)
+25 (Great Edge)
Def = Defender
- If the attacker positions themselves on any of the blue squares in relation to the defender and attacks, it is considered a flank attack. Flank attacks are visible.
- If the attacker stands on the turqoise squares when attacking, it is a rear attack. Rear attacks are not visible.
- All other positions (side, forward) are front attacks. The thick black square marks the melee range of attack.
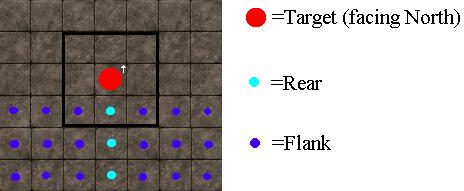
- Flank Attacks add +15 to hit roll before the roll is made and adds +25% damage after calculations. (+50% for Backstabbers)
- Rear Attacks add +30 to hit roll before the roll is made and adds +50% damage after calculations. (+100% for Backstabbers)
- Long-Range attacks use the same modifiers.
- Flank and Rear Attacks both allow the hit roll to exceed stage 5, and so can deal mortal wounds or even kill shots.
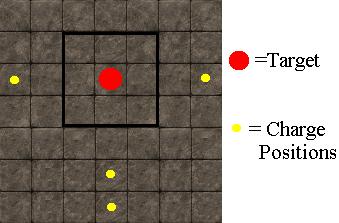
- The character must face their potential target at the beginning of their turn. If they are facing any other direction, they cannot turn and then charge.
- Charging increases the limit to which the character can move by the amount indicated in their movement in brackets. So, if a character has movement of 3 (+1), they can charge a max of 4 spaces.
- IMPORTANT NOTE: If there is no (+X) bonus in the movement column, that means that class CANNOT CHARGE. Zombies, ghosts, will o wisps, and three of the elementals and various other classes cannot charge, either because they are fully ethereal or do not have the speed or physical prowess to be able to thrust their bodies in such a way.
- When charging, a character can move no less than their regular movement. In the case above, that would be 3 spaces.
- There are two types of charges: Cut and Ram, based on the size rating of the character.
- A Cutting (C) charge means the attacker moves through the enemy to the opposite side and immediately turns in the opposite direction. So if a character cuts through an enemy from the south, they move past them, heading north, and then turn to face their enemy (south). The enemy is also gored if the attacker is no smaller than 1 size rating of the target.
- Characters size 7 and lower can only do cut charges.
- A Ramming (R) charge involves the attacker hitting the enemy so hard that it knocks them back (equal to half the number of spaces the charger moved). The charger, if they hit, stun their enemy (if they are no smaller than 1 size rating of the target) and take their place. If they miss, they simply cut through and turn around (like above).
- Characters size 8 and above can only do ram charges.
- For flying characters, the rules are the same, except that the character dives instead of charges. In the case of either a cutting or ramming dive, the character has the advantage of moving to low or mid height after they charge, even if they hit. All other rules remain the same.
- Charging, by itself, does not increase the chance of hitting. Same hit modifiers are added if it comes from the rear or flank, however.
- A character with not enough essence points left to cast a spell may still cast the spell, and for each essence short, there is a cumulative 25% chance that the spell will fail instantly and the character becomes stunned. Their essence is then reduced to 0, but not below. At 0 essence, no spells can be cast.
- The character aiming must specify whom they are aiming at. Anyone can do this, including melee warriors.
- Aiming can be used so long as the potential target is constantly within sight during the aiming period.
- If a character is attacked during aiming, they keep the bonuses that they have accumulated. If the character is disrupted, however, like being stunned or paralyzed or anything alike, their bonuses are removed and they must begin anew.
- If a character does any action but aiming after they have aimed already, the bonus is removed immediately.
- Aiming adds to a character's natural hit roll (i.e. before the roll is made, like the speed ratio) as follows:
- After 2 turns, the character gains +35 to their natural hit roll (+20 first aim, +15 second aim). They cannot exceed stage 7 on their hit.
- After 3 turns, the character gains +45 to their natural hit roll (+20, +15, +10 third aim). They can hit at any stage.
- Aiming after 3 turns maintains the +45 bonus but does not help it further.
- All visible incoming attacks have a -15 penalty to hit on the defender (-25 for those with SUPER DEFENSE).
- The defending bonus continues even if the character defending has already been hit.
- The defending bonus is removed if the character is disrupted (paralyzed, put to sleep, etc.)
- Defending does nothing to ward off flank or rear attacks.
- For characters with magic, 1 essence is recovered by defending self.
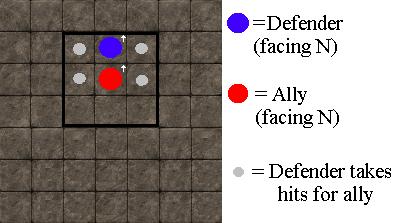
- The defender may CHOOSE to defend the ally behind them at any time. So if an ally moves into a position behind the defender, they will be protected so long as the defender allows it. This makes "Defending Ally" an instant action used to respond to enemy attacks and is allowed to be used when declaring defend or when any physical attack targets the ally.
- All damage on the defender is reduced by -25% (-50% for those with SUPER DEFENSE), but there are no hit modifiers.
- Same rules apply for disruption as on defending self.
- The defending ally action is removed if either the defender or the ally move out of their respective positions at any time.
- If the ally is attacked from the flank or rear, the defender can do nothing to help them with this action.
- Countering does not reduce damage if the attack hits.
- If an attack on the countering character misses (even if it's not the first), the character counter-attacks. The success of hitting is just like a regular hit: Attacker's speed minus defender's speed at base 80 success. Damage by a counter-attack is always reduced by -25%.
- Once a counter-attack has been made, the character reverts to a standing (non-defending position).
- An attack of opportunity makes the same calculations for a hit roll as does any other attack at base 80% success.
- All attacks of opportunity are reduced in damage by 50%.
- When an attack of opportunity is made by a character, regardless of whether they hit or not, their ending actions on their turn which may give them bonuses (defending, countering, etc.) are not removed. These bonuses remain.
- A character can only do an attack of opportunity if the character provoking the attack is in a front position (in other words, not moving in flanking or rear area of the character).

There is also added-on damage. This damage is over and above the damage that is counted normally as physical damage. To stay along the lines of the example above, a fierce fire elemental (promoted) not only has the same conversion but adds 25% fire damage, the % being of the total physical damage dealt.
The conversions and the added on damage is calculated in the following method:
[If the target is 50% weak to light, the 4 then becomes 6. Added to the remaining 4 physical, this equals 10.]
- Added-on Damage: The same rules apply to added-on damage as conversions in terms of when to add the damage on: after all modifiers have been taken into account. The difference here is the damage is over and above the total BEFORE further modifiers, like conversions. Here is an example. A character converts 75% damage to water and adds on 25% cold damage. If an attack is made that comes out to (after all modifiers) 14 damage, 11 of this damage is converted to water (always round up) and 4 cold damage is added on. The total = 3 physical + 11 water + 4 cold = 18 total damage. If the target is weak or strong to either water or cold, this would be changed.
Fire - The character turns to ashes. All revival attempts have instant 50% failure.
Water - The character drowns. Upon any revival, the character is stunned their first turn.
Air - No other effect upon death.
Cold - The character is frozen solid. They can be attacked, and any critical hit destroys them (-30).
Light - The character becomes "enlightened". If evil, all revival attempts have instant 75% failure.
Dark - The character becomes "damned". If good, all revival attempts have instant 75% failure.
Thunder - Same effect as fire - char turns to ashes. All revival attempts have instant 50% failure.
This is not to say that BMs will be lenient in letting players do whatever they like and the rules are just for reference. Exceptions are exceptions. Here's an example.
- A flying character does a dive attack on their target and tries to PICK THEM UP into the air and then, once high enough, drop them.
This kind of action is not in the rulebook, but it sounds interesting and obviously can be done. If the player playing the flying character role-plays this action out well, the BM might allow it to happen, within limits. If the flying character is half the size of the target, the BM should use common sense and forget about it.
Keep this in mind though, players and BMs alike. There can and will be exceptions.